Or get the complete book How To Big Wall Climb: SuperTopo
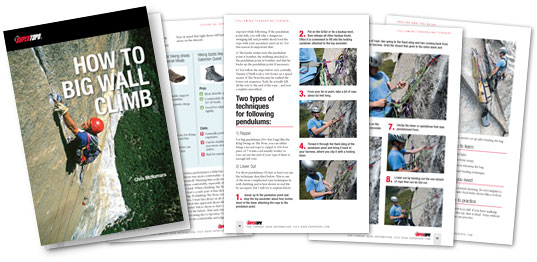
Visit on supertopo.com
A Note About Links
If you buy something from an online retailer below after clicking on one of those links, we get a little piece of the sale. If you are thinking about buying some of the gear mentioned in this article, we would appreciate it if you would click on one of the links before you buy. It wont cost you anything extra, and it does help support this website. Thanks for keeping us in mind. Our affiliates are Altrec, EMS, Moosejaw, Mountain Gear, Mammoth Gear, Backcountry, Patagonia, and REI.
Click here to see what is currently on my El Capitan rack.
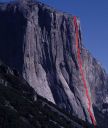
 The base routes are scattered to the left of the SE Buttress. Credit: Chris McNamara |
||
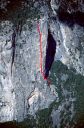
 Credit: Chris McNamara |
||
Master Checklist
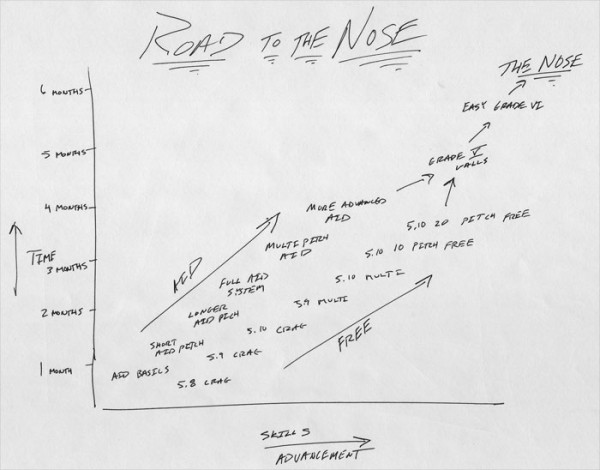
Question: How do I know when I am ready to climb The Nose?
Answer: Complete this 30-session course over four to six months. Thats enough time to have rests between practice days but not too much time so that you loose momentum. It is important to not skip steps. If you skip the low-angle environment and go straight to vertical or overhanging terrain, you will get frustrated and develop bad habits.
How many times should you practice each routine? When do you know if you are climbing efficiently?
Practice each skill until you have it so dialed you dont see any more improvement. Every time you do your first lap, time yourself to establish your baseline. At regular intervals after that time yourself and compare yourself to earlier times. At first you will see big improvements. Over time the increments will get smaller and smaller. If you cant get any faster, you are probably going as fast as you can.
You dont have to do each activity the listed number of times. However, make sure you err on the side of over-practicing each technique. Too many people get bored with a technique when they only have it 70 percent dialed. It can help to practice next to a friend and have friendly speed competitions. Or have speed competitions with yourself. That usually takes out the boredom.
[ ] = a checkbox
Each session takes about two to three hours.
1. Get psyched.
[ ] Read a bunch of books from the recommended reading list in the appendix. Check out some inspiring movies like El Capitan or Vertical Frontier. If you are not really motivated to climb El Cap, it will be hard to get through the inevitable challenging moments on the wall.
2. Acquire basic aid climbing gear.
[ ] Use what you have, borrow, or if you are going to buy check out OutdoorGearLab's Big Wall Gear Review
3. Leading 1: Low-angle terrain.
Sessions 1 and 2
[ ] Aid climb it once, timing yourself to get a benchmark.
[ ] Now aid it five to ten times. Focus on smooth but consistent movement.
[ ] Time yourself on the tenth time. Aim to be 50 to 75 percent faster on the tenth time than you were on the first.
[ ] Now aid ten times where you focus completely on smooth movement. Try to never stop moving up the Aiders from one piece to the next. Remember Slow is smooth. Smooth is fast.
[ ] Now go another ten times, focusing on both smoothness and speed. Try to get 20 percent faster than your last timed lap.
[ ] Overall, aim to do at least 50 laps over the course of two days.
4. Following 1: Low angle terrain.
Sessions 3 and 4
Set up a rope on a less than vertical 30 to 50-foot cliff.
[ ] Jug once, timing yourself to get a benchmark.
[ ] Jug ten times. Focus on smooth but consistent movement.
[ ] On the tenth time, time yourself and try be 50 to 75 percent faster than on your first benchmark time.
[ ] Adjust the length of daisy chain and go five times. Time the fifth one and compare it to the time before. Go with the daisy length that is most comfortable and gives the best time.
[ ] Adjust the height of your feet in the Aiders and go five times. Time the fifth lap and compare it to the time before. Go with the Aider height that is most comfortable and gives the best time.
[ ] Once you figure out the best place for your feet, do another ten laps. Time yourself on the last lap and try to be 25 percent faster than your tenth time.
[ ] Overall, aim to do at least 50 laps over the course of two days.
5. Leading 2: Vertical and overhanging terrain.
Sessions 5 and 6
[ ] Find a 30 to 50-foot vertical cliff. Slightly overhanging is okay. A gym with a bolt ladder is ideal.
[ ] Aid once, timing yourself to get a benchmark.
[ ] Aid like you free climb: Aid three times trying to use as many face holds as possible (and grabbing the Aider as little as possible).
[ ] Introduce the fifi hook. Do three laps with the fifi at different lengths to figure out the right length.
[ ] Introduce the daisy chains. Do three laps.
[ ] Top-stepping. Do three laps where you top-step every piece using holds or features on the wall for balance (when possible).
[ ] Top-stepping. Do three laps where you top-step every piece without using any holds or features on the wall for balance.
6. Following 2: Vertical and overhanging terrain.
Session 7
Where: Set up a free hanging rope at a cliff, climbing gym or tree.
[ ] Jug once, timing yourself to get a benchmark.
[ ] Jug ten times. Focus on smooth but consistent movement.
[ ] On the tenth time try be 50 to 75 percent faster than on your first benchmark time.
[ ] Adjust the length of daisy chain and go five times. Time the fifth one and compare it to the time before. Go with the daisy length that is most comfortable and gives the best time.
[ ] Adjust the height of your feet in the Aiders and go five times. Time the fifth lap and compare it to the time before. Go with the Aider height that is most comfortable and gives the best time.
[ ] Once you figure out the best place for your feet, do another ten laps. Time yourself on the last lap and try to get 25 percent faster than on your tenth time.
[ ] Get a good arm pump.
[ ] Recover for two days.
[ ] Anchor a free-hanging rope 20 to 30 feet up. Make sure the rope length is at least 200 feet. Build your jugging muscles so they won't lock up with cramps on Day 3 of the big wall.
7. Acquire clean aid protection.
[ ] Borrow, buy or improvise whatever gear to enhance your free climbing rack. If you are going to buy gear, check out OutdoorGearLab's Big Wall Gear Reviews
8. Leading 3: Placing gear.
Sessions 8 and 9
Where: A 30 to 50-foot-tall C1 and slightly low angle cliff.
[ ] Aid once, timing yourself to get a benchmark.
[ ] Aid five to ten times. Focus on smooth but consistent movement.
[ ] Time yourself on the tenth time. You want to be 50 to 75 percent faster than on the first time.
[ ] Try five to ten times where you a little slower but focus on fluidity. Try to never stop moving up the Aiders from one piece to the next.
[ ] Time yourself again, focusing on speed. Try to get 20 percent faster than on your last time.
[ ] Overall, aim to do at least 25 to 50 laps over the course of two sessions.
9. Following 3: Cleaning gear.
Sessions 10 and 11
Where: A 30 to 50-foot-tall, slightly low angle C1 cliff.
[ ] Clean once, timing yourself to get a benchmark.
[ ] Clean five to ten times. Focus on smooth but consistent movement.
[ ] Time yourself on the tenth time. You want to be 50 to 75 percent faster than on the first time.
[ ] Try five to ten times where you a little slower but focus on fluidity. Try to never stop moving up the Aiders from one piece to the next.
[ ] Time yourself again, focusing on speed. Try to get 20 percent faster than on your last time.
[ ] Overall, aim to do at least 25 to 50 laps over the course of two sessions.
10. Building Anchors and Basic Aid Course.
Session 12
Where: Any place where you can stand on the ground and have three to five pieces around chest level.
[ ] Build an anchor of three to five pieces of gear using a cordalette. Break down the anchor and rebuild it a couple more times.
[ ] Use different pieces and build and break down a few more anchors.
[ ] Build one more anchor with pieces that area spread out (use shoulder-length slings with the cordalette.)
Sessions 13 and 14 Basic Aid Course
Where: Ideally, you will have an 80-degree route that is 30 to 80 feet tall. I started in a tree. Not ideal. But work with what you got. The important thing is to get out there as much as possible.
With the skills dialed, it is time to learn to transition between them efficiently. The best way to do this is to build a course and time yourself. The course has five parts: lead, build an anchor, clean, break down the anchor, repeat.
[ ] Do the aid course once and time yourself to get a benchmark.
[ ] Do the course five to ten times or until you cant do it any faster.
11. Leading 4: Traversing Terrain.
Session 15
Where: find a traversing lower angle cliff 30 to 50 feet tall
NOTE: For this session, you need a belayer.
[ ] Lead up at least 20 feet, then build a lower-out point (one or two bomber pieces), then have the belayer lower you ten feet and pendulum over to a crack or face hold. Continue up to the top of the pitch or re-practice the pendulum.
[ ] Repeat the above but this time wear free climbing shoes and practice tension traverses. Especially work on communication with the belayer.
12. Following 4: Traversing Terrain.
Sessions 16 and 17
Where: Find a traversing lower angle cliff 30 to 50 feet tall.
[ ] Before you get to the a cliff, practice slinging something at eye level and passing the lead rope through a biner connected to it. Practice lowering out five to ten times.
[ ] Once you have the lower-out dialed on the ground, set up a traversing rope. Anchor a rope to the top of a cliff, clip it through a piece at least ten feet to the side of the anchor point and at least ten feet off the ground. Practice lowering out five times.
[ ] Set up a traversing rope. Anchor a rope to the top of a cliff, clip it through at least five pieces that diagonal up, hopefully at a 30 to 45-degree angle. Clean it five times. Remember to tie backup knots.
[ ] Try to find a traversing crack that takes three to five pieces. Jug up to the first piece, then switch to re-aiding mode. Practice re-aiding five times.
Congratulations, you are now an aid climber! You are about half way through the process of climbing El Capitan. And you are 95 percent closer to achieving that goal than most climbers are. If you have done all the items on this checklist you are proficient on the basic techniques of aid climbing. Even some climbers who have crawled and scratched their way to a big wall summit cant say that.
13. Acquire more gear: Haul bags and hauling gear.
[ ] Borrow what you can or if you are going to buy gear, check out OutdoorGearLab's Big Wall Gear Review
14. Hauling and belay management plus advanced aid course.
Session 18
Where; Ideally do this on your small practice cliff after first setting up the systems on flat ground.
[ ] Set up a hauling anchor at least five different times (incorporate both the lead and haul rope into the anchor).
[ ] Space haul 15 times.
[ ] If you think you can do it safely, body haul 15 times.
Session 19 and 20 Advanced Aid Course.
Do the Basic Aid Course on a longer, more sustained pitch (hopefully at least 100 feet long). Each time try to set up the anchor a little differently and alternate hauling techniques.
It is important to find a long and sustained pitch so that you learn to deal with these big wall issues:
[ ] How to maintain speed and fluidity over a longer pitch
[ ] How to conserve gear by mixing up what size piece you leave so you have a full selection at the end of the pitch and extra for anchor.
[ ] Time yourself the first time to get a benchmark.
[ ] Every ten times you do a lap on the course, time yourself and try to improve your time 10 to 20 percent every ten times.
[ ] After the first ten laps, introduce hauling for another ten laps. For the first five times, use the body hauling technique. Once you can body haul safely, try out the space haul first on the ground and later on the wall. DANGER: Remember body hauling only works if your haul bag weighs close to your weight. Otherwise: Danger!!).
[ ] Do 20 to 30 laps total over two sessions.
Congratulations, you are now a proficient aid climber! If you took the time to master all the lessons, then you have the basics dialed. Now take your solid set of skills to the multi-pitch environment. When the exposure kicks in on Day 2 and your partner wants to bail because It doesnt feel right," you can confidently draw from your mastered skill set and push on through!
15. The bivy.
Session 21
[ ] On the ground, put the portaledge together five times.
[ ] Hang from a wall and put the ledge together five times.
[ ] Put the ledge together twice while using a Headlamp-Review-Review-Review-Review-Review.
[ ] Try camping on the side of a cliff for a night (optional).
[ ] Set up the rain-fly and turn the hose on full blast. Spray it up from below the ledge. See how dry you stay.
16. Rescue and retreat.
Session 22
[ ] Practice rappeling with a haul bag.
[ ] Learn the basics of self rescue, how to escape the belay, etc. (material not covered in this book).
C. The Road to the Nose free climbing skills.
1. Training at the crag.
Sessions 23 and 24
Where: After becoming a solid 5.10b trad climber, go to a crag with 100-plus foot tall pitches. The El Capitan base is perfect but most people only have their local crag.
[ ] Climb five 5.9 trad pitches carrying a Nose rack [see page LINK TO MY NOSE RACK].
[ ] Climb five 5.10 pitches carrying a Nose rack.
[ ] Now add in a haul line and hang some Ascenders and a wall hauler off your harness. If you still climb 5.10b, you are in good shape. Try to climb pitches longer than 100 feet.
[ ] Practice moving from aid to free five times climbing out of your Aider and five times climbing out of a shoulder-length sling.
2. Training on the big climbs.
Sessions 25-28
Where: Any place with long multi-pitch climbs.
[ ] Climb five or more multi-pitch free routes
Key skills to pay attention to:
[ ] Fast belay changeover (two to five minutes).
[ ] Rope and belay management (practice seeing rope snags before they happen).
Congratulations, your are ready for your first wall! If you have not skipped any sections, if you have checked every box and graduated to each level honestly, you know where your weaknesses still lie or you are ready to charge.
3. Climb three Grade V walls.
Session 29-30
Where: Yosemite, Zion, Black Canyon or any other big wall area.
[ ] Climb two or more grade V walls
16. Climb The Nose!