Article
How to Set Up a Self Belay for a Solo Toprope
Solo Top Rope Self Belay Advice
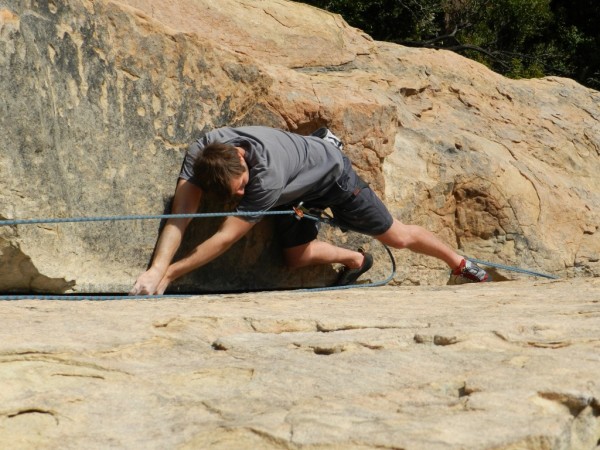
Some progress capture pulleys and ascenders can be rigged to travel along a fixed line providing a self-belay for a solo top rope climbing experience. Solo Top Roping is a great way to get a lot of laps in and have a positive training day when you cant find a partner, or are just looking for some solitude. As with all solo adventures keep in mind that the risks are all your own, no-one is there to help. As such, it is important that you understand the risks involved, and tailor your own experience in such a way that the risks you take on are well within your comfort zone.
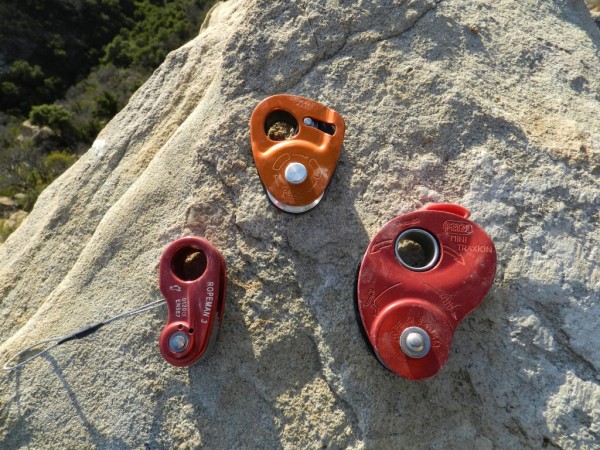
What device should you buy? Check our our OutdoorGearLab article The Best Progress Capture Pulley or Ascender for Solo Self Belay Toproping Right now our favorite device is the Petzl Micro Traxion.
There are many, many ways of creating a self-belay system with varying degrees of safety, and complication. Ultimately, as climbers, we accept a certain level of risk and it is your personal responsibility to make sure that the level of risk is acceptable. The description that follows is a method of rigging that we found to be simple, effective, and within our own range of acceptable risk. It is pretty similar to the system Petzl Recommends and we highly recommend reading Petzl's article: Self-Belay for Solo Climbing With Fixed Belay Rope.
Below is by no means a perfect system, nor is it a tutorial designed to instruct you in setting up a solo top rope system, but a description of what our testers did to assess the products in the OutdoorGearLab review.
Our System:
1. Fix the line
Find the midpoint of your dynamic rope and fix the line to the anchor at the top of the climb. Make sure it is a UIAA rated Single Rope and not a double rope or static line. (If you are using two separate ropes, the line that the progress capture pulley goes on can be static but the backup rope should be dynamic).
2. Use one strand of the hanging rope as the climbing strand, and tie backup knots in the other stand at intervals of your choosing. In order to facilitate smooth feeding of the rope through the self-belay device, it is helpful to tie a weight to the bottom of the climbing strand. We have used a full water bottle, a backpack, pieces of gear
whatever. Anything that will keep the rope from becoming slack.
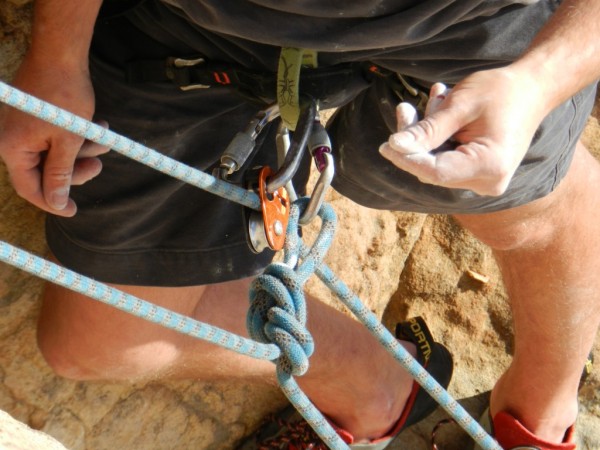
3. Attach the self-belay device to the fixed line, and clip it to the belay loop on your harness with a large locking carabiner.
4. Every 15 feet or so tie a back-up knot in the strand of rope that your self belay device is not attached to. Use another locking carabiner on the belay loop to clip into your backup knots as you climb.
5. When you get to the top, clip into the anchor, unweight your self-belay device, and swap it out for the rappel device of your choice.
6. Rap down the climbing strand.
On Backing up the system:
What is the best method of backing up your self-belay is? Is it even necessary to backup at all? To this we say: please back yourself up somehow. Our preferred method for backing up the system is tying knots on the non-climbing strand of the rope. We feel strongly that backups should be independent of the main system that you are working with. As such, we feel that tying back-up knots in the line that you are not climbing on affords the greatest degree of redundancy. If, for any reason, the strand of rope that you are climbing on fails, you will have a back-up knot on an independent strand of rope that will prevent you from decking.
Backing your self-belay device up with another similar device (i.e. two Mini Traxions on the same line, Petzl Mini Traxion and Tibloc on the same line, Mini Traxion and Petzl Grigri 2 on the same line, or any other permutation of the same setup) will safeguard against the failure of one of your devices, but not against rope failure. The devices listed in this article make use of rope gripping teeth that sink into the sheath of the rope and prevent the device (and you) from sliding down. These teeth can also damage the rope should a fall of any length occur. In an instance of rope damage (and potential failure) having another device on the same strand will be rendered useless.
Another viable option might be placing an additional self-belay device on the other strand of rope, but you are then always relying on the proper function of the devices. We find it most reassuring to use good old knots and lockers as a back-up. Simple. Quick. Tried and true.
A few recommendations for the aspiring Solo Top Roper
1. Practice your rigging on flat ground
Before you go out and work those routes, make sure that you have all your rope-work, and rigging down while still safely on the ground. Choose a system that makes sense to you, set up a list of safety checks, and run through it every-time. Nobody is there checking your setup
you have to do it yourself. Take it seriously, do your safety checks every time, and before long it will become routine.
2. Stick to familiar ground at first
Its tempting to immediately throw a Solo TR setup on your project so that you can work the moves without boring your belay slave. We recommend however, that you initially keep your solo adventures limited to areas that you are familiar with, and routes that are within your ability. Use Solo TR as a way to get many laps done. Familiarize yourself with all intricacies of your chosen system and then start pushing yourself.
3. Backup, Backup, Backup
Always backup your chosen self belay device. There can be no wiggle room on this one. Your self-belay device is your attachment point to the rope. Your anchor essentially. Just as you create a redundant anchor, make sure you create a redundant Solo TR setup.
4. Have an escape plan
If you get stuck, or injured, or anything goes wrong
you need to have an escape plan to escape your self-belay. Be it ascend the rope until you can clip the anchors then rappel down, or have some extra stuff so that you can escape the belay and head down immediately, you must be able to get yourself to safety if something goes wrong.
 Chris McNamara
|
|
About the Author
Climbing Magazine once computed that three percent of Chris McNamaras life on Earth had been spent on the face of El Capitan an accomplishment that left friends and family pondering Chriss sanity. He has climbed El Capitan more than 70 times and holds nine big wall speed climbing records. In 1998 Chris did the first Girdle Traverse of El Capitan, an epic 75-pitch route that begs the question, Why?
Outside Magazine called Chris one of the worlds finest aid climbers. He is the winner of the 1999 Bates Award from the American Alpine Club and founder of the American Safe Climbing Association, a nonprofit group that has replaced over 5000 dangerous anchor bolts. He is a graduate of UC Berkeley and serves on the board of the ASCA and the Rowell Legacy Committee. He has a rarely updated adventure journal, maintains BASEjumpingmovies.com, and also runs a Lake Tahoe home rental business. |
Elcapinyoazz
Social climber
Joshua Tree
|
|
|
|
Jun 27, 2012 - 04:29pm PT
|
Your system in the article allows the device to hang free (i.e. down), thereby introducing slack into the system that will guarantee more of a shock loading effect in any fall. If you are concerned enough about rope damage to use a separate line as a backup, you should probably be concerned about this.
Many people use something over a shoulder(s) to hold the device upright and eliminate the slack in the system. Some use a chest harness, improvise a chest harness out of slings or webbing, or (what I find best) use a loop of shock cord hitched through the clip-in hole on the device and worn bandolier style. It holds the device firmly upright but allows some stretch/give that won't inhibit your movements.
I also routinely use a static rope, but that's a different debate.
|
|
Dirka
Trad climber
Hustle City
|
|
|
|
Jun 27, 2012 - 04:40pm PT
|
Kool. I use a minitrax with a grigri back up. Nice totorial.
|
|
phylp
Trad climber
Upland, CA
|
|
|
|
Jun 27, 2012 - 04:48pm PT
|
Your system in the article allows the device to hang free (i.e. down), thereby introducing slack into the system that will guarantee more of a shock loading effect in any fall.
Elcap - I've always been interested in learning how to top rope solo. Never having used one of these devices, I can't visualize the distinction you are describing about "hanging free" vs being held upright. It doesn't look like there is any slack in the system in Chris' photo. Is there a photo you have of your system so I can compare the two?
|
|
Tfish
Trad climber
La Crescenta, CA
|
|
|
|
Jun 27, 2012 - 05:03pm PT
|
Be careful with the mini trax and shorts, I had mine get jammed up in my shorts. Prolly another good reason to have a sling to hold it upright.
|
|
Elcapinyoazz
Social climber
Joshua Tree
|
|
|
|
Jun 27, 2012 - 05:24pm PT
|
Phylp:
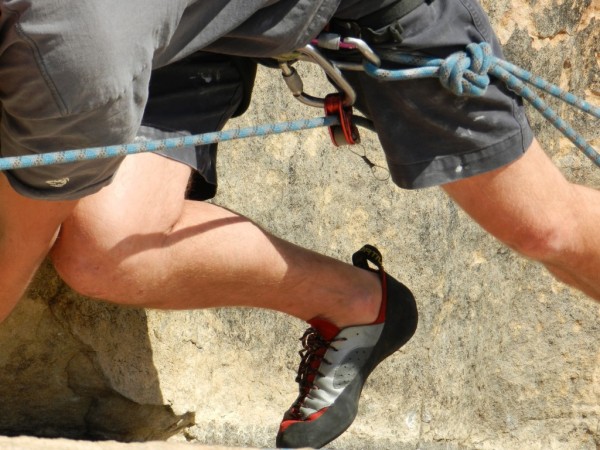
Look at the photo between #5 and #6 in the article and imagine what happens when he falls...for the device to engage and hold the climber's weight, it has to move from hanging down sort of between the legs to pointing up. The device, along with the biner it is attached to, will travel in a 180 degree arc before it catches the climber.
Sort of like if you were belaying with an ATC with the "top" side that the rope enters and exits pointing toward the ground and you caught a fall...the upward pull from the rope would rip the ATC through an arc until it was upright and cinched down...same thing.
Or just look at the pic after #6...the purple-gated biner is how the device would be oriented while climbing, hanging down, and the biner with device on it is how it will look (almost) when engaged...although it will actually be even more upright/closer to the chest when engaged/weighted.
|
|
surfstar
climber
Santa Barbara, CA
|
|
|
|
Jun 27, 2012 - 05:18pm PT
|
Funny, I was thinking that same crag would be a good contender for TR solo laps after work.
|
|
phylp
Trad climber
Upland, CA
|
|
|
|
Jun 27, 2012 - 07:17pm PT
|
OK, I can visualize it clearly now. Thanks!
|
|
John Butler
Social climber
SLC, Utah
|
|
|
|
Jun 27, 2012 - 07:26pm PT
|
Nice work Chris. I mostly do it your way, now with the Micro-T. Sometimes a Gri-gri is more convenient when you can get a hand free to take up slack often enough... then an easy transition to rap :-)
|
|
healyje
Trad climber
Portland, Oregon
|
|
|
|
Jun 27, 2012 - 07:41pm PT
|
Be careful with the mini trax and shorts, I had mine get jammed up in my shorts.
Gadzooks man! That's no place for teeth...
|
|
cliffhanger
Trad climber
California
|
|
|
|
Jun 28, 2012 - 02:52pm PT
|
The haul bag method can work on many steep climbs. Here the solo climber assumes the position of the pig. The rope goes up thru the hauling setup at the top of the climb. A falling weight (a bag full of sand or whatever) on the other end of the rope pulls the rope thru the pulley and inverted ascender as the climber progresses.
With a continuous loop there would be no need for the weight. Run the rope all the way to a pulley on the ground and then to the climber. As the climber ascends the whole loop revolves, providing the belay.
|
|
benjaminadk
climber
|
|
|
|
Jun 27, 2012 - 08:41pm PT
|
gotta agree with the having some sort of chest attatchment to keep the mini traxion higher thus shortening a potential fall to next to nothing. i just use a 4ft runner. i actually use two more lockers. one on either side of the mini through the chest harness and the biner that goes through the hole in the mini and belay loop....guarentees no cross loading and keeps the mini nice and tight so i never have to pull slack or adjust the device. i dont use a backup line but that isnt a bad idea. i do use a 10.5 dynamic rope and when i fall there is really no shock load, its more like resting on gear...i dont know if its the best system but it works for me.
|
|
ms55401
Trad climber
minneapolis, mn
|
|
|
|
Jun 27, 2012 - 08:59pm PT
|
rgold: point taken, and post deleted
|
|
S.Leeper
Social climber
somewhere that doesnt have anything over 90'
|
|
|
|
Jun 27, 2012 - 11:22pm PT
|
I also want to give the 2 rope method a try.
good stuff
|
|
Rankin
Social climber
Winston-Salem, North Carolina
|
|
|
|
Jun 27, 2012 - 11:48pm PT
|
Great article Chris, especially with the link to the photo of Kauk's set up. I find that keeping the device higher, by tying it to chest slings, makes for a cleaner running system. Not only does the rope run more smoothly but the device is restricted to a mostly upright position, away from the body, which probably lessens the likelihood of interference/obstruction from clothing or other gear.
|
|
Bargainhunter
climber
|
|
Can someone tell me why they choose to use a static vs a dynamic rope on solo TR? Is it just to avoid long rope stretch when falling at the start of a climb?
|
|
James Doty
Trad climber
Phoenix, Az.
|
|
Cliffhanger,
nice thinking outside the box.
|
|
rgold
Trad climber
Poughkeepsie, NY
|
|
Kludge, the first Petzl link of the three I posted above contains, at the bottom a video that gives some of the rationale for a second rope. The video itself mentions three solutions, one of which is the second rope, the other two of which protect a single rope.
The executive summary is that it isn't all that hard for repeated dynamic top-rope falls on a rope that passes over a 90 degree edge to sever the rope. Pendulum falls will also do the trick, but that's obvious. What happens with straight-down falls is the the repeated stretching over the edge wears the rope through.
|
|
10b4me
Social climber
Lida Junction
|
|
|
|
Jul 16, 2012 - 05:50pm PT
|
Just got my mini trains. Hoping to try this out very soon.
Thanks to Chris, and everyone else for the beta
|
|
Hummerchine
Trad climber
East Wenatchee, WA
|
|
|
|
Jul 30, 2012 - 09:15pm PT
|
Hey Chris...I think you and your site are totally awesome! But after 20 years or so of extensive solo-toproping using just about every technique out there, I have some concerns with what you post. I strongly agree with the need for some sort of backup, but loops in a second rope has so many issues! Takes time to rig, complicates self rescue if stuck, can get stuck on their own, dragging the rope up with you, having to clip in and unclip while climbing, still having to rap a single line while rigging, useless if near the ground or a ledge...
Yes, better than nothing...but far worse than better options! Two devices on the same rope are better. Better still are two devices on two separate ropes. I also disagree with using static ropes, since there is already an issue with the entire system being dynamic enough when near the anchor...that's only going to make it worse.
Currently, I prefer two devices on either one or two ropes depending on the climb. On climbs I have dialed I like having some slack so I do not use a chest harness, although I preload the ropes at the ground. A very simple chest harness system (simpler than the link you mention showing Kauk's system) is to loop a double runner through the hole of the top mini/micro and huck it over each shoulder.
A huge advantage of the Micros over the Minis is they disengage from the rope after being weighted. The Micros tend to "stick", which if you are trying a super hard route is a real issue. It's not like it's easy to whack the thing to release it while trying a 5.12 over your head...I KNOW!
Hope you agree; whether you do or not, you do rule!
|
|
Belay Device
Trad climber
UK
|
|
personally I prefer the Petzl Shunt for setting up a self belay. Anything with teeth on has an increased probability of shredding the sheath off your rope. The Petzl Shunt does have an increased chance of slipping, but so long as you put a knot or carabiner below the shunt from time to time this isn't an issue. I've been red-pointing on a shunt for years and never had any problems.
|
|
Morgan
Trad climber
East Coast
|
|
If you are going to improvise a "chest harness" as elcapinyoazz proposes (good idea) I think the MiniTraxion is a better bet than the MicroTraxion because the carabiner hole is more independent of the cam.
|
|
le_bruce
climber
Oakland, CA
|
|
Also well worth it imho to use a locker designed to prohibit cross-loading.
Here's what a Mini that has been cross-loaded looks like. Pic courtesy James Luca, by way of Samet's page linked above: http://www.gearinstitute.com/getschooled/item/how-to-toprope-without-a-partner
A DMM BelayMaster, BD Gridlock, or similar will help avoid this. Also agree with ECIYA that shock cord, girthed through the Mini and worn bandalier style, is the way to go for keeping the Mini and locker upright.
|
|
roadkillphil
Trad climber
Colorado
|
|
|
|
Feb 20, 2014 - 07:39am PT
|
Good article. I used to use a Soloist quite a bit, including leading. Very important to use some kind of chest harness arrangement. Very, very important to use backup knots in the climbing line, tied at a length no longer than you were willing to fall if the Soloist failed to engage; which it won't if the rope exits the device at more than a 90 degree angle....easily done on overhanging routes or if you catch a foot on the way down and flip over. I would tie the backup and clip it to my harness to help manage drag. On tr, a little weight on the rope end as described saves a lot of futzing trying to keep slack out of the system.
The cam on my Soloist is pretty worn and smooth, but still effective and seems relatively gentle on the rope. Sounds like there are better ways to go, though.
|
|
stilltrying
Trad climber
washington indiana
|
|
|
|
Feb 20, 2014 - 08:19am PT
|
I have done a lot of top rope soloing by just setting up my gri gri at the top anchors. Simple and works well. Walk to top, place rope in gri gri, attach to anchors making sure there are no issues with getting hung up on anything, drop rope, rap down, tie in climber side and pull belay side while climbing. I only used it on routes I had wired and were basically vertical. After reaching the top I would clip in, reset the rope and rap back down and repeat. Obviously the rope is placed in the gri gri at the mid point and use both sides of rope when rapping down. Connect gri gri to anchors using slings to equalize and locking carabiners.
|
|
couchmaster
climber
|
|
|
|
Feb 20, 2014 - 08:55am PT
|
ROPE PROTECTOR RANT*(follows)
Missed seeing this thread first go round. Also of note, which is not pointed out above that I can see, use of a rope protector should be considered. Might not be needed in the soft smooth rounded Yosemite Granite, but lots of other areas have sharp edges and or rugosites that will waste a rope pretty quick once you start dogging and rappelling on it. If you show up with one or two rope protectors, you'll tend to use them and your rope and your wallet will thank you.
I like the Spirol ones as they tend to be light fast and stick pretty good. I tie them in a knot on my harness gear loops when I'm like out in nowhere backcountry and say going to lead a pitch to toprope another pitch. They can still move if you have a dynamic rope and the protector is in an area with movement, but they tend to stay still. There is a small hole for ting it off with a mini-prussic, but duct tape would world better to fix it in a single spot (warning, I have not resorted to doing either). Fish and Petzl also make versions.
Hmmm, Fish Products link doesn't want to load right now for me. http://www.fishproducts.com/
Here's one to what the Spirol looks like.
http://www.rei.com/search?query=spirol
|
|
Tommy D
Trad climber
Santa Cruz, Ca
|
|
|
|
Feb 26, 2014 - 12:29pm PT
|
Though using and independent line with tie-in points is good redundancy, it is woefully cumbersome. I prefer to use 2 devices on the same line, a Mini Traxion, and a Pro. I use the Pro on top as you do not need to unclip it from your harness to rig it to the line. This allows it to be permanently set on your neck/ shoulder sling as well. With a little weight on the line it slides like a dream. There are some concerns about the Pro being pried open if it is cross loaded, but if this worries you, you can lock it to the line with a mini-biner. Makes for really fast transitions with plenty of redundancy for my comfort level.
|
|
sketchypro
Trad climber
Melbourne, florida
|
|
Hey roadkillphil,
My soloist's cam was worn after years of use - they replaced it FREE
I do not understand all these rube-goldberg rope-solo methods that y'all dream up and espouse. Just buy the f'n device designed for it or use knots. Ain't there enough ways to kill yourself already?
re:
The cam on my Soloist is pretty worn and smooth
|
|
mike m
Trad climber
black hills
|
|
So how far can you fall on a Mini trax before it breaks? More than Zero or there would be people dropping like flies as much as this gets used. Always makes me nervous so I will keep it tight when things get hard for me but you climb less well then. Many time there is slack in the system exxpecially when ice climbing as it is harder to tend with tools in your hands.Does having two devices really make it any safer as neither are made to handle a fall.
Also does having a locker that completely will thread trough the whole stop cross loading?
|
|
Alpamayo
Trad climber
Davis, CA
|
|
Sketchypro:
The Soloist IME works fine for leading, but I have not had great experience with while top-roping. I've tried a mini-Trax and it worked way better than the Soloist for top-roping. And Petzl has directions on their website for using it for solo-TRing, so this is one of its intended uses.
|
|
Alpamayo
Trad climber
Davis, CA
|
|
I've never been able to get the Soloist to self feed very well at the bottom of a TR. It seems like I always have to feed it for 15 feet or so before it self feeds, even if I have the line weighted. I have not had this problem with a Trax (or two). PLus it always just seems like the Trax feeds more smoothly than the Soloist. Maybe you have better tricks for using the Soloist than I do.
|
|
sketchypro
Trad climber
Melbourne, florida
|
|
Yea for using soloist on toprope, I just hang a few big cams or some iron on the rope to get it to feed smoothly at the beginning
Ed
|
|
trev.k
Sport climber
Nowra, NSW
|
|
|
|
Nov 30, 2014 - 12:51pm PT
|
Any comments on using a microscender/microtraxion combo? I'm attracted to the cam (microscender) instead of teeth option for my main device - at the chest (no chewing on ropes, instant release when you get back on the wall - not having to fiddle with unlocking it)and a different type (teeth - micro traxion) of device as backup at your waist harness (better redundancy).
|
|
justdave
Trad climber
New Paltz, NY
|
|
In the article it mentions that it's ok that the primary line can be static or dynamic, but that the backup line must be dynamic. I can understand that if your backup is to tie knots periodically, but I'm wondering, if your backup method is a second micro-trax a few inches below the (running on a parallel rope to the primary) is it still essential to have the backup be dynamic? Reason I ask is that I have a 200' static line and was thinking it'd be simplest to tie off two figure 8's in the middle of the line, creating two independent strands, and put a micro-trax on each. Seems nice to be able to just take one rope, and in this application to have it be static, but obviously I don't want to do anything dumb.
Cheers,
David
|
|
the Fet
climber
Tu-Tok-A-Nu-La
|
|
I think the main issue is cross loading. When you are belaying someone else you are not moving around and can keep an eye on your belay device and it's biner. When you are self belay climbing and fall the biner / belay device can get impacted at weird angles. A shoulder harness / bandolier to keep it upright definitely helps, but you could take an upside down fall. When you are tied in with a knot in regular climbing the angles don't really matter. You also shouldn't hook to the rope with a single biner (e.g. if you are tied into the middle of the rope on a 3 person team) for the same reason.
I've self belayed on a single rope with a chest harness keeping the device upright, but knew there was some risk. And I made sure no slack built up in the system.
It's also nice to have a second rope there to if say your self belay device got jammed on your main rope and needed to escape on the other rope.
Having the second back up rope a dynamic rope with just knots to clip into is nice because it's the simplest system and pretty foolproof. And if you end up taking a weird fall on it it would still work. That said a second static rope with another locking pulley type device is better than nothing.
|
|
MisterE
Gym climber
Small Town with a Big Back Yard
|
|
Hey, that purple-gate carabiner isn't locked! ;^)
A guy on the eastside totally broke his min-trax apart falling on a static line recently. He only saved himself by grabbing the rope and bat-manning up to a safe stance. YMMV.
|
|
Spider Savage
Mountain climber
The shaggy fringe of Los Angeles
|
|
Tip: Always carry your two prussik loops in the back of your harness. If the rare case of a bad jam-up happens you can easily bail yourself out.
|
|
Winemaker
Sport climber
Yakima, WA
|
|
Thanks everyone for some good ideas/advice. I just finished putting in some routes on my (large) sycamore tree with an anchor about 40 feet up. Since the route is mostly overhanging I needed some way to self rescue so am running a loose Klemheist knot above the microtraxion. It runs freely and is easily pushed up by the micro; I've been practicing escape from the micro and it's pretty easy and smooth; just push the Klemheist up high and tight, step into the loop and stand up, tighten the rope through the rappel device, release the micro and you're ready to weight the rope and descend.
|
|
simus
climber
|
|
|
|
Jan 10, 2016 - 11:36am PT
|
I used this method about fifty times and am not going to do this anymore. A couple of times the Micro traxion got locked in a disengaged position after I brushed it over the rock. The method is not safe.
|
|
le_bruce
climber
Oakland, CA
|
|
|
|
Jan 10, 2016 - 03:52pm PT
|
Simus - some folks, not many as far as I understand, shave off the locking mechanism with a Dremel to avoid that possibility. Also to avoid the (far more likely?) human error of forgetting to engage the cam before leaving the ground.
Not something I've done, but I always wonder whether I should.
|
|
Late Starter
Social climber
NA
|
|
|
|
May 27, 2016 - 08:36pm PT
|
So I recently bought a torse harness, as well as a croll (handled ascender as backup) Anything I'm missing with this set-up? Petzl looks like they recommend a basic vs. a croll, so in my paranoid state of mind I'd like to know if I'm missing something catastrophic (D shaped carabiner on my harness????). Right now I really like it for running laps on easier climbs. The microtraxion is nice, but I like the croll for quick removal and transfer to rappel. Am I the only one using this set-up?
|
|
rockermike
Trad climber
Berkeley
|
|
|
|
May 28, 2016 - 06:20am PT
|
This is all well and good, but how do you get the rope up there?
|
|
Late Starter
Social climber
NA
|
|
|
|
May 28, 2016 - 06:30am PT
|
Grappling hook!
|
|
ms55401
Trad climber
minneapolis, mn
|
|
|
|
May 28, 2016 - 09:46am PT
|
I used to TR with two ascenders on the TR, but now I just do one on a semi-static with a dynamic back up rope that I lock into every 5-10 feet. works well enough for me
|
|
jamesc
Trad climber
Bishop
|
|
I tried this method today. In a crack climb, the rope strand with the knots can get stuck in the crack. I'll be looking at methods with a second device and no knots, probably the Camp Lift ascender.
|
|
|
 |
|
Recent Articles
- Terms of Use
Apr 09, 2019; 2:35am
- Chuck Pratt
Mar 22, 2019; 5:52pm
- Cookies Policy
May 24, 2018; 4:04pm
- How To Big Wall Climb: Table of Contents
Feb 22, 2018; 7:40am
- The Best Yosemite Big Wall Climbing Rack and Gear List
Jun 26, 2017; 5:21pm
- How to Set Up a Self Belay for a Solo Toprope
May 09, 2017; 9:41pm
- SuperTopo Goes Solar - How and why we choose solar photovoltaic panels for our house
Mar 21, 2017; 3:29pm
- The Photographers of SuperTopo
Feb 21, 2017; 4:52pm
- Bold School, Old School
Dec 08, 2016; 7:24pm
- The Best Yosemite Climbing Rack and Gear List
Oct 09, 2016; 6:27am
- How To Big Wall Climb - Gear 3: Haulbags, Hauling and Bivy Gear
Apr 18, 2016; 4:24pm
- How to Big Wall Climb - Building Big Wall Anchors
Sep 30, 2015; 7:05pm
- How to Big Wall Climb - Leading 3: Placing Gear
Jul 08, 2015; 8:40am
- 10 Tips To Make Big Wall Climbing More Fun
Jul 08, 2015; 8:38am
- How to Big Wall Climb - Retreat, Bailing and Fear Management
Apr 06, 2015; 10:12am
|