This is part of the How to Big Wall Climb SuperTopo book. Videos like the ones above illustrate key points of the book and are meant to be watched while reading the book. Buy the book here or just read this free sample of the text below with photos.
Visit on supertopo.com
A Note About Links
If you buy something from an online retailer below after clicking on one of those links, we get a little piece of the sale. If you are thinking about buying some of the gear mentioned in this article, we would appreciate it if you would click on one of the links before you buy. It wont cost you anything extra, and it does help support this website. Thanks for keeping us in mind. Our affiliates are Altrec, EMS, Moosejaw, Mountain Gear, Mammoth Gear, Backcountry, Patagonia, and REI.
Click here to see what is currently on my El Capitan rack.
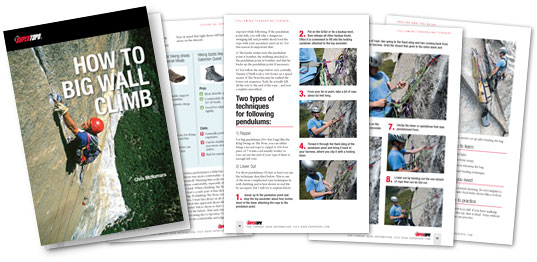
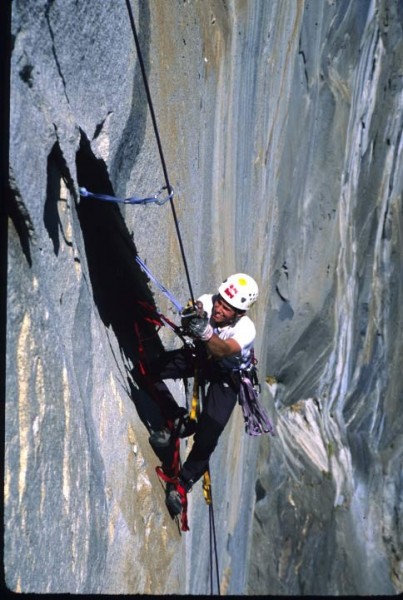 Chris McNamara jugging high on Zenyatta Mondatta, El Capitan. Long slings protect the rope from the sharp edge. Credit: Jason "Singer" Smith |
||
FollowingCleaning Gear
Overview
With your jugging skills dialed, it is time to move to a real-world cleaning environment. There are two key things to keep in mind when cleaning gear:
The most important thing is to keep yourself safe. When you are cleaning gear, your upper Ascender is often coming on and off the rope, which means you need to have a good backup system.
Skills to learn
Gear You Need
Where to practice
Idealy you still start on an 80-degree cliff that is 30 to 50 feet tall. But any of the cliffs you have used so far will do. The important thing is that the crack or bolt ladder you will be cleaning is straight up and down. You dont want to learn on a traversing pitch.
How to Rack Gear
Start by putting a shoulder-length sling over each shoulder. As you clean, you will put gear (cams, stoppers, etc.) on the right sling and biners and quick draws on the left sling. When you finish cleaning the pitch you can quickly take off the slings and hand them to the leader of the next pitch for quick re-racking. Note that the cleaner does not wear a double gear sling.
It is debatable how organized you should be when racking the gear while cleaning. There are three options:
1) Little organization. Just clip all the gear to the right side and all the biners to the left side.
2) Lots of organization. After cleaning a piece, clip it to the gear sling like you would when racking to lead. This means stoppers up front, followed by cams, smallest to largest, and grouping free biners in groups of five or seven and quickdraws in groups of two.
3) In between Options 1 and 2 and what I recommend. Make a little effort to put cams in order of size and do some basic organization. Maybe stop every five pieces and make sure things are not getting too clustered. You are organized enough to avoid a big cluster but also making sure to keep a good rhythm going on the Ascenders, which sometimes means just clipping on a piece out of order.
Video: How to Rack Gear When Cleaning
Cleaning Gear
There are two main ways to clean gear: removing the top Ascender and keeping the top Ascender on.
1) Removing the top Ascender means sliding the top Ascender up to one inch below the biner (attached to the piece you are cleaning) and sliding the bottom Ascender one inch below the top Ascender. You then take the top Ascender off, pass it over the biner, re-attach it to the rope and then slide it up as high as you can. If the terrain is overhanging, you then rest on the daisy chain. If the terrain is less-than-vertical, you dont hang on the daisy chain and just keep you weight on your feet in the Aiders.
2) Keeping the top Ascender on means sliding the top Ascender up to one inch below the biner (attached to the piece you are cleaning) and sliding the bottom Ascender one inch below the bottom Ascender. You then clean the piece.
In less-than-vertical terrain it is faster to not remove the Ascender. However, if it is a tricky piece to clean, it is best to pass the top Ascender because you will then be in a better position to clean the piece. On vertical or overhanging terrain, it is almost always best to pass the top Ascender.
TIP: On a stopper-intensive route (like Zions Desert Shield), it is a good idea to have a mini-hammer (not a full-sized wall hammer) and a long, thin lost arrow or nut tool. Gently tap the bottom of the stopper with the lost arrow. This will prevent the stopper cables from getting too damaged. If you just rip up stoppers to clean them, the cables will bend and weaken.
Key Points
Backup Knots
When you remove an Ascender to clean a piece, at that moment you are only attached to the rope by one point (the bottom jumar). If that piece failed you would fall all the way to the end of the rope (it has happened and killed people). You prevent this by tieing a figure-eight every 15 to 25 feet and clip it to a locking biner attached to your harness belay loop. That way, if you become disconnected from the Ascenders, you only fall the distance to you your last backup knot. Another benefit to tieing backup knots is that you avoid the risk of getting the rope stuck way below you and then having to rap down and free it.
On my first ascent of The Nose I decided to save time and not tie a backup loop. I had almost reached the belay after cleaning a steep 200-foot pitch in the Stovelegs when I stopped moving. The rope had snagged 100 feet below me. The only way to clear the snag was to rappel 100 feet, then jumar back up. My attempted shortcut had put me at risk of a 200-foot fall and I ended up burning a lot of time. This was a one-day ascent and later in the climb I got massive cramps around Camp V, no doubt encouraged by the 300-foot pitch I had jumared earlier in the day.
Using a GriGri: It is possible to use a GriGri or similar auto-lock belay device instead of back up knots but I dont recommend it because:
Read the rest of this chapter in the How to Big Wall Climb SuperTopo book
Visit on supertopo.com