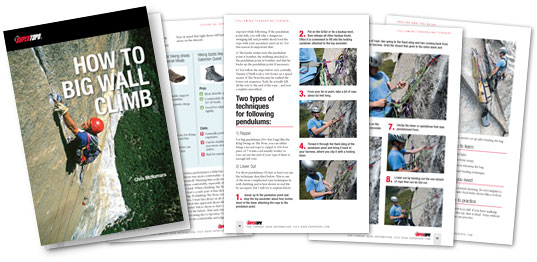
This is part of the How to Big Wall Climb SuperTopo book. Videos like the ones above illustrate key points of the book and are meant to be watched while reading the book. Buy the book here or just read this free sample of the text below with photos.
Visit on supertopo.com
Click here to see what is currently on my El Capitan rack.
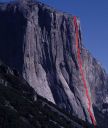
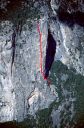
 The base routes are scattered to the left of the SE Buttress. Credit: Chris McNamara |
||
Wall Strategy: Crowds, Passing and Teams of Three and More
Crowds
The Nose is probably the most crowded big wall in the world. Since it can only handle so many parties starting at once, there is often a backup on the wall and on the ground. One of the goals of this book is for you to be more prepared when you start up the wall. If climbers had their aid, free and general wall skills dialed, the bail rate might go down from 60 percent down to 20 percent. There would be more successful ascents and fewer bailing clusters caused by under-prepared parties.
Until that day comes you need to deal with the reality of crowds. The best way to deal with crowds is climb the route in offseason in one or two bivies. Yosemite weather forecasts are really only solid for two to three days in the spring and fall. So if you can climb the wall fast, you can wait for a good weather forecast and probably be okay (but still be ready for a storm!)
Another option is to climb during July and August when most climbers dont want to deal with the heat. A good option would be to wake up really early and fix to Sickle. The next day start in the dark with a Headlamp when temps are cool and try to get into the Stovelegs by 10 a.m. when the breeze usually kicks up.
The last option is to just not climb the Nose. Lurking Fear, Salathé Wall and many others are great routes. If you show up and The Nose is too crowded, consider these alternatives.
Passing Teams
I often get questions like this: "We're thinking of doing The Nose and the crowds are probably our number one worry. How do we wait for a day to get on a wall? Is there a line? Do we have to stay there to keep your place? Can we climb through the night and pass parties that way?"
My Answers:
Whoever starts up the wall first is first in line until you work something out differently. It is customary and best for everyone involved to let a much faster party pass. It takes some extra time to the pass, so either the faster party usually jugs a fixed line by the slower party, or vice versa.
The tricky thing is when you get an only-slightly-faster team behind a slower party. When this happens, don't pass. The extra time of passing and dealing with the cluster of two parties at a belay takes extra time and takes away from both teams' big wall experience. In general, only ask to pass if you feel you are MUCH faster and CONFIDENT you can blast ahead.
As far as starting up at night to pass, this is okay as long as you work it out with the team being passed beforehand. Again, its important that you are confident that you are the MUCH faster team in order to get good spacing and make the experience pleasant for everyone.
When you are fixing pitches (e.g. fixing pitches to Sickle on The Nose). The team that fixes pitches first is first in line to start the route. They should try to haul all their bags that day to Sickle and start at very first light if there are other teams behind them. If the team first in line knows they are going slower than teams behind them, they should let the faster teams pass. However, the faster teams should start at first light or earlier if possible.
As for speed climbing, it is best for everyone involved to not try The Nose in a day when there are five parties or more on the wall.
Climb With Two People or Three?
Theoretically, walls can go smoother with three people. But it almost never works that way. More people means more cluster at the belay and the bivvy and more logistics management. On walls as in life, the best way to do things is almost always the simplest way. Three people makes everything more complex.
Three people also means heavier haul bagsmuch heavier. Theoretically you now have two people to haul but usually one person ends up doing most of the hauling on each pitch. More haul bags and weight means more stuck bags.
I strongly recommend climbing in a team of two. Even after 100-plus big walls, I still find it challenging to climb with three people. You are always dealing with more rope, belay, bivvy, and haul bag management. If it is one of your first walls, climbing with three people will make a difficult task even more daunting.
All that said, people want to know how to climb with three people. So here you go:
The main problem with three people (other than heaver bags and more clusters) is what to do with the third person after the leader is done with the pitch? If the third person jugs the haul line the leader has to wait to haul and the follower has to wait to clean the pitch. This adds 15 to 30 minutes to each pitch, which over 30 pitches would be an entire extra day on the wall, which would mean another 30 pounds of food and water to haul.
The safest way to deal with this is for the leader to trail two ropesone for the third person and one for the haul bags. This creates even more rope clusters and weight for the leader. The solution to the weight problem for the leader is to lead with a trail line, then use it to pull up the two ropes at the end of the pitch. But that takes extra time and now you are dealing with three ropes.
The simplest solution is for the third person to lower out on the haul line (make sure it is at least 10mm) with the haul bags. That way the cleaner can start cleaning while the third person ascends the rope and helps the leader haul. This system works but it can be tricky to lower out the bags and the third person at the same time. Also, the leader needs to fix the rope that the third person is jugging to the anchor with figure-eight knot on a bite. The third should never jug the rope when it is loaded in the hauling device. At least one person has died when the system for the third to ascend the fixed line was inapropriately attached to a hauling device.
Linking Pitches
If you are hauling, it generally makes sense to link pitches. The more pitches you link, the fewer belay change-overs, which means a big time savings. The downside to linking pitches is that you have more rope drag at the top of the pitch and you generally have to conserve your rack to make it last. Study the topo and seek beta to see where it is possible to link pitches on the route. If you are trying to free climb as much as possible, pulling hard moves 180 feet out from the belay will be a challenge with all the rope drag!
Fixing Pitches
Fixing pitches has its pros and cons.
Pros:
Cons:
I try to not fix pitches because I like to just blast off. However, if the approach is any more than 30 minutes, it often it works out nicely with the work flow to fix one rope length (which can mean one or two pitches depending on the length of the pitch).
Here is the way I usually a approach a route like Zodiac on El Capitan:
On Day 1 I wake up early and hike to the base with the full rack and as much water as I can comfortably carry. I lead the first two pitches and fix to the ground with one rope. I hike back to the Valley, do any last minute shopping, and pack the haul bags. That night, once the temperature cools down, I hike back to the base with the rest of the food, water, bivy gear and haul bag. Early the next morning I blast off.
Missing Fixed Gear
Many routes on El Cap either depend on fixed copperheads to go hammerless (like Lurking Fear or Zodiac) or are just a lot easier with key fixed pieces (The Great Roof on The Nose). Fixed gear is surprisingly resilient. In places where it disapears it usually reappears shortly thereafter (I guess some cracks are just hungry!). That said, you should be ready in case fixed gear is missing. Two ways around missing fixed gear:
1) Top step and reach higher. Use what you have learned about top stepping to bypass the placement. It may seem precarious, but if you use some face holds for balance you can usually get in the highest step in the Aider and reach the next placement.
2) Improvise a cheat stick. To make a cheat stick all you need is something rigid (like the tent pole for your rainfly) and some tape (you should always climb with some athletic tape and a little duct tape.) Most importantly, you need to see a fixed piece such as a bolt, sling, fixed stopper, copperhead, etc. that can be snagged by a carabiner.
Follow these steps:
Dont go up on a wall with a pre-made cheat stick. You will be too tempted to use it. Instead, carry all the materials you need. This way if you really need a cheat stick you can make one but you wont be tempted to use it all the time. Using a cheat stick a lot can be dangerous (if the fixed piece you snag pulls out you will take a big fall) and after a little while you start to feel dependent on it. While aid climbing is generally about getting up the wall by any means possible (while hammering and damaging the rock as little as possible), using a cheat stick takes a lot of the fun out of it.
Read the rest of this chapter in the How to Big Wall Climb SuperTopo book
Visit on supertopo.com