This list has the philosophy behind my gear picks. Click here if you just want a big wall gear checklist.
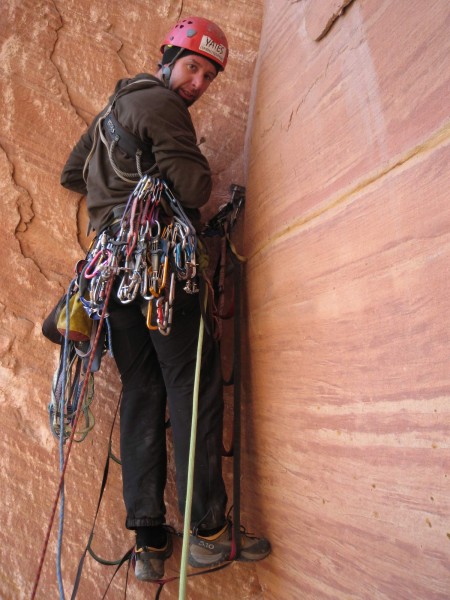 Ammon McNeely making the first move on a 23+ hour single push ascent of Rodeo Queen. The Camp 4's have nice reinforcement where the aider meets the shoe. Credit: Chris McNamara |
||
Gear Picks Are Updated as of June 2017
Chris Mac Pick
I add (Chris Mac Pick) after any gear that is currently my favorite.
Basic Aid Gear
Two basic principles of good aid gear:
Use the best gear you can get. The right gear is essential. But buying brand new all at once would cost $5000. Dont be discouraged. Borrow gear and improvise where possible until you fill out your rack with the best gear you can get. I was lucky that my aid mentor, Mark Melvin, basically let me borrow his haulbag, portaldege, and rack for my first season in Yosemite. See Dirtbag Options below for ways to improvise and the Do-It-Yourself Big Wall Thread.
Use the lightest and simplest gear. I use the lightest gear possible as long as it does not compromise safety or functionality. Aid racks are heavy. If you compare the difference between a standard rack and a rack that uses lightweight biners and slings, the difference can be more than five pounds. Psychologically, I feel much better standing on marginal aid placements with a lighter rack. And when it comes time to free climb the Stovelegs and Pancake Flake on The Nose5.9 can feel like 5.11 if you have a really heavy rack.
My exceptions to using the lightest gear possible: ropes, cams, Aiders, and harness. I will describe why later.
Warning: While I encourage using whatever you can latch onto at first, never use worn out gear, especially such critical equipment as a harness, daisy chain or rope. Todd Skinner's death on the Leaning Tower reminded us all of how important it is to check your harness carefully and retire it if there is any question about its safety.
Aiders
This is an short excerpt from our Aider Buying Advice article at OutdoorGearLab. Check out the complete Big Wall Aider Review to see how various aiders compare to each other.
There are three common types of Aiders:
AID LADDER
This is my favorite type of Aider for more aid-intensive walls like Zodiac, The Prow or The Shield, for three reasons:
1) They are much less prone to twists and "going inside out" than standard Aiders.
2) You dont have to orient the Aider step to the correct side when you are stepping into it.
3) Because the steps are closer together at the top, you can often rest two feet in the Aider at the same time. Make sure there is a plastic spreader bar at the top of Aider. The downside of aid ladders is that they are a little heavier than standard Aiders and generally have more material, which means they are more likely to get stuck in the crackwhich really sucks when moving from aid to free.
Examples:
STANDARD AIDERS AKA ETRIERS
This is the most common type of Aider. I prefer these on walls with lots of free climbing (The Nose, Lurking Fear) over aid ladders because they are lighter and less bulky when you clip them to the side of your harness and free climb. The downside is they get twisted, the steps get turned inside out, and you always have to orient them properly (left foot into a step oriented left of center). That means more dealing and declustering time, which adds up over the course of a wall and disrupts the aid climbing flow. Make sure there is a grab loop at the top. I prefer models where the top and second step have sub-steps. The webbing should be at least one inch wide and have some type of reinforcement on the bottom of each step.
Examples:
LIGHTWEIGHT AIDERS AKA ALPINE AIDERS
These are best for mostly free routes where you occasionally need to use Aiders. Very light weight but uncomfortable if you are standing for more than a few minutes. Bad choice for learning to aid climb.
OTHER AIDERS
Daisy Chains
This is an excerpt from our old Daisy Chain Buying Advice article.
There are two types of daisy chains: adjustable and regular. I have always used regular daisy chains and most aid climbers prefer them. All daisy chains I have seen work; the most important thing is to get the length right. You dont want the daisy chain to come tight before you get to your maximum reach. (photo showing the proper reach for a daisy chain).
When shopping in the store, put one end at belt level and hold the other end as high as you can above your head with fingers outstretched. There should be to four to eight inches of extra daisy beyond your fingers. If between sizes, err on the size of being too long. If shopping online, then raise your hand, measure from your waist to the tip of your fingers, and add a few inches. I am 5' 10" and like daisy chains that are 55" long. A little shorter is okay but too much shorter and I come up short on big reaches. If you go too much longer, you have more daisy to tangle.
The point on the daisy chain that wears out first is the point that you clip to the biner that you then clip to the Aider and the piece you are standing on. If you aid climb a lot, buy a daisy chain that has this critical point reinforced (although these can be hard to find).
I always buy Dyneema or Dynex daisy chains because they are lighter than regular nylon daisy chains. However, the nylon stretches more than Dyneema and therefore will be more forgiving during a short daisy fall. How much more forgiving? I'll leave that to the physics geeks to calculate. I feel it is not a big enough difference to sway me away from the Dyneema.
More about adjustable daisy chains: I find that most of the adjustable daisy chains do not have very smooth one-handed extension. The one that does extend nicely is the Metolius Easy Daisy. However, they are for bodyweight use only and I have heard that they have broken during small falls. Even if Metolius fixed that issue I still find that overall the regular daisy chains are faster and require less management. With adjustable daisy chains you have to keep them untwisted or they don't slide as well. If you are just going to be jugging a wall and not leading, I might go with adjustable. But otherwise, go regular.
Ascenders
The only widely available models are the Black Diamond Index Ascender and the Petzl Ascension Ascender. I have used the old Petzl Ascender a lot and like it a lot. The movement up the rope is not as smooth as the original Jumar but it is light and overall it works great. There is now a new version of this Ascender that has a different teeth design that Petzl says is easier on the rope. Black Diamond replaced their nForce ascender with the Index. I was not a fan of the nForce. The Index looks like a big improvement and similar to the Petzl.
Belay Device
An autolocking belay device like the Petzl GriGri 2 or Trango Cinch is mandatory on a wall. There are times when you need to take your brake hand off the device to clear a rope snag or dig into the haul bag. Also, it is often hard to stay perfectly alert during a multi-hour belay. I have used the GriGri a lot and love it, especially because it is also a great belay device at the crags as well. However, I prefer the Cinch on big walls for one reason: it automatically slides up the rope when you are jugging up whereas the GriGri does not unless there is a ton of weight on the rope and everything is aligned just right. This means that between backup knots, you have a nice extra backup with the Cinch.
Read my complete Best Belay Device Review to see how the top belay devices compare. Also, check out our article How To Choose a Belay Device
Carabiners
I only climb with lightweight wire gate biners. With a big rack and hundreds of biners, using lightweight biners saves pounds of weight. My current favorite is the CAMP Nano 22 (Chris Mac Pick) because it is the lightest carabiner out there. However, many wall climbers want something a little bigger and easier to handle, in which case I would recommend the Black Diamond Oz or Wild Country Astro. If you are absolutely on a tight budget, it's hard to go wrong with the Mad Rock UltraLight Straight Gate.
There are two phrases you will never hear on a wall:
Bring more biners than you think. Then bring some more.
Oval biners like the Black Diamond Oval were the old aid climbing standby mainly because they dont make the scary biner shift noise. But oval biners are heavy and are the weakest biners out there. I dont use them. FYI: the "biner shift" noise occurs when three biners are clipped to each other and the load changes between biners. A biner can then shift position and make a noise eerily similar to a piece pulling out. If you are using the simple systems in this book, biner shift won't happen much and is not a big deal when it does. If you are going to use an oval biner, I would go with something lighter than the standard oval, like the Black Diamond Oval Wire.
We have a complete climbing carabiner review.
Locking Carabiners
I like to have four to eight locking carabiners. Again, light ones are best such as the Petzl Attache 3D (Chris Mac Pick). I also bring a few larger locking carabiners for attaching the haul bag to the haul line and for using as the master point at the belay. A good big locking carabiner like the Black Diamond Rocklock is also good to have.
Read my complete Best Locking Carabiner Review to see how the top locking carabiners compare. We also have a Locking Carabiner Buying Advice article
Quickdraws
I prefer four to six-inch Spectra draws with lightweight biners. I currently use the Black Diamond Oz Quickdraw (Chris Mac Pick), which is awesome. So light. But there are many other great light quickdraws, like the CAMP Nano 22 Quickdraw and the Wild Country Astro Quickdraw. The best deal on quickdraws at this writing is the Mad Rock UltraLight Quickdraw.
Climbing Slings and Runners
Just like carabiners, it is hard to bring too many slings. I bring 15 lightweight shoulder-length slings on a wall. The Spectra ones are the best because they are so light, like the Mammut Contact Dyneema (Chris Mac Pick). However, I also bring 2-5 non-sewn nylon slings so that I can leave one behind at a pendulum point or just have something more versatile.
Helmets
It is especially important to wear a helmet on a wall for two reasons: 1) If you get a bad head injury on a wall, rescue will be many hours away. 2) When bounce testing, pieces will pull and hit you squarely in the head.
Most helmets made by major manufacturers work. I use the lightest I can find with the requirement it must allow me to attach a Headlamp-Review-Review-Review-Review-Review for night climbing. Two helmets I have used and like are the Petzl Elios and Petzl Meteor III (Chris Mac Pick). I take the Meteor on one-day ascents and the Elios on ascents that take more than a day. But there are a lot of great helmets out there. Read our complete Best Climbing Helmet Review to see how the top helmets compare.
TIP: To avoid bad farmers tan and skin cancer, [image] wear a bandana under the helmet so it covers your neck and ears. Or, for maximum ventilation, duct tape the bandana to the back of your helmet.
Fifi Hook
There are a few different manufacturers of fifi hooks. The important thing is the length of the half-inch webbing that connects the fifi hook to your harness. The length is usually shorter that you thinkusually about six inches or just long enough to be able to girth hitch to your harness. If the fifi hook comes with pre-sewn webbing like Black Diamond Fifi Hook (Chris Mac Pick), you may need to cut off the webbing and tie on your own in order to get the right length.
Big Wall Harness
Get a harness with decent padding that is well padded at the waist and leg loops. Because I dont like heavy gear, I dont wear the super-beefy wall harnesses like the Yates Shield Harness but a lot of people love em. Make sure there are two beefy gear loops on each side. Before you commit to a beefy harness for a mostly-free route like The Nose, make sure you are willing to sacrifice the extra weight for comfort.
If I am going to spend multiple days on a wall, I will wear a "medium beefy" big harness like the Metolius Safe Tech Waldo (Chris Mac Pick).
Most of the time, especially on a one-day ascent, I just wear a trad climbing harness because they are light. My favorites right now are the Black Diamond Momentum or the Petzl Sama Harness.
We have a complete big wall harness review and an article How To Choose A Big Wall Harness.
Gloves
I used to only use sturdy leather gloves like the Metolius Climbing Glove. They are beefy and probably the best option for serious nailing routes. However, they really only protect your palms. After days on a wall your fingers will be sore and black from handling biners and the rope. Then when you eat finger foods with those black fingers You get the idea. Im now a fan of bringing two pairs of gloves. I bring the Black Diamond Stove Glove (Chris Mac Pick) for leading aid pitches. I bring a full-finger Mountain Bike Glove for cleaning. The Mountain Bike Gloves protect your entire hand, have great dexterity, and you can do easy free moves with them on. The downside is they are a little expensive considering they wont last for a lot of walls. If I am going to do a wall with lots of burly hauling, instead of the Mountain Bike Glove I bring Wells Lamont Leather Work Glove or a pair of construction gloves if there are some lying around.
Wall Shoes
Walking up and down in Aiders maybe the single most destructive activity to a pair of shoes. What shoes to bring on a wall? is still a question I grapple with on every climb. I have listed all the different types of footwear with their pros and cons below. I usually use climbing approach shoes but at the peak of my wall climbing activity I would buy a cheap pair of hiking boots and cover the seams in Shoe Goo or Seam Grip. Even if you buy a pair of climbing-specific approach shoes, it may still make sense to cover them in Seam Grip. Some climbers go as far as putting two tubes on each shoe! This will likely result in the fabric blowing out long before the stitching does... which is what you want to happen.
As for shoe fit, I err on the side of wearing my wall shoes a little tight. That way they perform better when doing free moves. But bear in mind that tight shoes will hurt a little more on the descent.
Climbing approach shoes like the Five Ten Camp Four (Chris Mac Pick).
Pros:
Great for moving from aid to free climbing.
Generally low profile, so they move in and out of Aiders efficiently.
What I usually use on The Nose.
Cons:
Expensive.
Will only last for a handful of wall climbs before blowing outsometimes only for one wall.
Painful for long A3-A5 leads.
Regular hiking boots like Scarpa Zen.
Pros:
Reasonable support and durability.
Can be pretty cheap (not the Zen but other styles of hiking boots).
Cons:
Not as precise for doing the occasional free move.
Cheap versions can blow apart fast.
Heavy duty hiking boots
Pros:
Most durable option.
Comfortable for long A3-A5 leads.
Good for edging if fit tightly.
Cons:
Generally pretty expensive.
Can be clunky when you move around in Aiders.
Bad for smearing.
TIP: If you really want your boots to last as long as possible and dont care if theyre ugly, liberally apply Shoe Goo or an equivalent product to the seams most likely to blow out (mainly the area around the toe).
Big Wall Free Climbing Shoes
For free climbing on a big wall, I bring shoes that are one size too big. Big shoes reduce performance a little but make the shoes way more comfortablea worthy tradeoff. Wearing thin socks makes them more comfortable, especially when you have to haul. When climbing The Nose in a day I will wear a comfy pair of free shoes all day long. If climbing The Nose over multiple days I will wear free shoes on all of my leads but switch into approach shoes when cleaning. I prefer Velcro shoes so that I can take them off at the belays. That sais, lately I have been using the La Sportiva TC Pro (Chris Mac Pick) because they are comfortable and edge very well. Unfortunately, they cost $170. If you are on a budget, just about any free shoe will work. But in general, go with a stiff sole.
Lead Rope
You want a 10.2 to 10.5mm rope with a perfectly intact sheath. Anything smaller diameter will wear through too quickly and be scary to jumar on. The 11mm ropes add an extra feeling of security but are really heavy. I like a 60m rope. A 50m rope is too short these days and wont allow you to link pitches as easily. In general, a 70m rope is overkill and means you will have 30 extra feet of rope to manage at the belay on every pitchwhich can lead to more rope clusters. Check out the how to buy a climbing rope at OutdoorGearLab
TIP: Always carry climbing tape on a wall. There is nothing worse than being halfway up an aid route and noticing a tiny bit of white core poking through the sheath of your rope. Its a personal call as to when a rope is so damaged that you should not lead on it and need to bail. In most cases, if the core is not damaged, I will wrap the damaged spot in athletic tape and mainly use the better half of the rope the rest of the climb (this means switching ends of the rope every time you switch leaders).
DIRTBAG OPTIONS
When you start aid climbing you can improvise just about everything you need off a regular free climbing rack.
Aiders: Intertwine two shoulder-length slings or buy some one-inch webbing and improvise an Aider like they used to do in the olden days (show image)
Helmet: Hard hat or bike helmet from thrift store (NOT as safe as climbing helmet but better than nothing).
Fifi hook: Biner or quickdraw.
Harness: Regular free climbing harness.
Shoes: Old pair of running shoes or hiking boots.
Haul Bag: check out this Do-It-Yourself Big Wall Thread for more inspiration
Pants
The ideal pants are synthetic, have reinforced knees and are loose enough that you can roll them up to the below the knee if you get too hot. I never wear shorts on a wall. My favorite are the Patagonia Simple Guide Pant or Prana Stretch Zion Pants.
Knee Pads
I dont use them because they get in the way and make you sweat behind the knees. But a lot of aid climbers, especially beginners, seem to like em. On The Nose or any free climbing wall they really get in the way when free climbing. If you are going to use them I would use the lightest and most low profile ones you can find. One problem with more beefy knee pads like, is that they can get snagged in the Aiders.
See what is currently on my El Capitan rack.
Next Chapter: 3. Leading 1: Low Angle Terrain