This is a free sample of How to Big Wall Climb. If you want the full details on how to climb a big wall, check it out here.
Visit on supertopo.com
Click here to see what is currently on my El Capitan rack.
 Credit: Chris McNamara |
||
The Bivvy, Food, and Water
Brief intro
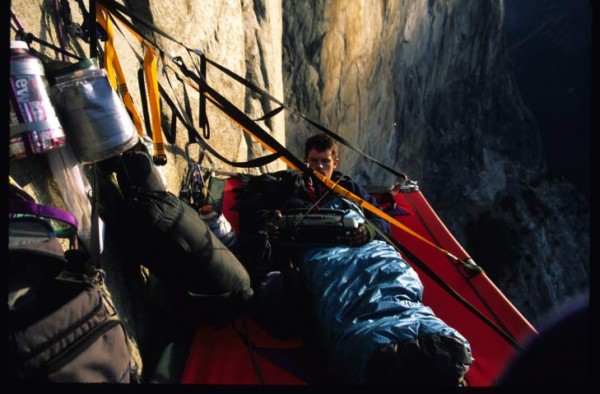
A big reason to do walls in the first place is the bivvy. There is no place cooler to sleep than on the side of El Capitan, Half Dome, or any big wall with thousands of feet of air under your pillow. If all goes right, the bivvy is the best part of wall climbing. But if it goes wrong, the bivvy becomes the source of the most discomfort and clusters.
Key points
Gear you need:
Pretty much everything: gear, lead line, haul line, cordalette, portaledge, haul bags.
Where to practice
Anywhere you can. My first nights in a portaledge were in my backyard tree. I was 15 years old so this was more socially acceptable than if you are 45. But ideally you can set up a ledge on the side of a cliff. Even if you are only ten feet off the ground, it is helpful to get real world experience of managing the belay, the bags, and the ledge.
To Portaledge or Not to Portaledge?
The first question is whether to bring a portaledge or not? On most walls it is not an optionyou need one. But on a route like The Nose or Salthé there are natural ledges of varying sleep-ability.
For me, the answer used to be easy: if I was spending one night on a wall, no ledge. Two nights or more, bring a ledge.
I would even bring a portaledge on a three-day, two-night ascent of The Nose because the ledge would allow me stop and bivvy anywhere. This is especially helpful if there are a lot of parties on the wall because it means not everyone has to crowd onto the big ledges. Also, aside from El Cap Tower, none of the natural ledges on The Nose, and most places on El Cap, is as comfortable as a portaledge. Portaledges are comfy!
However, now that portaledges are so heavy I have to reconsider my advice. The extra weight of 13 to 19 pounds (not including fly) of a ledge will definitely make hauling harder. So there is a tradeoff between having a light load and having the flexibility to sleep where every you want.
Step-by-Step Guide to Setting Up the Hanging Bivvy
So you just finished the last pitch of the day and you get to the belay
1) Set up a clean anchor (Chapter 8).
2) Before you tie the lead line to the master point, pull up enough rope (usually 15 to 20 feet) so that you will have enough of a leash to be able to comfortable hang out where you are sleeping.
3) Haul the bags but before you clip them into the anchor, pause and
4) Decide where the portaledge will hang relative to the haul bag. There are two options:
A) Hang the portaledge about four feet right of the haul bag so that one end of the ledge touches the bag.
B) Hang the bag above the ledge so that the bottom of the bag is 1-2 feet higher than the bed of the ledge.
The advantage to Option A is that you have more space on the ledge because the bag is off to the side. The advantage to Option B it is very easy to unpack and pack the haul bag. However, the haulbag is more in your way. I usually go with Option A.
4) Clip the haul bag to the anchor so that it is in a good spot, depending on whether you choose option A or B (above).
5) Set up the portaledge (see more on this below). Keep in mind that certain rain-flys will change where the ledge ultimately rests.
6) Take the haul or lead rope from where it clips to the haul bag and clip it to the master point.
7) Stretch over horizontally and clip it into the biner that is clipped to the portaledge. Your portaledge is now backed up to the anchor and you have a tensioned horizontal piece of rope to which you can clip gear, stuff sacks, etc.
8) Your parter has cleaned the pitch and is at the belay. He can now give himself a 15 to 20 foot leash and tie into the master point.
9) Hang out in the ledge, pop a warm beer, and take in the scenery.
Tips for Setting Up a Portaledge
Setting up a portaledge by yourself, at a hanging belay, is hard. There are not too many tips other than practice a lot before you get on the wall. But I will try to give a few:
Click here to see what is currently on my El Capitan rack
POOP TUBES
Poop Tubes, Turd Cages, Coiler Cans Your Step By Step Guide
It is essential to poo in a bag then carry it to the summit. Pooing in bags and tossing them or just pooing on the wall is not an option. The is nothing worse than being on the best climb in the world (The Nose) and coming across splattered crap.
Step 1 Go in a bag. There are a few variations
a) Buy a disposable waste bag ($3-4 each). Sealable plastic bags that come with an odor killing powder, TP, hand sanitizer. The most common brands are Wag Bag and Restop
b) Make your own:
Cheapest Option: go in a thin waste basket plastic bag. Big, cheap, and you can't miss. They are about the same size as Wag Bags. Preload with kitty litter or detergent to give the set up some good structure.
or here are three other options (will work but not as well as option above)
go in brown paper bag (lunch size or giant)
go in a large Ziploc bag
go in a small brown bag then put it in a large Ziploc bag
Its nice to have some powder laundry detergent or kitty litter to then sprinkle on the poo to knock down the odor. Or prepage your bags with powdered detergent and shake n bake.
Step 2 put the bag in a sturdy turd cage
Here a few options for how to carry the poo to the summit (AND BACK DOWN!).
Metolius Waste Case - Best Option
A mini-haulbag designed for turds that comes with 6 Wag Bags
Pros: lightweight, can haul outside of haul bag, doesnt require assembly
Cons: cost $59.50, cant get completely airtight seal
Bulk Container - Best Option on a budget
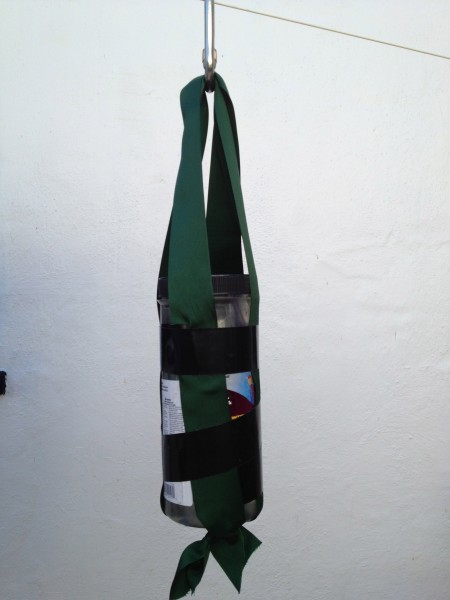 Home made poop tube big wall climbing waste container Credit: Chris McNamara |
||
Pros: lightweight, cheap, can haul outside of haul bag, minimal assembly, seals tight
Cons: takes time to find container, some assembly, lose lid halfway up wall and you are hurting.
Visit on davidlnelson.md
image from http://www.davidlnelson.md/ElCapitan/DefinitionPoopTube.htm
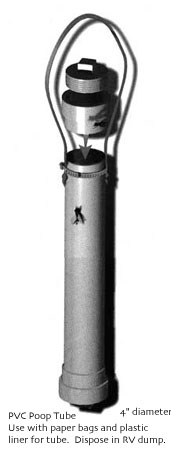
PVC Tube - Fish Big Wall John
4-inch PVC tube, seal one end and use a screw cap at the other end. (see Mike.s post above for more details on construction)
Pros: sturdy, can haul under bag, airtight seal: good at keeping down odor, cheap
Cons: heavy, requires some time to assemble and hardware store visit, have a habit of being abandoned mid route or on summit
Or you can buy save the hassle and buy one pre-made by Fish - Fish - Big Wall John
Visit on designitourselves.com
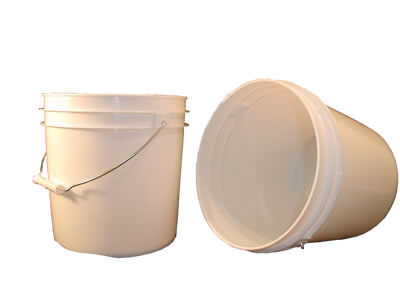
Painters Bucket
Take a 5 gallon or smaller painter bucket, improvise a harness system and either poo directly into the bucket or go in bags and then store them in the bucket.
Pros: comfortable, cheap, can be hauled outside the haul bag
Cons: tricky to rig a good harness, bulky on the hike down, hard to maintain air tight seal, lose the lid and you are screwed!
River Bag/ Dry Bag
Pros: lightweight, relatively easy to find, air tight (depending on who you talk to)
Cons: cant haul outside of haul bag or lower-angle rock so you have to deal with it every time you unpack and repack bag, while a good bag wont leak feces the odor may leak out, air tight (depending on who you talk to), not that much cheaper than Metolius Waste Case
2-Liter Bottles
Crap in a paper bag, then slit an empty two liter water bottle and stick your bag of business in the bottle. As you move up the wall you'll have more emties to fill as you drink more water. Duct take up the slit, and carry the collection under your haul bag. Don't have to carry an extra container. Careful on lower angle routes (don't want the duct tape to ware off). Back on the ground it's easy to slice off the tops and dump the contents of each bottle into a pit toilet.
Pro: cheap and easy to make, great for "in a pinch"
Con: not good for low angle routes, takes lots of duct tape to get secure seal, must be very careful they don't separate from haulbag
Step 3
Have hand sanitizer handy. You can get some more expensive Purell hand sanitizer
Step 4
When done with wall and you have returned to the ground, dispose of brownpaper bags in pit toilet. The sooner the better!! If you went in a plastic bag, Restop, or WagBag, dispose of in garbage can or dumpster.
My cheap option of choice: get a bulk food container from a store like Costco that is over a foot tall and has at least 4" diameter opening and a lid that screws tight. Usually these containers have Biscotti, Pretzles, Candy, etc in them
Now, imagine you were sewing webbing to create a haulbag. Make a harness for the container just like that. Secure with duct tape.
Pros: lightweight, cheap, can haul outside of haulbag, minimal assembly, seals tight
Cons: takes time to find container, some assembly, lose lid halfway up wall and you are hurting.
As for the bag set up: go in a big zip lock bag. add powdered detergent. Double zip lock if necessary
Food and water
On a wall, everything tastes great. This is because you are working really hard and usually dont have much time during the day to make a lunch. When it comes time for dinner, I am always surprised how good cold chili on a bagel tastes. For this reason, I never bring a stove because I like to save weight and hassle. However, if you want to bring gourmet food, or brew coffee, a stove is really nice. Bring a canister stove like the JetBoil.
Here is what I usually bring on a wall
Breakfast
Canned fruit (peaches, pineapple, fruit cocktail); applesauce; mandarin oranges;
granola with instant coffee and dried milk; Danishes; Fig Newtons; Pop Tarts, espresso shots in a can.
Lunch/Snacks
For the first day a nice big deli sandwhich. For subsquent days: Candy bars (that dont melt); granola bars; bagels, plain with cream cheese or salami and cheese, PB&J sandwhiches; energy bars; Power Putty made from peanut butter, raisins, granola, honey, flour (just a little to eliminate stickiness); beef jerky; cheese (pre- cut and put in zip lock bag); nuts; trail mix; dried fruit; Jolly Ranchers (if you are out of food you will love these); chocolate-covered espresso beans. String cheese is always a winner and easy to eat with dirty hands. Dont forget the Jolly Ranchers.
Dinner
Pudding cups; smoked oysters or salmon on crackers; Schippoopi Sandwich built on a bagel with ground pepper, cucumber, bell pepper, red onion, Grey Poupon(from deli) and hot sauce (from Taco Bell); canned food such as ravioli, spaghetti, chili, and hearty canned
soups. Bread, bagels, and tortillas make cold canned food a little more palatable. Tupperware is crucial to keeping soft foods from getting squashed. Bagel sandwhich with cheese, salami and mustard.
Be sure to have some large, heavy duty zip lock bags and a stuff sack to put all your trash.
H2O Rations (per person per day)
3 quarts: OctoberMay
4 quarts: May, June, September
4+ quarts: July and August
For carrying water, two-liter soda bottles work best. Two-quart Gatorade bottles also work. These bottles are sturdy on their own and wrapping them in duct tape is generally a waste of time and tape. To clip in the bottles, clove hitch a thin tie-off under the mouth of the bottle.