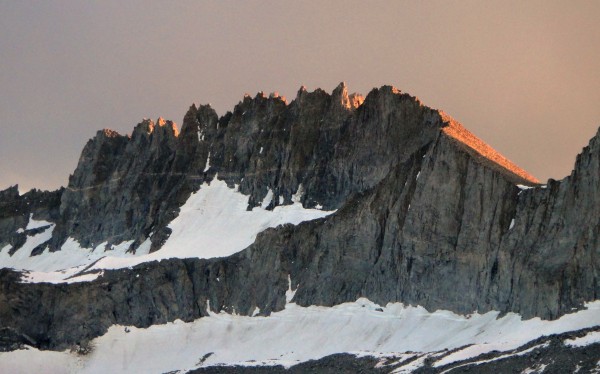
 September 2, 2011 - Palisade Crest at sunset from the Temple Crag plateau. Credit: PellucidWombat |
||
Similar to Carl Heller, this is a semi-obscure climb that, while not on any major lists, is definitely one of my all time favorite routes in the High Sierra. Frankly, after traversing this ridge, I think the Thunderbolt-Sill traverse pales in comparison. This crest is far more varied, and it is far more sustained in difficulty, exposure, and commitment. I would say that the rock is also comparable if not better.
One thing that makes the crest fun is how rarely it is traversed. When I first attempted a traverse in 2010, as far as register entries indicated, no one else had visited the summit for several years. Dating back to the beginning of the original register, the southern summit seemed to only see climbers once every 3-5 years, and few were attempting a traverse of the crest, and of those, most were attempting the full Palisade Traverse. I'm not too worried about highlighting this climb making it crowded. Since 2010, it has seen more traffic, but more like one signed ascent a year. It is tough enough of an approach compared to the other sexier peaks in the Palisades that I doubt it will ever be nearly as crowded unless access were dramatically improved. Not that it is all that hard to access, but just hard enough, and probably mostly spared a lot of traffic due to that phenomena of 90% of climbers crowding onto 10 % of the routes (see Temple Crag, Mt Sill, N Pal, etc.).

Visit on googleusercontent.com
Michael Graupe climbing along the class 3 portion of the Palisade Crest. Gandalf Pk lies beyond.
I first saw the Palisade Crest on a Sierra Challenge outing to climb Gandalf Peak in 2004. However, I was too timid to cross the gap to reach the cl. 4 slab leading to the summit, so I turned around and bagged Jepson as a consolation prize. I figured if I were roped I'd be OK, so that was a perfect excuse to come back and do the full traverse, where a rope is more required anyways. From this earlier outing I had seen that the crest was amazing, and I had gotten familiar with the standard approach, which is via a convoluted cross-country approach up the South Fork of Big Pine to Scimitar Pass, one of the most unlikely passes in the Sierra.
Lastly, I want to point out that one of the things that made this climb so great was knowing so little about it, and the joy we experienced in working out the route, seeing it unfold, with the drama of uncertainty as to if we could find out way. We definitely had moments of doubt. So I was a bit torn as to whether I should deprive others of that experience by posting beta. However, I think the annotated images are so convoluted that if you merely browse them in a casual reading, you'll still be just as lost as we were up there, but plenty psyched to check it out! So don't worry about ruining a great mystery climb by reading this report. And for those who really want to follow every detail, they can take what they want with them and enjoy the route in a less mysterious way, but still plenty awesome.
One mystery that still remains is the name of the summits. The northermost one is named Gandalf Peak after the wizard character in J.R. Tolkien's 'The Hobbit', and the remaining 11 summits are supposed to be named after other characters from the novel. However, no specifics are given in any source, and Don Jenson, who first named these pinnacles, appears to have left no record either. I'll discuss this more at the end of the report. (Note: There are more than 12 summits, really. But for whatever reason, some were chosen as summits, and others not. At times we had trouble telling on the traverse whether or not a summit was one of the 12).

Visit on googleusercontent.com
Palisade Crest and Scimitar Pass
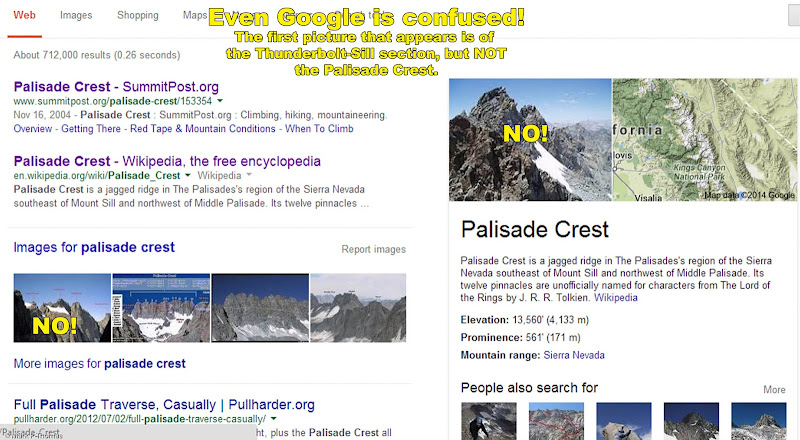
First, a rant. Whenever I would speak of the Palisade Crest to others, trying to convince them that we should check it out, they would think that I meant the Thunderbolt-to-Sill Traverse, which the erroneously called the 'Palisade Traverse'. When I would correct them, often the response is that the Palisade Traverse and Thunderbolt-To-Sill traverse are pretty much the same thing, and 'what is this Palisade Crest, then?' Such misnaming has even become common in online resources. So please see my corrections below!
Visit on googleusercontent.com
A sign of how common the mislabeling of the Palisade Crest is, even Google brings up incorrect photos for the ridge!
Visit on googleusercontent.com
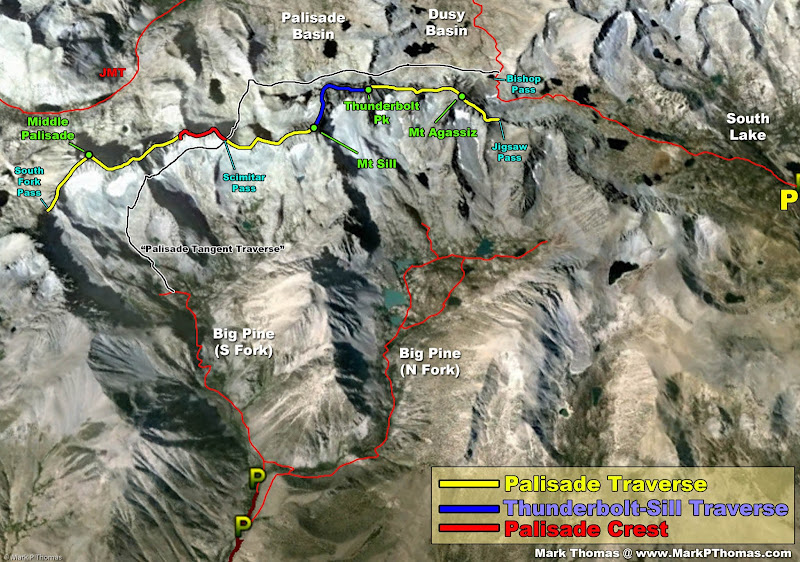
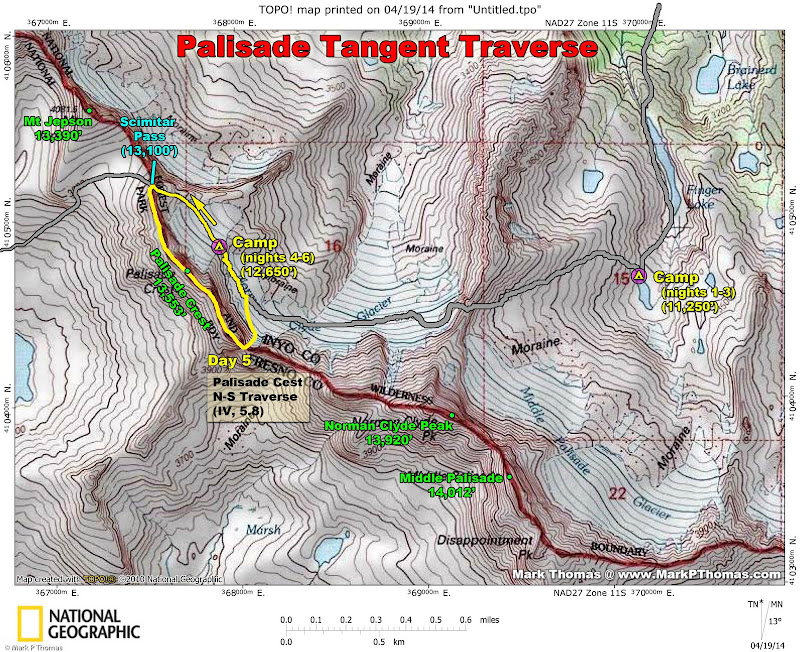
Palisade Traverse(s) and the path Steph and I took through the range. Hopefully this clears up why confusing the Palisade Traverse with the Thunderbolt-Sill Traverse is not a small difference!
Round 1
2010-08-07to09 - Attempt with Dirk Summers
In 2010 I first attempted the traverse with Dirk Summers, heading south-to-north, which is the standard direction as most people who traverse the crest are doing the Palisade Traverse, which is also typically done that direction. We ascended the II 5.8 Southeastern Pinnacles Route and made it to the second of the 12 spires before we decided that we should bail due to clouds accumulating to the NW. And not a moment too soon! Next time I'll wear socks in my climbing shoes if snow and graupel/hail are a possibility. (Secor calls the route II, 5.7, but the way we found felt more like a stout, bouldery 5.8).
Visit on googleusercontent.com
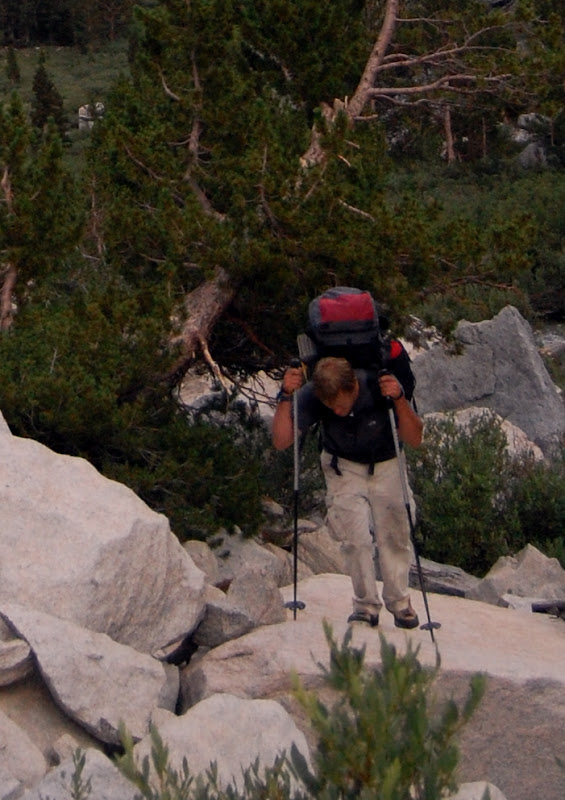
Dirk enjoying the mosquitoes on the x-country approach.
We chose to camp at Elinore Lake and wake before sunrise to finish the remaining 1,200 ft or so approach before sunrise. So on the first day we hiked the trail to the low point after the first big headwall, then cut across a mosquito-infested swamp and up an endless talus streambed heading towards Temple Crag and Contact Pass. Although we left the swamp, we did not lose the mosquitos. A ways up this northern fork of the South Fork, the route takes a 180 degree turn as it twists around and up to picturesque Elinore Lake.

Visit on googleusercontent.com
Dirk enjoying the mosquitoes on the x-country approach near Elinore Lake.

Visit on googleusercontent.com
View from camp at Elinore Lake.
Despite a very early start, we still got to the route later than expected, as there is still significant terrain to cover above Elinore Lake. This left us behind schedule and tired for the climb. This left me more convinced that next time I should camp higher, at the pocket glacier beneath the Crest.
We reached the crest at a perfect time to see the alpenglow illuminate it.

Visit on googleusercontent.com
Alpenglow on the Palisade Crest

Visit on googleusercontent.com
Alpenglow on the Palisade Crest. The cl. 4 NE Face rises above for over 500 ft!

Visit on googleusercontent.com
Alpenglow on the Palisade Crest. On our N-S traverse, we climbed the prominent shaded dihedral to the left of what looks like the face of Optimus Prime.

Visit on googleusercontent.com
Alpenglow on the Palisade Crest and 'Optimus Prime' Peak :-)
From below the crest, we then traversed south alongside 2/3 of it to get to the start of the route. This traverse is awkward as the snow is steeply sloped and heavily suncupped. At the end of the traverse, you must climb a steep snow chute and then figure out how to ascend the rock beneath and over a massive chockstone.

Visit on googleusercontent.com
I expected the top to be steep, and I wasn't let down! (Photo by Dirk Summers)
Some dirty, unprotectable climbing took us up and left off of the top of the snow chute, and then we traversed back right, beneath the chockstone, to an exposed, thin 5.7-5.8 finger crack that nicely took us up and around the chockstone to the notch on the ridge crest. From here we hoped to simul-clim as much of the SE pillar as possible to get some mileage in. As I was still fairly new to technical climbing, I went first on the simul-climb.

Visit on googleusercontent.com
Leading the simul-climb, trying to keep it easy! (Photo by Dirk Summers)
The rock on the SE Pinnacle route was a bit loose, and the route convoluted. Overall, I'd give it about 2/5 stars, with the main drawback being the tricky and dirty first pitch getting to the notch. About halfway up the terrain got hard enough that we pitched it out the rest of the way to the summit. And what a summit it was! The original summit register was on the peak, and this register stated that the peak was named Gimley. (WAS being the key word. It is gone now).

Visit on googleusercontent.com
Summit of Gimley Peak! ca. 13,400'
We resumed simul-climbing on great rock on a knife-edge over to the next summit. This had a newer register in it, placed by Jason Lackey, stating that the peak was named Master Samwise (I am less trusting of this source, now).

Visit on googleusercontent.com
Dirk belaying just short of Master Samwise Peak to protect an exposed and tricky downclimb.

Visit on googleusercontent.com
This is why I practice crack climbing, downclimbing, and climbing with a pack on in the gym . . . (Photo by Dirk Summers)
Things were starting to get fun! Still, I was wary that it was not very early in the day, and the ridge ahead looked long and a lot more difficult. Secor rated the ridge 5.6, with rappels, but looking ahead, it looked like it would be very difficult to keep the climbing at 5.6. Also, clouds were beginning to build to the NW and there had been a 30% chance of showers forecast for the day. The summit dropped away in a way that made it seem likely we would need to rappel, and be committed. We made the call to turn around.

Visit on googleusercontent.com
Dirk looking at the exposed rappel ahead as we consider turning around.
Although it seemed like we turned around early, it took us a lot of time to reverse the ridge. As we neared the top of the SE Pinnacle route, the storm broke. Hail started falling, and we both started feeling an unnerving tickling of our hair vibrating up and down our arms and legs. Then ice axes started humming! There was a brief debate about whether to rappel off a side into the unknown and hopefully that would make us safer from a lightning strike. We decided this had enough downsides to racing to the beginning of our known rappel line that we should just go for it. The next decision was what was riskier: climbing as fast as possible to reach the rappels and get down before the imminent lightning strike, or recognize that the rock was exposed and getting slick from the hail, and hurrying would likely lead to a fatal fall (which would also occur if we were too slow and got struck by lightning.)
Visit on googleusercontent.com
Run away!
We unroped and Dirk chose to run, and I chose to take my chances climbing carefully. We met at the top of the rappels and down we went! The humming went away, but the wind and hail picked up. Hands burned, feet went numb (we had bare feet in our climbing shoes), and we had been in such a rush that we hand't donned any shells, so we were soaked and frigid.
Visit on googleusercontent.com
These ledges were dry when we started climbing, but then the graupel storm began (Photo by Dirk Summers)

Visit on googleusercontent.com
Rappelling in the COLD graupel storm (Photo by Dirk Summers)
Naturally, the rope got stuck on one of the rappels. Dirk, being more brave than I, freed it while I attempted to rewarm my hands. We then made a gear anchor and did one last long rappel straight down to the snow.

Visit on googleusercontent.com
Dirkules saving the day retrieving the stuck rope.

Visit on googleusercontent.com
Last rappel. Notice how clear and blue the sky is now :-P (Photo by Dirk Summers)
Just as we reached the snow, the storm dissipated. We had clear skies the rest of the day, but alas, it was too late to go back up. Still, this was probably for the best. After returning and climbing the crest when I was faster, more confident, and starting earlier, I can say that we definitely would have bivvied if we had continued.

Visit on googleusercontent.com
Palisade Crest seen from Elinore Lake.
Round 2
2013-06-23 - Day 5 of my Palisade Tangent Traverse with Steph Abegg
Dirk wasn't as captivated by the crest as I was, and was mostly turned off by the mosquitoes and arduous approach, so I searched around for other adventurers who I could lure into traversing the crest with me. Three years later the stars aligned for me and Steph Abegg to climb it together, albeit in some different ways. We did a different approach to make it part of an extended backcountry linkup trip, and we chose to attempt the crest N-to-S after I read about some PullHarder guys doing the Palisade Crest that direction. They said that they did some rappels, but that they were able to climb the crest that way at about 5.7-5.8 and though it one of the most enjoyable and tricky parts of the entire traverse. We decided to try this option as getting onto the Crest from Scimitar Pass would be much easier, with rappelling the SE Pinnacles route serving as our descent.
Visit on googleusercontent.com
Day 5, we spent a long day traversing the Palisade Crest.
This is one of the most interesting routes I have ever done. Steph Abegg and I traversed the Palisade Crest North to South while managing to avoid doing any rappels, apart from the 5 to descend the SE Ridge in the dark to get off the Crest. It was a 20 hour day, with sustained and complex route finding, and while seemingly improbable, usually a passage could be found at cl. 4 to 5.6, with a couple of 5.7 to 5.8 cruxes, the most interesting of which was what we dubbed 'The Ivory Way', a white dike ledge that passed through very exposed terrain. For most of the day we were blasted by frigid wind, from the west, which was from an incoming snowstorm and added to the alpine flavor of the route. For the most part the rock on the route was fantastic.

Visit on googleusercontent.com
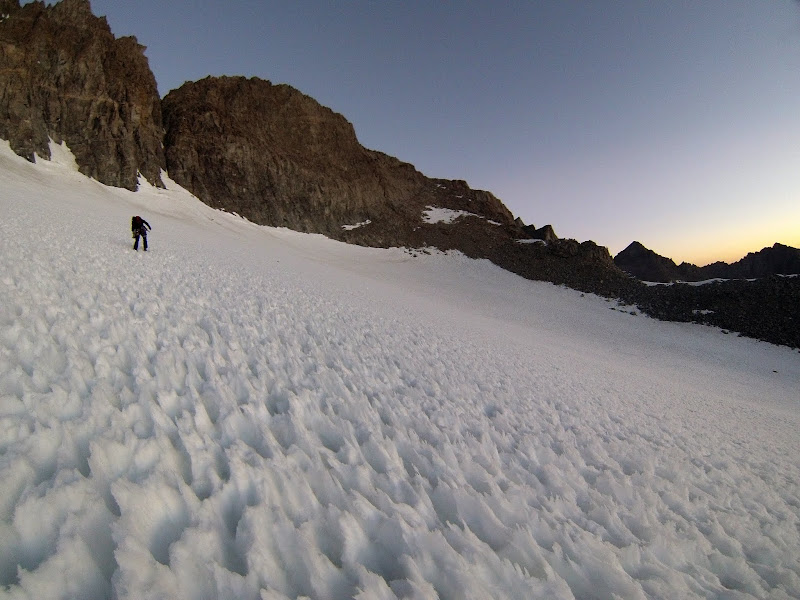
Morning stroll in sun cups. (by Steph Abegg)
Visit on googleusercontent.com
Morning stroll in sun cups, heading towards Scimitar Pass. (by Steph Abegg)

Visit on googleusercontent.com
Norman Clyde Peak in morning alpenglow

Visit on googleusercontent.com
Me doing some class 3 scrambling on the Palisade Crest. (by Steph Abegg)
When we reached Scimitar Pass, a frigid, strong wind blasted us. The skies were clear, but this wind would stay with us all day, and turn into a snowstorm that night.

Visit on googleusercontent.com
Me class 3 scrambling on the Palisade Crest, with Gandalf Peak beyond. (by Steph Abegg)
Fortunately we were on the crest shortly after sunrise, and scrambling through cl. 3 terrain we were soon atop Palisade Crest Peak. This is the long hump north of Gandalf Peak and is not one of the 12 summits, but it is part of the crest, and cannot be avoided on any traverse. From here the terrain got exposed, so we roped up and began simul-climbing. Apart from a couple of sections just south of Gandalf Peak, the route stayed sustained enough that we never unroped for the rest of the climb, although we only stopped to belay a few pitches.

Visit on googleusercontent.com
Steph atop Palisade Crest Peak, with Gandalf Peak beyond.

Visit on googleusercontent.com
Palisade Crest Peak register

Visit on googleusercontent.com
Gandalf Peak

Visit on googleusercontent.com
Steph downclimbing to the notch

Visit on googleusercontent.com
Class 4 slab leading to Gandalf Pk
The cl. 4 slab wasn't too hard, but it sure would be heady to solo - especially on the mandatory downclimb if you are only climbing Gandalf Peak. The climbing was pretty fun and clean.

Visit on googleusercontent.com
Steph following the class 4 slab. Mt Gayley (left) and Temple Crag (right) are in the distance.

Visit on googleusercontent.com
Final scramble up Gandalf Pk

Visit on googleusercontent.com
Looking south along the Palisade Crest from atop Gandalf Peak.
One summit down, 11 to go! The crest doesn't look any shorter from this end than it did from Gimley Peak. A long day awaits!
After summitting Gandalf Peak, which has an active summit register as it is frequented by peakbaggers (maybe a dozen or so each year), we continued south. For the next while the terrain was mostly cl. 2 ledges and some blocky cl. 3 ledges. We were tempted to unrope, but the ridge got difficult again soon enough. This section is the only easy part of the ridge, and perhaps one of the few good places to bivy on it.

Visit on googleusercontent.com
Looking back at Gandalf Peak

Visit on googleusercontent.com
Heading south on the easy part of the ridge.
Up and down, all around. One repeating theme of the climb was that perspective often made the way ahead appear more difficult than it was. Usually we would climb towards an impasse to find that the scale was smaller than we though, or that a knife-edged headwall actually had enough slope to it to make it easy to simul-climb. Although the terrain stayed sustained at cl. 4 to low 5th class, it was good for simul-climbing, and the route was usually obvious, or there would be several fun ones to choose from. We made good time knocking off summit ticks along this section.

Visit on googleusercontent.com
Climbing the next summit

Visit on googleusercontent.com
Climbing another summit

Visit on googleusercontent.com
"Gimli" Peak (according to Jason Lakey)
We were still mostly finding summit registers on every obvious summit, collecting names as we went. Learning the peak names would be like a treasure hunt! Unfortunately, we encountered another Gimley peak, but spelled Gimli. As all of the registers we had found had been put up by one climber, we wondered about his sources, as this name was already bestowed upon the southernmost summit, according to the summit register dating back to the 1970s. I would be really curious to hear if Jason had a source, or if he just decided to name them himself as he placed the registers ... oh well, it was still fun writing down names and looking for registers!

Visit on googleusercontent.com
Steph atop "Gimli Peak", seen from "The Orc"

Visit on googleusercontent.com
Continuing along beyond the Orc.
Visit on googleusercontent.com
Steph atop "The Orc" seen from atop "Strider"

Visit on googleusercontent.com
On the Palisade Crest. (by Steph Abegg)
The terrain was passing by fast. At this rate it seemed like we'd be done and down at a comfortable hour, confirming the Grade III status of the route. However, I was suspicious, since Secor's III, 5.6 w/ rappels rating also said that the FA party spent 2 days climbing the ridge . . .
We enjoyed a nice lunch break on a roomy summit, mercifully providing some wind breaks from the westerly winds that had been increasing throughout the day. Then on we went! from here on out, we saw no more registers, and the terrain got a lot more difficult, and routefinding a lot more convoluted. Our nice pace was about to slow down dramatically.

Visit on googleusercontent.com
Lunch on the Palisade Crest, hiding behind a wind shelter as the western breezes picked up. (by Steph Abegg)

Visit on googleusercontent.com
Notch to Sky Panorama, looking south.
One detail that made the next part difficult was that overall we lost elevation. Picking our way on downclimbs of a knife-edge ridge turned out to be a lot more difficult than seeing a route climbing up one. Often we would have to downclimb towards what appeared to be a dead end, and either a route presented itself, or it was truly a dead end and we would have to traverse around and over to the other side of the crest. Also, from this point on along the crest, the summits each had much more prominent notches separating them, requiring lots of climbing up and down.

Visit on googleusercontent.com
Steph following one of the many downclimbs on the ridge.

Visit on googleusercontent.com
More downclimbing, after a very wide step across.
Along the way we did find a few fresh rappel slings, most likely left behind by the Pullharder Crew. However, in each circumstance, we looked around a bit and found a way to downclimb instead of rappel. This was fun to piece together!
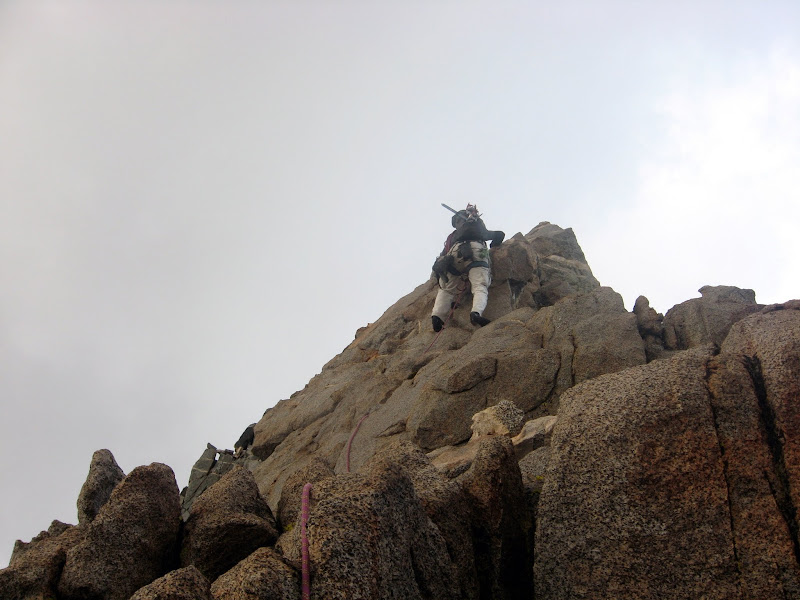
At the route crux, the ridge ends in a sheer step, and I was forced to downclimb about 100 ft or so into some chutes on the east side. As I dropped lower from the crest, the rock quality deteriorated, getting worse as I got lower. Although it looked like I could traverse around the next spire on the east side, the rock was rotten, and the way was so far below the crest that it seemed against the spirit of the traverse. Also, it wasn't clear if it was a dead end or were we could next climb back up to the crest. So I trudged up a cl. 3 scree chute to a notch. The climbing looked stout ascending out of the notch, so I belayed Steph in and she put me on belay.
Visit on googleusercontent.com
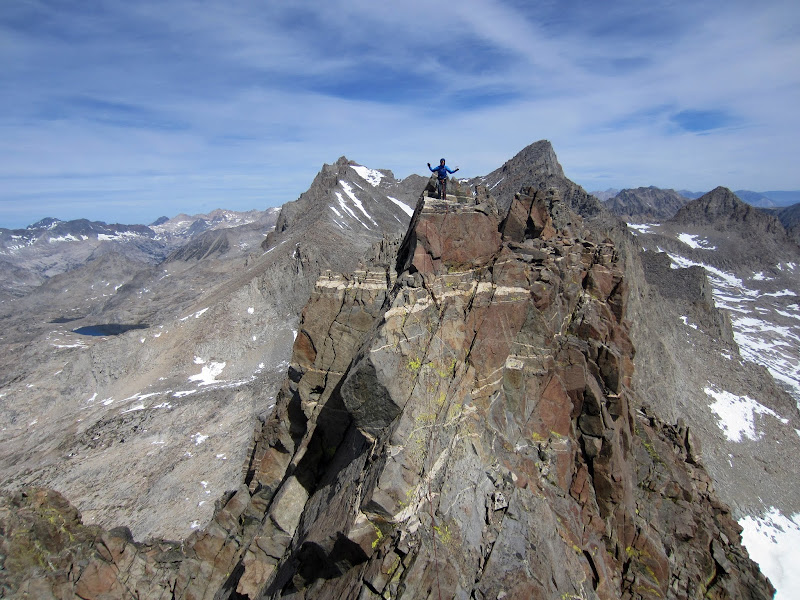
Looking ahead to the next summit as we climbed through the crux section of the Palisade Crest.
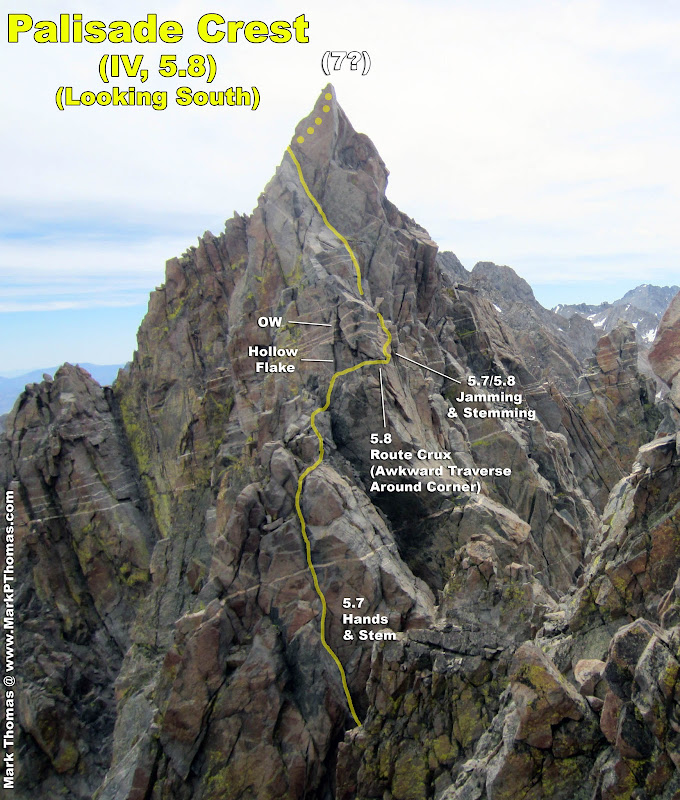
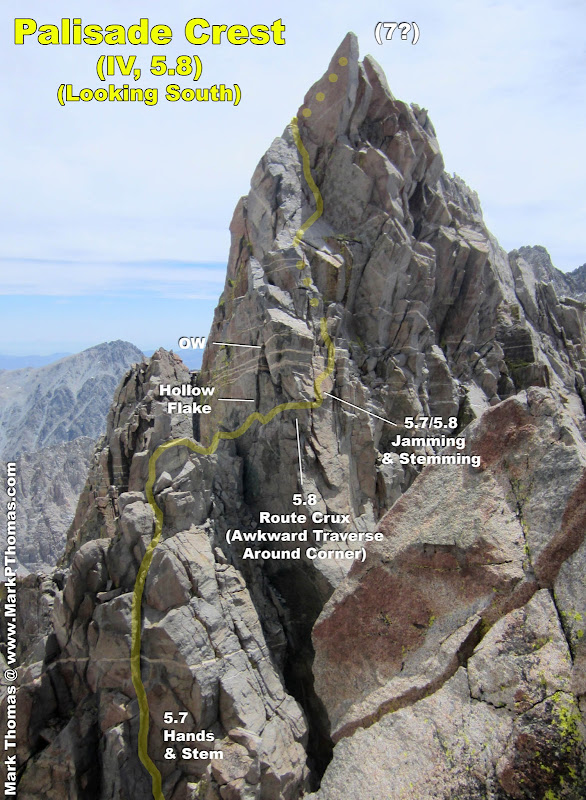
From the notch it was sustained 5.7 crack climbing up to another headwall. The obvious way from there was to climb into an OW, bit it looked tricky. Fortunately there was a crack beside it . . . which turned out to be behind one of the larger and thinner flakes I have encountered. There would be no gear for the stout OW as any gear in the vibrating flake would clearly blow it apart, and a bad ledge fall waited 15 ft below. This didn't seem right.
I saw an exposed midget ledge leading out right to a corner ending in space. Perhaps there was a way around that corner? I awkwardly shuffled and hand-traversed over, but halfway along I encountered a 2'x2' block that seemed precariously perched. It would be difficult to climb past without risking a bad fall (I still had no gear in above the ledge) and I would likely dislodge it in the process. Or the rope might just knock it off after I climbed past. I knew that Steph was in a notch behind the last step, about 80 ft below, and the rock would clearly fall into chutes to the West, so there was no way it would strike her. Still, it seemed pretty large.
I called down to Steph and explained the situation.
"Do you mind if I trundle this block?" I asked.
"Sure! Go ahead!" Steph responded. So without too much effort I peeled the block off of the ledge and it fell free for about half a second before first impact, at which point it ricocheted down the chute, exploding many other chunks of rock and sending up a plume of gritty dust. The mortar impact was a lot larger and more impressive than I had expected! It also first impacted close to Steph's height, but around the corner. Still, she experienced enough of the blowback that she called out:
"OK, that one was OK, but don't send down any more!"
I had used up my trundling allowance for the day.
Visit on googleusercontent.com
Looking ahead to the next summit as we climbed through the crux section of the Palisade Crest.
I made an awkward blind reach around the corner and found a hand crack. I swung around into a wide stem in a stem box that ended as a roof just beneath my feet. From here it was pretty wild stemming and jamming up the exposed slot. Rope drag became a beast, and I barely made it to the top, where I belayed Steph up. From here the climbing got slightly more straightforward again, but this was definitely the crux of the route. It felt about 5.8 and should be less heady now that the loose block is gone.

Visit on googleusercontent.com
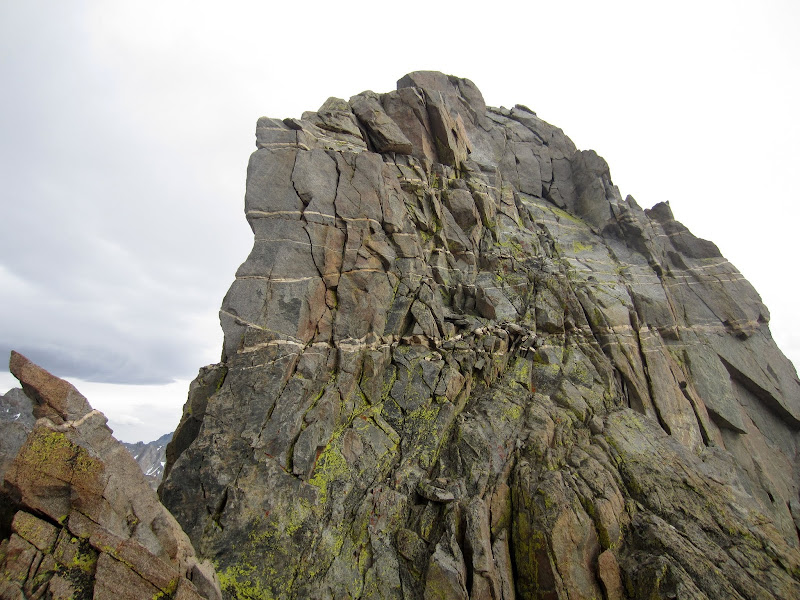
Looking back after the crux section of the Palisade Crest at spires (8?) and (9?).

Visit on googleusercontent.com
Looking up the first spire (7?) after the trickiest crux.

Visit on googleusercontent.com
Continuing south along the ridge.

Visit on googleusercontent.com
Passing yet another spire.

Visit on googleusercontent.com
Downclimbing beyond the rappel slings on spire (5?), looking back at (left to right) spires (8?), (9?), (7?), (6?) and (5?).

Visit on googleusercontent.com
Looking south at spires 4, 3 and 1 (left).

Visit on googleusercontent.com
Unnecessary rappel sling. Routefinding was a tad tricky, but plenty fun and much better than rappelling.

Visit on googleusercontent.com
After the rappel slings, I turned a hard 180 and found this slightly loose gully to downclimb as I wrapped back around to facing south.

Visit on googleusercontent.com
Downclimbing the face on the right. This looks to go somewhere . . .

Visit on googleusercontent.com
Steph downclimbing the face section that bypasses the rappel. Spire (5?). Note how the rope is bowing from the wind!

Visit on googleusercontent.com
Standing atop spire (4.5?) on the narrow Palisade Crest. (by Steph Abegg)
After traversing a summit section threading serrated rock fingers, we found another impasse. I saw good, clean rock leading down into what rolled into a dropoff. Rather than trusting the iffy rapp sling that dropped off onto the steeper, shady East side I downclimbed to the West and found a nice traverse back over to the crest just above the dropoff along some white dike bands. After this there was some more back and forth running pro around various gendarmes. This was getting fun again!

Visit on googleusercontent.com
More spires along the crest. This one looked good to stand on top of! (Spire 4.5?)

Visit on googleusercontent.com
Looking back up at the downclimb after I reached the next big impasse. We actually came from the left side of the tower, headed back to the right side, and downclimbed over there.
We were picking up the pace again, and only had four more summits left. Then we were stopped by the most definitive impasse yet. A large notch, and there was clearly no way to downclimb the crest, or anywhere near it. I saw perhaps some ledges to traverse on lower down, so I downclimbed about 100' on the East side of the crest. This seemed fair, as it only dropped me down as low as the notch we had to climb past anyways. Now to find a way over to it ...

Visit on googleusercontent.com
Looking across the 'Ivory Way' crux notch to spire (4?).

Visit on googleusercontent.com
I traversed back north on a thin ledge on the east side of the crest, and then downclimbed a full 100 ft off of the crest, where I found the perfect passage past the deep, knife-edged notch.
Finding our way to the notch provided the biggest surprise of the day, and one of the funnest discoveries that I have had rock climbing. The terrain was improbably steep and smooth and nowhere close to 5.6 unless one dropped down much farther, but I happened across a delightful smooth white dike that protruded from the cliff face anywhere from 12-24". It was continuous and appeared to traverse over as far as I could see, and appeared to pass just beneath the notch, providing a possible crossing. Near the notch it seemed to recede into the wall, but I couldn't be sure. After that little corner, I could see the dike continuing along on the other side of the notch. Would this way work? Only one way to find out!

Visit on googleusercontent.com
There was this continuous white dike that traversed from spire (4?) to spire (5?), just below the notch. The rock was slick and smooth, with few cracks, but the dike projected a bit, leaving a perfect ledge to shuffle along! We whimsically dubbed this 'The Ivory Way'.
Steph belayed me as I mantled the dike and shuffled for a long ways to the south. There wasn't much gear, but the ledge was wonderfully secure as long as you didn't lose your balance and fall backward.

Visit on googleusercontent.com
Looking back at Steph on the 'Ivory Way'.

Visit on googleusercontent.com
The ledge system tucked back in at one point, so I couldn't tell if we could traverse all the way across. It turned out you barely could, as one of the 3 cruxes of the Palisade Crest traverse.

Visit on googleusercontent.com
Looking back along the 'Ivory Way' crux, which was about a 5.8 stem.
Where the dike appeared to recede into the wall, at a corner, it turned out there was an exposed but reasonable step across. It felt similar in difficult and style to the 5.8 step across on Selaginella, but with far more exposure and on far prettier rock.

Visit on googleusercontent.com
Steph following the 'Ivory Way'. The ledge traverses for more than 100' like this.
The dike was so long that I ran out of rope (115' out) just after the step across, so I belayed Steph over, then traversed along the dike for another 50 ft or so. This was an amazingly long and continuous secret passed through the cliff face! We were so struck by this feature that we decided that it needed to be named. 'Ivory Way' sounded good to us.
[Click to View YouTube Video]
Steph following on 'The Ivory Way'

Visit on googleusercontent.com
Looking back at Steph as I do P2 of the 'Ivory Way'. The thick band of the white dike behind her to the right is what we had traversed over on. We had passed the highest spire in this photo on the left side from this view, and shortly beyond, on the second step on the skyline, downclimbed to the dike in the corner where it tucks back.
At the end of the 'Ivory Way' the rock turned steep and blocky. Big mantles and bouldery moves. Still, mostly easier than it looked, about mid 5th class, if you choose the right line. I had to zig-zag some, and there was an occasional loose rock to mind.

Visit on googleusercontent.com
Cl 4 climbing back up spire (4?), up the arete, and crossing over to the west side.
We did a 180 and climbed back north as we gained elevation, reaching the crest about 50 ft above the big notch. I stayed on the crest a short bit, traversed to the East, then straight up and over the crest to some ramps and corners on the West side.

Visit on googleusercontent.com
Looking back across the crux notch and 'Ivory Way'.
Visit on googleusercontent.com
Nearing the top of spire (4?).

Visit on googleusercontent.com
Strong wind blowing the ropes as Steph follows from spire (4?) to (3?). The wind had been blowing hard and cold since midday and was the front of a snow storm moving into the area.
Now we only had two summits remaining! Still, there was one last uncertainty that I was wary about. The next peak was 'Master Samwise' and as I recalled from when I was atop it with Dirk, it dropped off very steeply on the side we were approaching from, and there were rappel slings at that step. Looking at photos of the peak taken from below, the summit had a prominent corner on the West Side, but it looked steep and the crack in the back looked like an offwidth. I was curious how we would surmount this peak.

Visit on googleusercontent.com
Master Samwise and The Nazgul, seen as we downclimbed from spire (3) into the final notch. This flared corner was the final crux of the traverse.
Another big downclimb into a notch and another big climb out of the notch led me to the corner. Fortunately, it was like many other parts of the route and was easier up close than it appeared from a distance.

Visit on googleusercontent.com
Master Samwise seen as we downclimbed from spire (3) into the final notch. This flared corner was the final crux of the traverse.
The corner ascended a slick corner (maybe due to stepping in the snow at the base?) with nice hand jams, at just shallow enough of an angle to make it easy. The corner flared just enough to require a bit of thrashing, though. It ended at a small roof and required a delicate traverse left around it, the crux of the pitch.

Visit on googleusercontent.com
5.7 to 5.8 corner on Master Samwise. One of the cruxes is traversing left beneath the roof.
Visit on googleusercontent.com
Climbing towards The Nazgul.
At last I was back on familiar terrain! We still had a bit of a ways to go, but at this point all uncertainty was gone and I new the way. I also looked forward to the fun climbing that I knew lay ahead.

Visit on googleusercontent.com
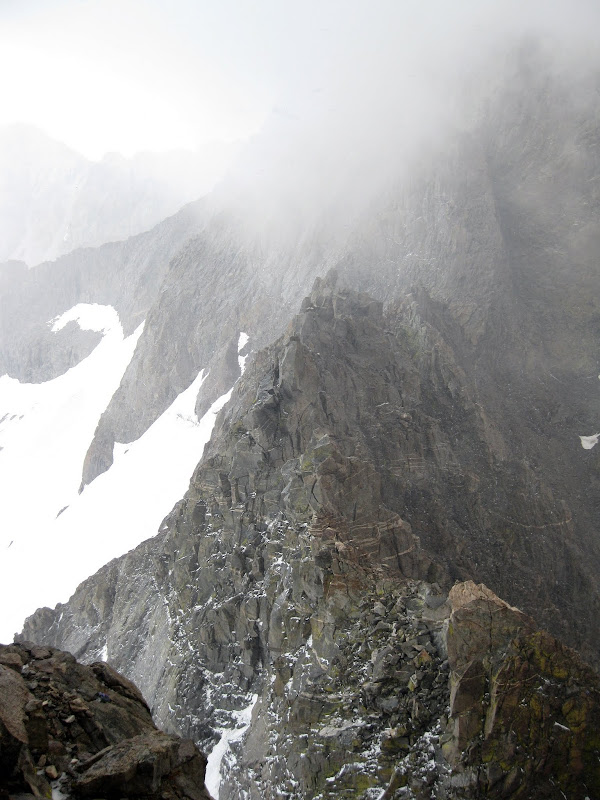
2013-06-20 - The Palisade Crest seen from high on Firebird Ridge on Norman Clyde Peak.
The winds had picked up considerably over the last couple of summits.

Visit on googleusercontent.com
Steph following down 'Master Samwise'.

Visit on googleusercontent.com
Heading towards the 'Nazgul,' the last spire at the end of a long day. (by Steph Abegg)
The drag from the wind and fatigue from the long day really slowed us down. We spent some time struggling with a stuck rope that had become entwined in the blocks as the wind whipped it around and I picked by way through the best line. After some fiddling, we cleaned up our mess and were atop the final summit!
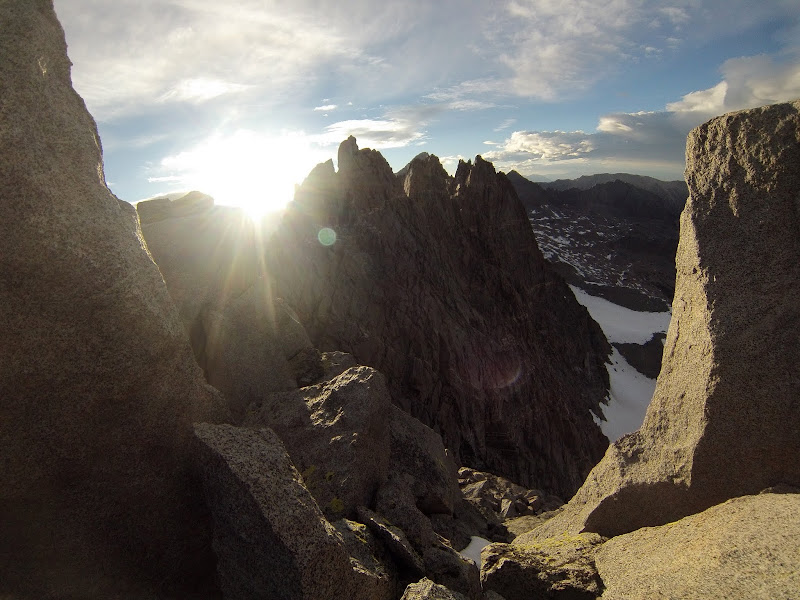
Visit on googleusercontent.com
Sun setting on the Palisade Crest (by Steph Abegg)
(Looks like SuperTopo TR have length limits! :-P Report is continued below.)