| Route Name |
Formation |
Climbing Area |
|
|
Review |
|
|
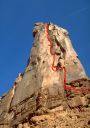
Moses |
Desert Towers, Utah, USA |
8 |
5.11d |
|
|
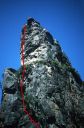
| Regular Route
5.11d of 5.9 A2+, Grapevine Buttress
The route starts a little right then moves to the center of the buttress.
Photo:Corey Rich |
|
Grapevine Buttress |
Grand Canyon, Arizona, USA |
8 |
5.11d of 5.9 A2+ |
|
|
|
Red Arch Mountain |
Zion National Park, Utah, USA |
8 |
III/IV 5.11 |
|
|
|
The Watchman |
Zion National Park, Utah, USA |
8 |
IV 5.11- |
|
|
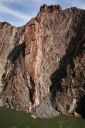
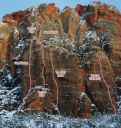
| Mojo Risin
IV 5.11 or 5.10 C1, Johnson Mountain
Photo:Bryan Bird |
|
Johnson Mountain |
Zion National Park, Utah, USA |
8 |
IV 5.11 or 5.10 C1 |
|
|
|
Red Arch Mountain |
Zion National Park, Utah, USA |
8 |
IV 5.11 |
|
|
|
Mt. Spry |
Zion National Park, Utah, USA |
8 |
IV 5.11 |
|
|
| Force Boyle
IV 5.11 A0, Johnson Mountain
Photo:Bryan Bird |
|
Johnson Mountain |
Zion National Park, Utah, USA |
8 |
IV 5.11 A0 |
|
|
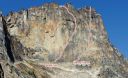
| Kearney-Thomas
III 5.11b or 5.10b C1, Big Kangaroo
Big Kangaroo
Photo:Ian Nicholson |
|
Big Kangaroo |
Washington Pass, Washington, USA |
8 |
III 5.11b or 5.10b C1 |
|
|
|
Liberty Bell |
Washington Pass, Washington, USA |
8 |
III 5.11b/c |
|
|
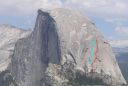
| Blondike
5.11b R, Half Dome
Blondike is the red line and Two Hoofers is the Blue Line.
Photo:Chris McNamara |
|
Half Dome |
Yosemite Valley, California USA |
7 |
5.11b R |
|
|
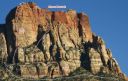
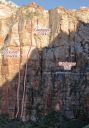
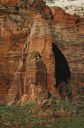
| Wigs in Space
IV 5.11 or 5.9 A1, Red Arch Mountain
Photo:Eric Draper |
|
Red Arch Mountain |
Zion National Park, Utah, USA |
7 |
IV 5.11 or 5.9 A1 |
|
|
|
Gatekeeper Wall |
Zion National Park, Utah, USA |
7 |
IV 5.12a or 5.11+ C1 |
|
|
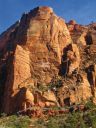
| South by Southwest
5.11a, Lower Cathedral Spire
View from near the base.
Photo:Randy Spurrier |
|
Lower Cathedral Spire |
Yosemite Valley, California USA |
6 |
5.11a |
|
|
|
Minotaur Tower |
Zion National Park, Utah, USA |
6 |
III/IV 5.11- |
|
|
|

