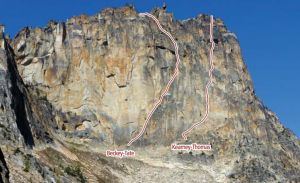
Kearney-Thomas, Big Kangaroo III 5.11b or 5.10b C1 |
||
Washington Pass, Washington, USA | ||
|
Avg time to climb route: 4-7 hours
Approach time: 3-4 hours Descent time: 3-4 hours Number of pitches: 8 Height of route: 900' Overview
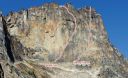
The Kearney-Thomas is a good, albeit slightly burly, climb on one of the sweetest features in the Washington Pass region. The South Face of Big Kangaroo, one of the larger walls in the area, is steep, sunny, and clean. You cant see a road or hear a car while on the wall, which gives it a very remote feel and adds to the alpine flavor.The Kearney-Thomas is a modern adventure climb with many quality pitches. There are only a few loose sections and these are all lower down on the route. One of the warmer walls in the area, this route dries extremely fast after a storm; is one of the earliest rock climbs to come into shape in the spring and one of the last climbable features in the fall. When there is snow sitting on ledges on north faces, you can often still climb on the South Face of Big Kangaroo in a T-shirt. It is similar in warmth to the South Face of South Early Winters Spire. Climber Beta on Kearney-Thomas
Find other routes like
Kearney-Thomas
Route History
The Kearney-Thomas was first climbed by Alan Kearney and Jeff Thomas in August 1984. Kearney had convinced Jeff Thomas and his father Bill Thomas to join him on a two-day trip to the South Face of Big Kangaroo. After a long approach, they reached their camp near the base of the South Face around 4 pm. Bill and Alan were tired, but Jeff was feeling extremely motivated. He pointed out that the long summer days would allow them to do one route that afternoon and a second the following day. Bill agreed to climb the next day but stayed in camp that afternoon. He said that they better not have an epic and get caught out or lost in the dark. Jeff wanted to try the obvious corner system on right-hand side of the face, and the promising looking cracks above. Without further discussion, Kearney and Jeff set off, going extremely light, with no extra clothing, food or even a headlamp, intending to climb fast enough to make it back before dark. Alan did sneak a lighter and some bug spray into his pocket, items he considered essential for survival.The pair quickly scrambled up the low 5th class terrain to where the wall turned steeper and they worked their way into the corner they had eyed from below. The corner wasnt a hand crack or finger crack as they had hoped, but a full body chimney shrinking to fists near the top. Kearney made quick work of this challenging pitch, especially impressive given how far he had to run it out between placements as they had few larger pieces in their rack. Jeff took the next lead, up around the corner and up a crack to a large belay ledge. Kearney led the next pitch which involved stemming up a flaring slot, while Jeff tossed down boulders, hoping to make the route safer for the next party. Jeff s next pitch was a difficult .75-1 crack in the back of a left- facing corner, too big for fingers and too small for hands. Aware of the hour of the day, he free climbed most of this pitch but pulled on gear to save time. Kearney freed this pitch on top rope, climbing as quickly as he could in the now fading light. After another pitch, the pair was confronted with a small roof which Jeff quickly aided around the left side. The pair climbed the final, moderate pitch in the dark. The two struggled down the talus field in the dark, trying to find their way back to the col, so they could descend into camp. At 11 pm, Kearney and Jeff walked into camp and awoke Jeff s father. Kearney had had doubts about their climb throughout the afternoon, but the experience gave him valuable skills that he would go on to use in default first ascents in remote ranges around the world. Other History This route was free climbed on June 30, 2007 by Eric Wehrly and Ross Peritore on their second attempt. It is possible there was a previous first free ascent. Strategy
If the south face of Big Kangaroo faced the highway, it would no doubt be as popular as other similarly sized walls in the area, such as the south face of South Early Winters Spire or the east face of Lexington. As it is, crowds are unlikely even on a busy weekend.The Kearney-Thomas is a modern classic and a great route for solid 5.10 climbers to push themselves into the 5.11 realm. The 5.11 cruxes are well-protected and you can easily pull through the hardest sections on gear. There are some small runouts on 5.10a and easier terrain so climbers attempting this route should be solid at the grade. The route has a mellow Pitch 1 with lots of scrambling and low 5th class climbing up a ramp. There are a few loose blocks stacked on this ramp. Pitch 2 gains the corner. There are also has few loose blocks wedged in the chimney, so position your belay accordingly. From the ground Pitch 3 looks like an amazing hand crack in a corner, so the full body chimney that starts the pitch can be a surprise. There are a handful of placements that keep this pitch from being runout, but it is slightly spicy and should only be led by climbers solid at 5.10a chimneys. The chimney shrinks into a fist crack higher up in the corner, where a fun and physical exit out the right side brings you to a nice, large belay ledge. Pitch 4 is unobvious at first. It starts deep inside a small chasm, and despite this section being a full body chimney, there is good pro in the back. Once you exit the chimney, there is some slightly runout face climbing, but it gets easier as you climb higher. Pitch 5 was one of the original aid pitches, and is now one of the highlights of the route. The crux consists of well- protected steep 5.11a/b jamming up a .75- 1 corner. The crux sections are relatively short and the pitch offers a few good rests in between the harder sections, making this is a great place for 5.10 leaders to push themselves at the 5.11a/b grade. Pitch 6 is short and powerful. This was the second aid pitch on the first ascent. A good strategy is to place a 3 cam as high as you can, have another 1-3 piece at the ready and punch it. Hanging around to place gear is the main reason climbers fall off this pitch. You can pull through all the hardest moves on gear. This pitch is steep and well-protected, making it another great place for 5.10 climbers to push themselves at the 5.11 grade. Above this section, another pitch and some 3rd class take you to the col that divides the south face from the true summit of Big Kangaroo. While you can climb directly to the summit from here, it is NOT recommended. The rock on this side is extremely loose and the protection poor. Instead, drop 200 feet down a scree-filled gully (snow in early season) and then climb up the normal West Face finish on mostly 4th and low 5th with a final, slightly spooky 5.6+ slab. One of the biggest questions of this route is whether or not to leave gear at the base. You certainly need to carry your approach shoes over. It is a long way to the base with a lot of loose, cross country travel back up and over the pass. Sometime climbers will rack up at the broad central pass, leave their pack, trekking poles and any unnecessary equipment there, hike to the base and send. The return to this col is about 15 to 30 minutes and the descent relatively pleasant from there. The third and most convenient option is to just go super light to the base of the South Face and carry all of your gear up and over the route. This means climbing challenging terrain and a few chimneys with a bigger pack, but it saves you a lot of time and hassle at the end of the day. Sometimes climbers camp below the South Face. There is rarely running water, but you can find snow in shady areas for most of the summer. Camping allows for a short start in the morning, but means youll have to return to camp at the end of the climb and hike back up and over the central pass on Kangaroo Ridge. Retreat Storm
There are no fixed anchors on this route. You could rappel this route off trees and horns but you would likely be forced to leave gear. Having two ropes means leaving less gear. There is a fair bit of loose rock, both on the route and on ledges, and rapping down this face would be a scary and hazardous undertaking. The bottom three pitches traverse a lot, but it would be feasible to reverse this section.
Everything You Need to Know About
Washington Pass
Search the internet for beta on
Kearney-Thomas
|
 Big Kangaroo Photo: Ian Nicholson
Other Routes on Big Kangaroo
|