| Route Name |
Formation |
|
|
Review |
|
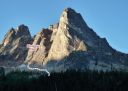
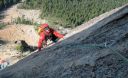
| Early Winter Couloir
III AI2-3 and M4+, North Early Winters Spire
Early Winters Couloir from the east
Photo:Steph Abegg |
|
North Early Winters Spire |
6 |
III AI2-3 and M4+ |
|
|
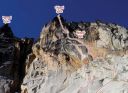
| Chockstone Route
II+ 5.7, North Early Winters Spire
North Early Winter Spire - Blue Bradley follows Pitch 6 of the Chockstone Route
Photo:Larry Goldie |
|
North Early Winters Spire |
6 |
II+ 5.7 |
|
|
| Labor Pains
III 5.11a, North Early Winters Spire
North Early Winter Spire
Photo:Ian Nicholson |
|
North Early Winters Spire |
6 |
III 5.11a |
|
|
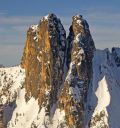
| East Face
III 5.10b, Minuteman Tower
Minuteman Tower East Face
Photo:Mark Allen |
|
Minuteman Tower |
6 |
III 5.10b |
|
|
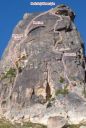
| Rebel Yell
III 5.10b, Chianti Spire
Chianti Spire Rebel Yell
Photo:Ian Nicholson |
|
Chianti Spire |
7 |
III 5.10b |
|
|
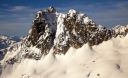
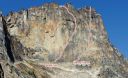
| Cauthorn-Wilson
III WI4, Cutthroat Peak
The East face of Cutthroat peak with the obvious Cauthorn-Wilson in the center of the face.
Photo:Ian Nicholson |
|
Cutthroat Peak |
7 |
III WI4 |
|
|
|
Liberty Bell |
7 |
II+ 5.9 |
|
|
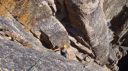
| South Face
III 5.8, Kangaroo Temple
Ian Nicholson leading Pitch 1 on the South Face of Kangaroo Temple.
Photo:Rebecca Schroeder |
|
Kangaroo Temple |
7 |
III 5.8 |
|
|
| Remsberg Variation
II+ 5.10d, Liberty Bell
Dale Remsberg nearly 20 years after making the first ascent. Now Technical Director of the AMGA.
Photo:Ian Nicholson |
|
Liberty Bell |
7 |
II+ 5.10d |
|
|
|
Big Kangaroo |
7 |
II 5.6 R |
|
|
| Beckey-Tate
III 5.9, Big Kangaroo
Big Kangaroo
Photo:Ian Nicholson |
|
Big Kangaroo |
7 |
III 5.9 |
|
|
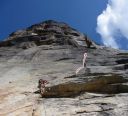
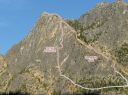
| Spontaneity Arête
III 5.7, Le Petit Cheval
The North face of Le Petit Cheval as seen from the road.
Photo:Ian Nicholson |
|
Le Petit Cheval |
8 |
III 5.7 |
|
|
| Kearney-Thomas
III 5.11b or 5.10b C1, Big Kangaroo
Big Kangaroo
Photo:Ian Nicholson |
|
Big Kangaroo |
8 |
III 5.11b or 5.10b C1 |
|
|
|
Liberty Bell |
8 |
III 5.11b/c |
|
|
| Tooth and Claw
IV 5.12a, Lexington Tower
Lexington Tower when viewed from the East
Photo:Ian Nicholson |
|
Lexington Tower |
8 |
IV 5.12a |
|
|
|


