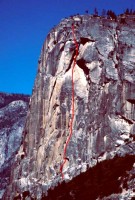
Moof
Big Wall climber
Orygun
|
 |
P3 anchor now has 2 good bolts and still one ~5/16 POS. I didn't do it, but it was nice to have when we bivied there.
P5 goes clean using a crappy 0.1 X4 in the funky scar, and 3 solid hand placed beaks in the thin section (medium and large peckers or Tomahawks) to attain the high quality corner crack to C1 Alien happiness. P12 is the only other place a hammer might be needed if some of the fixed pins are missing (if doing the Planck's Constant roof variation).
The alcove above the hateful flare on P7 has been excavated by someone. They went to town with a crowbar, as there was a bunch of stuff beyond the loose block taken out. They did all but sweep it off when they were done, kind of sad.
Bypassing the P7 hateful flare by staying in the main crack takes lots of #0.75-#2 camalots (on top of the many needed just to get up that far), plenty of leap frogging necessary. It is vastly preferred over the hateful flare. Also takes one each up to a 4.5" cam, plus another above the alcove, very little mandatory free to get into the alcove itself. The narrow corner above the alcove is awkward, send up whoever has the skinniest shoulders.
The end of P12 has gotten a bit spicier. The rotting horizontal slot at the very end is getting more flared. The more you sweep out the loose grit, the more loose grit you knock loose, takes pretty much one each of #0.75-#3 camalots for the last stretch. At the exit to the bolts there is a low down pocket that looks like someone blew out and is now useless. I pulled a free move off a piece before that and had to yard on a pathetic plant to attain the bolts.
The two dead trees at the very top are getting pretty old and weak. Don't haul anything heavy off of them. I fixed the line at the top of the 4th class section to a decent bush with a sling, and two 4.5" cams between blocks right above the exit of the actual moves. Otherwise just take a handful of long slings to girth hitch the small trees along the sandy ledge up to the chimney.
If taking the Planck's roof variation no hooks or heads are needed. For nuts just minimal brass, few medium to large stopper, a few medium to large offset nuts, and just a single set of offset aliens are needed (take extra standard micro cams in preference to extra offsets). We took ballnuts but never used them. Just one 3/32 rivet hanger is needed. Tricams are not helpful unless you have a fetish. 5 each #0.75-#3 camalots is appropriate, and still requires rationing and leapfrogging on pitches like P6, P7, and P9+10. P11 requires careful rationing of #0.75 and #1, use any opportunity to use something else since you can't really back clean.
|
james Colborn
Trad climber
Truckee, Ca
|
|
Just did the route 6/9/12, loose block on P. 7 ready to go. Don't go near that thing. Nearly shat myself when it shifted and I fell on to it. The thing should be trundled. It is a death trap. More on this later.
|
Chris McNamara
SuperTopo staff member

|
|
A little First Ascentionist quote
"Mike Corbett. That was a wonderful experience. we did it in april. The weather fine for the most part. We were so happy to find all these crack systems that haven't been done. It sure looked like a good free climber could free this. Pretty cool roofs.
We got snowed on towards the end and sit it out through the storm. Not an epic -- just waiting for a day or two for the snow to pass. no epicening at all. just a good route. We bibivied under those roofs. we were happy in our hammocks. it was okay though. We had a good time. " -- Steve Bosque
|
clustiere
Trad climber
berkeley ca
|
|
Thanks for the upgrade, your efforts are appreciated and comended!!! Perhaps it would have been good to pull the 1/4 inch bolt so as to reduce the schwank up there. Beware the Internet over projections and assumptions it can cause undue sh#t flinging..
|
Pass the Chongo, Chongo
Social climber
IN CAVE IN YOSEMITE NATIONAL PARK
|
|
Moof-
Yes certainly sometimes anchors need proper upgrades. Truth be told though you ADDED another bolt to the route for your conveniece with out chopping and patching the poor rivet or what ever. This is obviously poor form and why belays on the Zodiac used have up to 15 bolts. When I did this route years ago all of the belays had bomber gear to back anything up so half the time I recall some of the bolted anchors being pointless. I assume you might be the same one on bigwalls.com badmouthing Eric Sloan for adding bolts when you your self are guilty of the same crime. You seem like you may be a little bolt happy, so maybe next time leave the bolt kit at home and youll still send with less weight. Learn how to do gear anchors on big walls, if you step it up a notch alot of bigwall routes have belays with no bolts. Sadly though the trend of simply adding bolts to belays because you didnt like how it looked has caught on. Eric Kohl would call you a pussy. And that guy knows how to climb Yosemite walls. You obviously had the balls for a clean ascent wich I certainly applaud you for.
|
Moof
Big Wall climber
Orygun
|
|
PTCC,
The bolt I added was well needed route maintenance to the 11th pitch anchor. The anchor consisted of a small button head and a ~3/8" rawl spike or similar (and is goobered in glue for some reason?). Compared to the upgraded bolts at most of the other belays (and lead bolts), it seemed clear that this belay needed a little TLC. I've heard no complaints about this bolt from the community in the year and a half since I added it. I went up the first time expecting to need to perform an upgrade base on Mike's Beta, and when I arrived I was whole heartedly convinced that the anchor was due for the upgrade.
The original P3 anchor is a similar story, a 3/8" rawl spike and a small button head. It is also begging for an upgrade. Since I've take the Planck's Constant variation both times I've climbed the route, it doesn't have me stopping there. Perhaps those doing the route the conventional way might be motivated to upgrade it (or do y'all link up to the tree belay?).
|
Pass the Chongo, Chongo
Social climber
IN CAVE IN YOSEMITE NATIONAL PARK
|
|
Moof-
Why would you climb a route twice in a row and proceed to brag about adding a bolt to the route? What gives?
|
Moof
Big Wall climber
Orygun
|
|
Another update from doing another lap this last week:
Clean: We did the route hammerless via the Planck's Constant variation and the Pitch 7 variation (keep reading), clipping 12 lead bolts/rivets (counting a couple interim anchors we clipped on Planck's variation), and 12 pins total for the whole route. Most of the pins could easily be done with C1 cams/nuts if the pins were gone, but we used them as lower out points a few times to better conserve gear. Only a couple pins looked key, mainly one 5/8" angle on P12. The aid crux was P5, requiring a bad blue alien or #3 ball nut, a #3 camalot in iffy rock, a hand placed medium pecker, a #1 ball nut, and finally back to bomber aliens.
Pitch 7: AKA the awful flare. Based on my last awful experience I wanted to try out the continuation of the crack as seen in distant pictures. My buddy Stew-Beef took the lead, and had a fine time. It took mainly #0.75-3 camalots, with a 4.5" piece as well (#5 Wild Country was fine, perhaps a #5 C4 would be better). The crack does have a bit of loose crystals on the surface, and is best finished with a few easy free moves. 5.6/C1+ is probably a fair rating. Doing the variation actually felt more in keeping with the style of the route (endless cam cracks), and actually felt less like a variation than taking the flare does.
|
Moof
Big Wall climber
Orygun
|
|
Just got down from this beast, and to add to Mike's beta:
P11 anchor now has a real bolt added to the mix (was a 3/8" rawl spike and a 5/16" button head, I added a 3/8x2.75" SS wedge bolt). Adding one more bolt far out right would really make this belay sweet.
We finished using the original finish for P13. It is a bit mossy and such, but was pretty non-scary compared to Mike's description of the Astroman finish. From the P12 anchor follow up right till the crack turns into a bulge/runnel (takes green aliens to #4, plus a handful of stoppers, and a black alien). My shoes were half duck tape so I did not try to get over the bulge. I instead traversed left on a black alien to an obvious flake, and kept going up and left to attain a ledge. From the ledge it was easy (except for rope drag...) to scamper back right to a large tree with a good stance to begin the semi-epic hauling. A final 4th class scramble (take no gear, wear the haul line on your back so it can be lowered down) gets you to the bivy pad and 2 trees to haul from. Bags will need active assistance on the haul, ugh. Clear the lip of loose blocks before you begin hauling, as the bags traverse in by 50' and will scrap stuff loose onto your partner who is minding the bags.
The route mostly gets morning sun, but is in its own shade by noon'ish on most pitches.
We counted only ~10 lead bolts and a rivet that we clipped. The rivet took a 3/32" wire snuggly.
We used no hooks, though we did not do pitches 2 and 3 (we did the Planck's roof variation), so you may need hooks on those. Cam hooks didn't look helpful, as the places you would want to use them you can't without screwing the second.
P7 is heinous. Worst most awkward aid inside the flare you can imagine. Mike's annotated topo said "Terrible Aid", which was a massive understatement. Consider NOT going into the flare and instead staying in the crack out left (#1-#3 sized). It will meet up at the same halfway ledge as the flare does (and will bypass all hammering on the pitch). From the descent I could see this crack looks uniform and continuous, and it looked fine from both the top and bottom, so I don't know why the route didn't follow it in the first place? Beware that there are large detached pillars on the ledge that would be very easy to accidentally kick loose.
Rock quality is mostly excellent, except for the C2+ section of P5, the start of P9, and a short bit on P12.
1 each medium/large peckers are damn critical, especially on P5, also useful on P7. No need for them elsewhere I think (maybe useful on P12?)
P8 main anchors are great, but the bivy bolts are so-so, a 3/8" rawl spike and a button head. Consider upgrading it if you are planning on a bivy there.
Out of 11 pitches we did (linking 9+10, and using Planck's to skip 2+3) we counted 7 pitches that we thought were at least damn steep. Planck's roof, P5, P6, P7, P9/10, P11, and P12 all ranged from overhung to upside down dangle style aiding. Only P1, P8, and P13 counted as slab. P4 was merely vertical'ish.
The end of P5 has a loose head sized block just sitting on a shelf right before the end, beware. I was about to use it to free the last move to the bolt, but it came loose in my hands.
My recommended rack:
1 set medium offsets (large brass ones up to #10)
1 set stoppers #3-13
1 minimalist set of brass (used very little)
1x black alien
3x aliens blue-yellow
4x red aliens
4x #0.75 BD
5x #1-#3 BD
2x #4 BD (we had a #4 friend and #4 C4 and were cush)
2x #5 BD (we had a #5 friend and a #5 C4 and were cush)
For Planck's roof add a 3rd #5 and 2x #6 at a minimum
1x #3 (gold) ball nut, useful for the first piece in the P6 flair, and on P12.
Iron:
5-6 LA's is perfect, I only used them on P7
2x 1/2" and 5/8" angles is plenty, we placed none, but the few fixed ones looked semi-critical (P9 and P12 mainly)
other:
25 draws would be about right
TR: http://www.supertopo.com/climbing/thread.html?topic_id=870745
|
clustiere
Trad climber
berkeley ca
|
|
Wow any ascents this fall?
|
Moof
Big Wall climber
Orygun
|
|
Just to add to Nanook's beta on Planck's roof:
There is a bolted anchor not shown on the topo. It's on the sloped ledge below the roof, maybe 40-50' right of the tree, and 40' left of the fixed pins that are shown on the topo. If you belay from the ground for P1 you can't make these, but if you belay from the tree 60' up P1 as shown in the supertopo (easy 3rd class to tree), they are in easy reach. Doing so will allow you to do the roof and still get to P4 anchors in 3 total pitches from the ground.
From these bolts you can easily scamper up the ramp with minimal pro (one 0.75 camalot or so) to the fixed pins. From those scamper over a small crack for a good nut and/or green alien (about 5' along the right face of the dihedral under the roof). Downclimb/tension easily down to the crack leading to Planck's Constant roof. This crack uses 1 each from red alien up to #5 camalot (skipping a couple sizes depending on your reach). C1 bomber placements the whole way, so backclean a few to ease cleaning and reduce rope drag. Don't bother stopping at the bolts, clip one, hang your red aliens and smaller on the other to lighten the load, and backclean the big cam at your feet. The roof take 0.75 and bigger, mostly bigger. Once you are into the roof you'll only need 1x #3, 1x #3.5, 1-2x #4, 1-2 #4.5, 2-4 #5's, and two draws. I think I used a #1 or #2 at the very start to traverse the large block.
For the roof I aided under the block at the start, going over it looks doable too, not the crux. Bring as many #4.5 and #5 camalots sized pieces as you can beg, borrow, and hump up. I got by with a #4, #5 tech friend (~#4.5), a #5, a #6 tech friend (~#5), and a #3 big bro. That is extremely minimal rations, and required several out and backs to figure out ways to not need the piece I was on, or had left as pro to proceed. Use your reach and get the most out of every piece. Clip the heavy mothers into you daisy so you can dyno aid them further out with confidence (fun for the cleaner). You'll need a #4.5 and two #5's near the end of the roof, so keep back cleaning them. You can leave the last #4.5 right before the first bolt, it's all #5's from there. Particularly after the second bolt you'll need the two #5's to get the last 8' up to the anchor, or it's 10+ OW free climbing at best. Zip the two #5's back to your partner once you get to the anchor so they can use them to clean the darn thing. Belay here, about 160'.
There is a flake in the middle of the roof. DO NOT PUT GEAR ON THE FRONT OF THE FLAKE! It groans, it moves, it is f*#king scary. It will try and steal your #1 camlot as punishment. Blindly reach behind it to the left and place a #3 up high. It didn't groan or moan or move for me, and basically shoves the flake up against the roof block. The #3 nice and mid-range Probably a good idea not to fall on it, but leave it to help the cleaner.
For the next pitch I went under the small roof directly overhead and out left. It looks plenty doable to go straight up the crack on the right and then traverse back into the route along the top of the block (not on topo), but it will be longer and harder to clean, but no grass or gardening. The C2 on the topo felt easy, but lots of gardening to get the C1 aliens and offset nuts up the grassy ramp/crack/trough to the P3 anchor. The P3 anchor does indeed have one good 3/8" and one 1/4" in a water streak, but there is no reason to stop here if you are doing the variation, the P4 anchors are easily reached in a 140' total pitch length.
The loose scary block with the 5.7 move at the start of P4 can be minimized. Trying to aid it with a #3.5 high up made it creeeak and move, screw that. Place a #2 at anchor level where the leverage is much reduced and lean WAY left to get a good alien in a different, more solid block. Back clean the #2 so you don't fall on it and pull the block loose. There are good C1 and C2 placements up the left side to avoid the free climbing on the loose scary block. The remainder of P4 takes all kinds of gear from black alien to #4.5 (1 each on #2 and larger is plenty).
Supertopo is a little misleading as to the length to the ground from P4. It's less than 380' listed, but the intermediate anchor is a red herring. It is just under 100' to the Planck's Constant belay, about 110' to the intermediate anchor they call out. From Planck's it is 230' to the ground, from the intermediate it is probably about 215'. However from P4 to the sloped ledge anchor is 185-190'. Once you are at the Planck's or intermediate anchor level you can clearly see your ropes piled on the ledge next to the bolts for additional confidence before committing. From the sloped ledge to the ground is another ~130-140'. Or just tie your ropes together than do one massive rap/jug/haul.
|
alik
Big Wall climber
edmonton
|
|
Dan:
who cares what the book says. Judge how long it will take you by you and your partner's experience and speed, not by one persons opinion on what an "average time" might be. If you haven't done a lot of walls I'd say three days after fixing to four, so four days total. If you haven't done any other walls then go and do the prow, or south face, unless your partner has a couple walls under his belt. This route would be a bit much for a pair of complete newbs. By the way, the pitch 10 belay makes a killer (hanging) bivy--right in the middle of all those huge roofs.
|
DanRabinowitz
Trad climber
Los Angeles, CA
|
|
Im a little confused about whether to budget 3 days or 4 days for this route.
The SuperTopo suggests climbing the first four pitches and fixing ropes to the ground on day one. So it would make sense to sleep on the ground. Then it says most parties spend 2 nights on the wall. I interpret 2 nights on the wall to mean 3 days of climbing in addition to the first day climbing the first four pitches. So that means I should plan on 4 day to climb the route.
But the website says that the average time to climb the route is 3 days.
Any advice?
-dan
|
Erik Sloan
Big Wall climber
Yosemite Big Wall
|
|
Alik's comments are right on. Very quality route with just a few short nailing sections.
I aided the freeclimbing variation to avoid the very wet second pitch, which was C2 with very wild easy-aiding in the Planks Constant roof--though you do have to bring three 7-9" pieces to climb that way(if you fix to 4 you could take them back to your car, and enjoy not being soaked:)
There is a good nook for one on the ledge. We slept two there but did use the ropes and empty haulbag to make flatter quarters.
Rather than nail up a belay at 9, consider just linking it with 10 via fifty wildly overhanging ft of straight in C1.
|
alik
Big Wall climber
edmonton
|
|
The first three pitches definitely suck compared to the rest of the route. The second pitch was still running water in July. The rest of the route is really good though. All the belays are bomber, and there is very little fixed gear. A much different experience than climbing the column trade routes. The nailing and loose section are more serious than anything on Prow. This is a climb that would be pretty hard to do completely clean, bring a few blades and arrows. Crux is the 7th pitch, watch out for a teetering spike sitting on the ledge right after the "A2 arrows" section. If you trundle it you will most likely take out your belayer. The ninth pitch has some spicy sandy climbing at the start, and some 1/2" and 5/8" angles were useful at the belay (natural belay). The remainder of the route is just killer, easy, steep climbing. The 11th overhangs at least 60'!
Some other thoughts:
-the bivy ledge (pitch 7) is really big, but pretty blocky and uneven. Wouldn't be very comfortable to sleep on. It's adequate, but if you've got a ledge, bring it.
-The only cam sizes where you'd want more than 3 each are camalots 1 and 2 (4-5 each with plenty of backcleaning). 3 #3's, 2 #3.5's, and 1 #4 will be plenty in the bigger sizes.
|
mswan
Big Wall climber
Santa Barbara
|
|
Just did the first three pitches of this route last weekend before it rained and the valley was flooded. It was really wet,muddy and grassy. I'd recommend bringing a three-pronged gardening tool and some goggles, the sh#t was thick. The anchor at the top of pitch 3 was a little meager. The anchor lies in the middle of a giant water streak so the only good bolt a 3/8 is showing some signs of rust. The only other points of protection are a 1/4 incher and a 2 inch crack which is behind a 15 foot tall detached flake with a horizontal fracture at the bottom. Definately don't mistake this as an easy layback for the next pitch. It looked like the upper pitches got a little better and drier so maybve worth doing them later in the season.
|
|
|
*What is "Route Beta"?
It's climber slang for information or tips on a route as in, "what's
the beta on that route?" As a service to fellow climbers we ask SuperTopo
guidebook users to post tips and updates to this website if they have relevant
information to share after a climb.
| | | | | | | | | | | | | | | |