| Route Name |
Formation |
Climbing Area |
|
|
Review  |
|
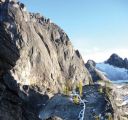
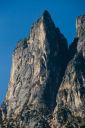
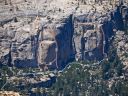
| Liberty Traverse
V 5.8-5.11a, South Early Winters Spire
Less traveled section between Lexington and N.E.W.S. Rappel at far end of ledge in middle of photo.
Photo:Ian Nicholson |
|
South Early Winters Spire |
Washington Pass, Washington, USA |
24 |
V 5.8-5.11a |
|
|
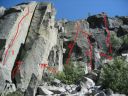
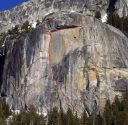
| Space Walk
5.11c, Eagle Lake Cliff
Space Walk is route number 1.
Photo:Chris McNamara |
|
Eagle Lake Cliff |
Lake Tahoe, California, USA |
1 |
5.11c |
|
|
|
Harlequin Dome |
Tuolumne Meadows, California USA |
3 |
5.11b |
|
|
| The Hitchhiker
IV 5.11b or 5.10d C1, South Early Winters Spire
South Early Winter Spire
Photo:Ian Nicholson |
|
South Early Winters Spire |
Washington Pass, Washington, USA |
9 |
IV 5.11b or 5.10d C1 |
|
|
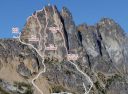
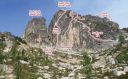
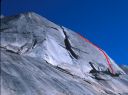
| Direct East Buttress
IV 5.11a or 5.10a C0, South Early Winters Spire
The soaring East Butress of South Early Winters Spire
Photo:Andrew Burr |
|
South Early Winters Spire |
Washington Pass, Washington, USA |
10 |
IV 5.11a or 5.10a C0 |
|
|
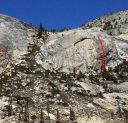
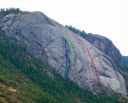
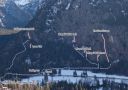
| High Times AKA Silk Road
5.11b, Calaveras Dome
Calaveras Dome. Wall of the Worlds (red), Sands of Time (green), High Times (blue).
Photo:Chris McNamara |
|
Calaveras Dome |
Calaveras Dome, California, USA |
10 |
5.11b |
|
|
| West Face
III 5.11a or 5.10a C1, North Early Winters Spire
North Early Winter Spire
Photo:Ian Nicholson |
|
North Early Winters Spire |
Washington Pass, Washington, USA |
6 |
III 5.11a or 5.10a C1 |
|
|
| Northwest Face
III 5.11a, South Early Winters Spire
The Northwest Face of South Early Winters Spire
Photo:Ian Nicholson |
|
South Early Winters Spire |
Washington Pass, Washington, USA |
10 |
III 5.11a |
|
|
| John Lee Hooker
5.11b or 5.10b A0, Phobos-Deimos Cliff
John Lee Hooker is route D
Photo:Greg Barnes |
|
Phobos-Deimos Cliff |
Tuolumne Meadows, California USA |
3 |
5.11b or 5.10b A0 |
|
|
|
Chapel Wall |
Yosemite Valley, California USA |
5 |
5.11c |
|
|
| Anatolio (P1)
5.11b, Drug Dome, Base
OZ continues up and left to the summit while the Gram Traverse follows the roof out right.
Photo:Chris McNamara |
|
Drug Dome, Base |
Tuolumne Meadows, California USA |
1 |
5.11b |
|
|
| Dope Show
5.11b, Drug Dome, Base
OZ continues up and left to the summit while the Gram Traverse follows the roof out right.
Photo:Chris McNamara |
|
Drug Dome, Base |
Tuolumne Meadows, California USA |
1 |
5.11b |
|
|
| Cross Reference
5.11a R, Stately Pleasure Dome
This line ascends splitter cracks to face moves.
Photo:Greg Barnes |
|
Stately Pleasure Dome |
Tuolumne Meadows, California USA |
1 |
5.11a R |
|
|
| Push It
5.11a, Drug Dome, Base
OZ continues up and left to the summit while the Gram Traverse follows the roof out right.
Photo:Chris McNamara |
|
Drug Dome, Base |
Tuolumne Meadows, California USA |
1 |
5.11a |
|
|
| Just Say No (P1)
5.11a R, Drug Dome, Base
OZ continues up and left to the summit while the Gram Traverse follows the roof out right.
Photo:Chris McNamara |
|
Drug Dome, Base |
Tuolumne Meadows, California USA |
1 |
5.11a R |
|
|
|