| Route Name |
Formation |
Climbing Area |
|
|
Review  |
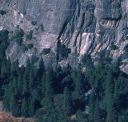
| Velvet Gloves |
Wrights Lake, Black Beauty Wall |
Lake Tahoe, California, USA |
1 |
5.10b |
|
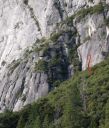
| The Gamoke |
Lover's Leap, West Wall |
Lake Tahoe, California, USA |
1 |
5.10b |
|
| Magnum Force |
Lover's Leap, West Wall |
Lake Tahoe, California, USA |
1 |
5.10b |
|
| Enemy Within |
Olmsted Canyon |
Tuolumne Meadows, California USA |
1 |
5.10b |
|
|
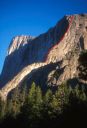
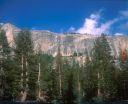
| East Buttress
5.10b, El Capitan
East Buttress with top of The Nose on left.
Photo:Mark Kroese |
|
El Capitan |
Yosemite Valley, California USA |
11 |
5.10b |
|
|
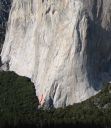
| Ahab
5.10b, El Capitan
Photo:Chris McNamara |
|
El Capitan |
Yosemite Valley, California USA |
1 |
5.10b |
|
|
|
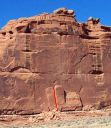
Great Wall |
Desert Towers, Utah, USA |
1 |
5.10b |
|
|
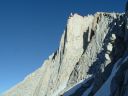
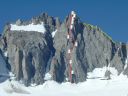
| North Buttress
5.10b/c, Merriam Peak
The prominent North Buttress of Merriam Peak
Photo:Ryan Crochiere |
|
Merriam Peak |
High Sierra, California USA |
10 |
5.10b/c |
|
|
| Church Bowl Tree
5.10b, Church Bowl
Church Bowl has on of the easiest approaches in the valley.
Photo:Chris McNamara |
|
Church Bowl |
Yosemite Valley, California USA |
1 |
5.10b |
|
|
|
Camp 4 Wall |
Yosemite Valley, California USA |
1 |
5.10b |
|
|
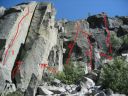
| Pirates
IV 5.10b, Starlight Peak
Red line + the climb. Yellow line is the descent.
Photo:Ryan Crochiere |
|
Starlight Peak |
High Sierra, California USA |
10 |
IV 5.10b |
|
|
| Peace (P1)
5.10b R, Medlicott Dome, Right
Photo:Greg Barnes |
|
Medlicott Dome, Right |
Tuolumne Meadows, California USA |
1 |
5.10b R |
|
|
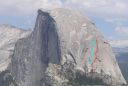
| Two Hoofers
5.12 or 5.10b A0, Half Dome
Two Hoofers follows the blue line.
Photo:Chris McNamara |
|
Half Dome |
Yosemite Valley, California USA |
7 |
5.12 or 5.10b A0 |
|
|
|
Glacier Point Apron |
Yosemite Valley, California USA |
1 |
5.10b R |
|
|
| Buster Brown
5.10b, Eagle Lake Cliff
Route # 7
Photo:Chris McNamara |
|
Eagle Lake Cliff |
Lake Tahoe, California, USA |
1 |
5.10b |
|
|
|
