| Route Name |
Formation |
|
|
Review  |
|
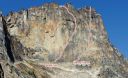
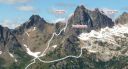
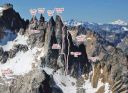
| Flycatcher Buttress
IV 5.10b, North Early Winters Spire
The East Buttresss of South and North Early Winters
Photo:Ian Nicholson |
|
North Early Winters Spire |
11 |
IV 5.10b |
|
|
|
Liberty Bell |
7 |
II+ 5.9 |
|
|
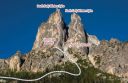
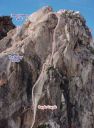
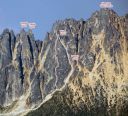
| The First Amendement
IV 5.11a, Le Petit Cheval
The North face of Le Petit Cheval as seen from the road.
Photo:Ian Nicholson |
|
Le Petit Cheval |
10 |
IV 5.11a |
|
|
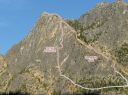
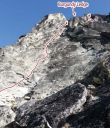
| Labor Pains
III 5.11a, North Early Winters Spire
North Early Winter Spire
Photo:Ian Nicholson |
|
North Early Winters Spire |
6 |
III 5.11a |
|
|
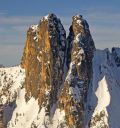
| Beckey-Tate
III 5.9, Big Kangaroo
Big Kangaroo
Photo:Ian Nicholson |
|
Big Kangaroo |
7 |
III 5.9 |
|
|
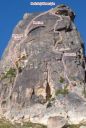
| Action Potential
III 5.10c, Burgundy Spire
Burgundy Spire Action Potential
Photo:Ian Nicholson |
|
Burgundy Spire |
8 |
III 5.10c |
|
|
| Over Exposure
II 5.8, Liberty Bell
Liberty Bell Over Exposure
Photo:Kurt Hicks |
|
Liberty Bell |
4 |
II 5.8 |
|
|
| East Face
III 5.10b, Minuteman Tower
Minuteman Tower East Face
Photo:Mark Allen |
|
Minuteman Tower |
6 |
III 5.10b |
|
|
| Spontaneity Arête
III 5.7, Le Petit Cheval
The North face of Le Petit Cheval as seen from the road.
Photo:Ian Nicholson |
|
Le Petit Cheval |
8 |
III 5.7 |
|
|
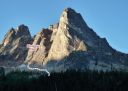
| South Buttress
III+ 5.8, Cutthroat Peak
An overview of the routes.
Photo:Ian Nicholson |
|
Cutthroat Peak |
12 |
III+ 5.8 |
|
|
| Rapple Grapple
II 5.8+, Liberty Bell
Liberty Bell Rapple Grapple
Photo:Ian Nicholson |
|
Liberty Bell |
4 |
II 5.8+ |
|
|
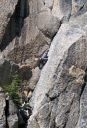
| North Face
III 5.8+, Burgundy Spire
Burgundy Spire North Face
Photo:Ian Nicholson |
|
Burgundy Spire |
4 |
III 5.8+ |
|
|
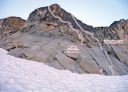
| Early Winter Couloir
III AI2-3 and M4+, North Early Winters Spire
Early Winters Couloir from the east
Photo:Steph Abegg |
|
North Early Winters Spire |
6 |
III AI2-3 and M4+ |
|
|
| East Face
II 5.6R, Chablis Spire
The Wine Spires viewed from the East.
Photo:John Scurlock |
|
Chablis Spire |
4 |
II 5.6R |
|
|
| Gato Negro
IV+ 5.10d, Whine Spire
Whine Spire Gato Negro
Photo:Ian Nicholson |
|
Whine Spire |
12 |
IV+ 5.10d |
|
|
|