| Route Name |
Formation |
Climbing Area |
|
|
Review |
|
|
The Cookie Cliff |
Yosemite Valley, California USA |
2 |
5.10d |
|
|
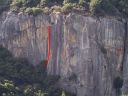
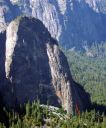
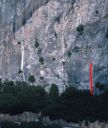
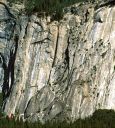
| Bummer
5.10c, Sunnyside Bench
Bummer the line on the left.
Photo:Chris McNamara |
|
Sunnyside Bench |
Yosemite Valley, California USA |
2 |
5.10c |
|
|
|
Pat and Jack Pinnacle |
Yosemite Valley, California USA |
2 |
5.10d |
|
|
|
Arch Rock |
Yosemite Valley, California USA |
2 |
5.10c |
|
|
|
Lower Cathedral Rock |
Yosemite Valley, California USA |
2 |
5.10c |
|
|
|
Generator Station |
Yosemite Valley, California USA |
1 |
5.10c |
|
|
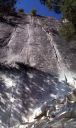
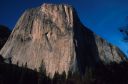
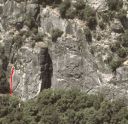
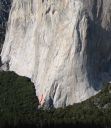
| Moby Dick
5.10a, El Capitan
The base routes are scattered to the left of the SE Buttress.
Photo:Chris McNamara |
|
El Capitan |
Yosemite Valley, California USA |
1 |
5.10a |
|
|
|
The Cookie Cliff |
Yosemite Valley, California USA |
1 |
5.10c |
|
|
|
Reed's Pinnacle |
Yosemite Valley, California USA |
1 |
5.10c |
|
|
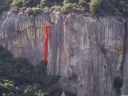
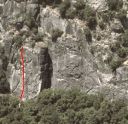
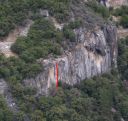
| Midterm
5.10b, Arch Rock
Photo:Chris McNamara |
|
Arch Rock |
Yosemite Valley, California USA |
1 |
5.10b |
|
|
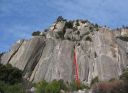
| Knob Job
5.10b, Pat and Jack Pinnacle
Photo:Chris McNamara |
|
Pat and Jack Pinnacle |
Yosemite Valley, California USA |
1 |
5.10b |
|
|
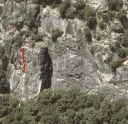
| Sherrie's Crack
5.10c, Pat and Jack Pinnacle
A great finger and hand crack.
Photo:Chris McNamara |
|
Pat and Jack Pinnacle |
Yosemite Valley, California USA |
1 |
5.10c |
|
|
|
Royal Arches Area |
Yosemite Valley, California USA |
1 |
5.10a |
|
|
|
Five and Dime Cliff |
Yosemite Valley, California USA |
1 |
5.10d |
|
|
| Ahab
5.10b, El Capitan
Photo:Chris McNamara |
|
El Capitan |
Yosemite Valley, California USA |
1 |
5.10b |
|
|
|