| Route Name |
Formation  |
Climbing Area |
|
|
Review |
| Silly Willy Crack |
Lover's Leap, Main Wall |
Lake Tahoe, California, USA |
1 |
5.12c |
|
|
|
Lover's Leap, Lower Buttress |
Lake Tahoe, California, USA |
1 |
5.12a |
|
|
|
Lover's Leap, Lower Buttress |
Lake Tahoe, California, USA |
1 |
5.12b |
|
|
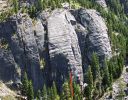
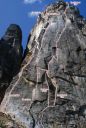
| Stone Cold Crazy
5.12c, Lover's Leap, Dear John Buttress
Route E in the photo.
Photo:Chris McNamara |
|
Lover's Leap, Dear John Buttress |
Lake Tahoe, California, USA |
1 |
5.12c |
|
|
| Fight the Power
5.12b/c, Lover's Leap, Dear John Buttress
Route D in the photo
Photo:Chris McNamara |
|
Lover's Leap, Dear John Buttress |
Lake Tahoe, California, USA |
1 |
5.12b/c |
|
|
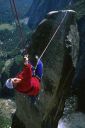
| Lost Arrow Spire Tip
5.12b or 5.7 C2, Lost Arrow Spire
One of the most spectacular summits in Yosemite.
Photo:Corey Rich |
|
Lost Arrow Spire |
Yosemite Valley, California USA |
2 |
5.12b or 5.7 C2 |
|
|
| Freedom or Death
III or V 5.12a, Liberty Bell
Liberty Bell Freedom or Death
Photo:Mark Allen |
|
Liberty Bell |
Washington Pass, Washington, USA |
14 |
III or V 5.12a |
|
| Thin Red Line |
Liberty Bell |
Washington Pass, Washington, USA |
14 |
V 5.10a or C3/A2 or 5.12b |
|
|
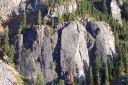
| Tooth and Claw
IV 5.12a, Lexington Tower
Lexington Tower when viewed from the East
Photo:Ian Nicholson |
|
Lexington Tower |
Washington Pass, Washington, USA |
8 |
IV 5.12a |
|
|
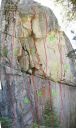
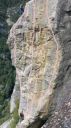
| Meltdown
5.12c, Knobby Wall
Knobby Wall Overview
Photo:Jes Neal |
|
Knobby Wall |
Yosemite Valley, California USA |
1 |
5.12c |
|
|
|
Knobby Wall |
Yosemite Valley, California USA |
1 |
5.12b |
|
|
|
Knobby Wall |
Yosemite Valley, California USA |
1 |
5.12a |
|
|
| Unnamed
5.12a, Knobby Wall
Knobby Wall Overview
Photo:Jes Neal |
|
Knobby Wall |
Yosemite Valley, California USA |
1 |
5.12a |
|
|
| Portside
5.12b, Knobby Wall
Knobby Wall Overview
Photo:Jes Neal |
|
Knobby Wall |
Yosemite Valley, California USA |
1 |
5.12b |
|
|
|
Killer Pillar |
Yosemite Valley, California USA |
1 |
5.12a |
|
|
|
