| Route Name |
Formation  |
Climbing Area |
|
|
Review |
|
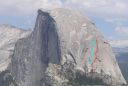
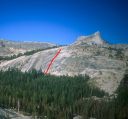
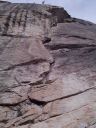
| Two Hoofers
5.12 or 5.10b A0, Half Dome
Two Hoofers follows the blue line.
Photo:Chris McNamara |
|
Half Dome |
Yosemite Valley, California USA |
7 |
5.12 or 5.10b A0 |
|
|
|
Great Wall |
Desert Towers, Utah, USA |
1 |
5.10b |
|
|
|
Glacier Point Apron |
Yosemite Valley, California USA |
1 |
5.10b R |
|
| Roof |
Ellery Lake |
Tuolumne Meadows, California USA |
1 |
5.10b |
|
|
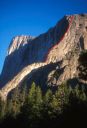
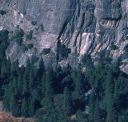
| East Buttress
5.10b, El Capitan
East Buttress with top of The Nose on left.
Photo:Mark Kroese |
|
El Capitan |
Yosemite Valley, California USA |
11 |
5.10b |
|
|
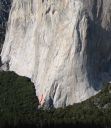
| Ahab
5.10b, El Capitan
Photo:Chris McNamara |
|
El Capitan |
Yosemite Valley, California USA |
1 |
5.10b |
|
|
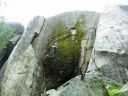
| Flintstone
5.10b R, East Cottage Dome
Photo:Greg Barnes |
|
East Cottage Dome |
Tuolumne Meadows, California USA |
1 |
5.10b R |
|
|
|
East Cottage Dome |
Tuolumne Meadows, California USA |
1 |
5.10b R |
|
|
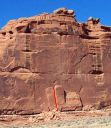
| Barney Rubble
5.10b, Eagle Lake Cliff
Barney Rubble starts up route 4 then goes up the obvious crack.
Photo:Chris McNamara |
|
Eagle Lake Cliff |
Lake Tahoe, California, USA |
1 |
5.10b |
|
|
| Buster Brown
5.10b, Eagle Lake Cliff
Route # 7
Photo:Chris McNamara |
|
Eagle Lake Cliff |
Lake Tahoe, California, USA |
1 |
5.10b |
|
|
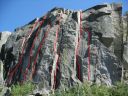
| Plutonics
5.10b R, Dozier Dome
Plutonics is right of route O
Photo:Greg Barnes |
|
Dozier Dome |
Tuolumne Meadows, California USA |
3 |
5.10b R |
|
|
| Tourette's
5.10b, Dozier Dome
Bit by Bit is just left of route L
Photo:Greg Barnes |
|
Dozier Dome |
Tuolumne Meadows, California USA |
1 |
5.10b |
|
|
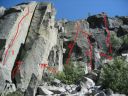
| Crescent Arch
5.10b, Daff Dome
Crescent Arch takes the obvious line in the middle.
Photo:Todd Snyder |
|
Daff Dome |
Tuolumne Meadows, California USA |
5 |
5.10b |
|
|
|
Cosumnes River |
Bay Area, California USA |
1 |
5.10b/c |
|
|
| Church Bowl Tree
5.10b, Church Bowl
Church Bowl has on of the easiest approaches in the valley.
Photo:Chris McNamara |
|
Church Bowl |
Yosemite Valley, California USA |
1 |
5.10b |
|
|
|
