| Route Name |
Formation  |
Climbing Area |
|
|
Review |
|
|
The Cookie Cliff |
Yosemite Valley, California USA |
1 |
5.10c |
|
|
|
The Cookie Cliff |
Yosemite Valley, California USA |
3 |
5.10c |
|
|
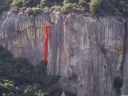
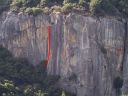
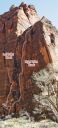
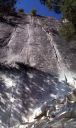
| Wheat Thin
5.10c, The Cookie Cliff
Photo:Todd Snyder |
|
The Cookie Cliff |
Yosemite Valley, California USA |
1 |
5.10c |
|
|
|
The Cookie Cliff |
Yosemite Valley, California USA |
1 |
5.10a |
|
|
|
The Cookie Cliff |
Yosemite Valley, California USA |
2 |
5.10d |
|
|
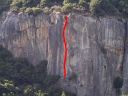
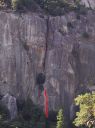
| Catchy
5.10d, The Cookie Cliff
Photo:Todd Snyder |
|
The Cookie Cliff |
Yosemite Valley, California USA |
1 |
5.10d |
|
|
|
The Cookie Cliff |
Yosemite Valley, California USA |
5 |
5.10a |
|
|
|
The Cookie Cliff |
Yosemite Valley, California USA |
3 |
5.10a |
|
|
|
Temple of Sinewava |
Zion National Park, Utah, USA |
5 |
III 5.10- |
|
|
|
Temple of Sinewava |
Zion National Park, Utah, USA |
1 |
I 5.10 |
|
|
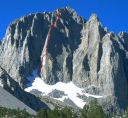
| Sun Ribbon Arete
5.10a, Temple Crag
The route as seen from Second Lake.
Photo:SP Parker |
|
Temple Crag |
High Sierra, California USA |
16 |
5.10a |
|
|
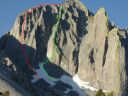
| Dark Star
5.10b, Temple Crag
The route as seen from Second Lake.
Photo:Ryan Crochiere |
|
Temple Crag |
High Sierra, California USA |
20 |
5.10b |
|
|
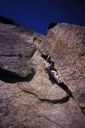
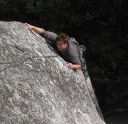
| Goat for It
5.10a, Swan Slab
Mark Miller at the crux of Goat For It.
Photo:Chris McNamara |
|
Swan Slab |
Yosemite Valley, California USA |
1 |
5.10a |
|
|
| Lazy Bum
5.10d, Sunnyside Bench
Lazy Bum the line on the center.
Photo:Chris McNamara |
|
Sunnyside Bench |
Yosemite Valley, California USA |
1 |
5.10d |
|
|
| Bummer
5.10c, Sunnyside Bench
Bummer the line on the left.
Photo:Chris McNamara |
|
Sunnyside Bench |
Yosemite Valley, California USA |
2 |
5.10c |
|
|
|