| Route Name |
Formation  |
Climbing Area |
|
|
Review |
|
|
Circle A Wall |
Tuolumne Meadows, California USA |
1 |
5.11b |
|
|
|
Dos Rios |
Bay Area, California USA |
1 |
5.11b/c |
|
|
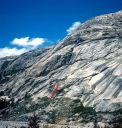
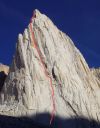
| Anatolio (P1)
5.11b, Drug Dome, Base
OZ continues up and left to the summit while the Gram Traverse follows the roof out right.
Photo:Chris McNamara |
|
Drug Dome, Base |
Tuolumne Meadows, California USA |
1 |
5.11b |
|
|
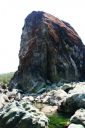
| Dope Show
5.11b, Drug Dome, Base
OZ continues up and left to the summit while the Gram Traverse follows the roof out right.
Photo:Chris McNamara |
|
Drug Dome, Base |
Tuolumne Meadows, California USA |
1 |
5.11b |
|
|
|
El Capitan |
Yosemite Valley, California USA |
1 |
5.11b or C1 |
|
|
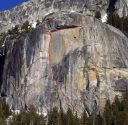
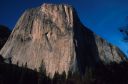
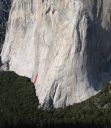
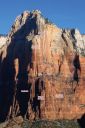
| La Escuela
5.11b, El Capitan
The base routes are scattered to the left of the SE Buttress.
Photo:Chris McNamara |
|
El Capitan |
Yosemite Valley, California USA |
3 |
5.11b |
|
|
|
El Capitan |
Yosemite Valley, California USA |
1 |
5.11b |
|
|
|
Five and Dime Cliff |
Yosemite Valley, California USA |
1 |
5.11b |
|
|
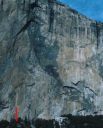
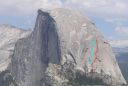
| Blondike
5.11b R, Half Dome
Blondike is the red line and Two Hoofers is the Blue Line.
Photo:Chris McNamara |
|
Half Dome |
Yosemite Valley, California USA |
7 |
5.11b R |
|
|
|
Harlequin Dome |
Tuolumne Meadows, California USA |
3 |
5.11b |
|
|
|
Harlequin Dome |
Tuolumne Meadows, California USA |
4 |
5.11b |
|
|
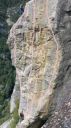
| Sun Spot Dihedral
5.11b, Incredible Hulk
The route as seen from the bivy spot.
Photo:Chris McNamara |
|
Incredible Hulk |
High Sierra, California USA |
12 |
5.11b |
|
|
|
Isaac |
Zion National Park, Utah, USA |
16 |
IV/V 5.11b/c |
|
|
|
Killer Pillar |
Yosemite Valley, California USA |
1 |
5.11b |
|
|
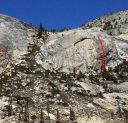
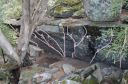
| Unnamed Flake
5.11b, Knobby Wall
Knobby Wall Overview
Photo:Jes Neal |
|
Knobby Wall |
Yosemite Valley, California USA |
1 |
5.11b |
|
|
|

