Route Name  |
Formation |
|
|
Review |
|
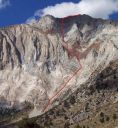
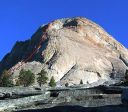
| North Buttress
5.9, Mt. Goode
The route as seen from the final approach to the snowfield.
Photo:Chris McNamara |
|
Mt. Goode |
9 |
5.9 |
|
|
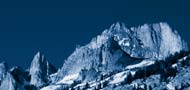
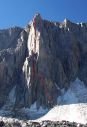
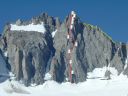
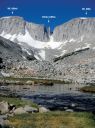
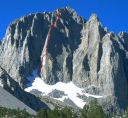
| North Buttress
5.10b/c, Merriam Peak
The prominent North Buttress of Merriam Peak
Photo:Ryan Crochiere |
|
Merriam Peak |
10 |
5.10b/c |
|
|
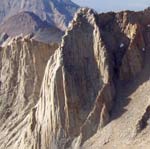
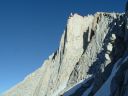
| North Ridge
5.5, Lone Pine Peak
The North Ridge of Lone Pine Peak.
Photo:Dan Mingori |
|
Lone Pine Peak |
N/A |
5.5 |
|
|
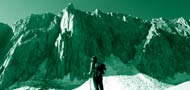
| Northeast Couloir
AI 2 4th Class, North Peak
The Northeast Couloir of North Peak.
Photo:Dan Mingori |
|
North Peak |
N/A |
AI 2 4th Class |
|
|
| Northeast Gully
5.2, Laurel Mountain
The route as seen from Convict Lake.
Photo:Chris McNamara |
|
Laurel Mountain |
N/A |
5.2 |
|
|
| Northeast Ridge
5.5, Bear Creek Spire
The route as seen from above Dade Lake.
Photo:Chris McNamara |
|
Bear Creek Spire |
N/A |
5.5 |
|
|
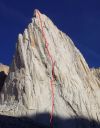
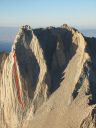
| Pirates
IV 5.10b, Starlight Peak
Red line + the climb. Yellow line is the descent.
Photo:Ryan Crochiere |
|
Starlight Peak |
10 |
IV 5.10b |
|
|
| Positive Vibrations
5.11a, Incredible Hulk
The route as seen from the bivy spot.
Photo:Chris McNamara |
|
Incredible Hulk |
13 |
5.11a |
|
|
| Red Dihedral
5.10b, Incredible Hulk
The route as seen from Maltby Lake.
Photo:Chris McNamara |
|
Incredible Hulk |
12 |
5.10b |
|
|
| South Face
5.8, Charlotte Dome
The route as seen from the approach.
Photo:Karl Lew |
|
Charlotte Dome |
12 |
5.8 |
|
|
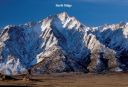
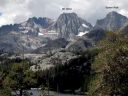
| Southeast Face
5.4, Mt. Emerson
Overview of Mount Emerson, Mount Humphreys and Basin Mountain.
Photo:Luke Lydiard |
|
Mt. Emerson |
N/A |
5.4 |
|
|
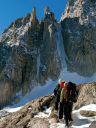
| Southeast Face
5.7, Petite Griffon
Overview of the Petite Griffon and surrounding peaks.
Photo:McKenzie Long |
|
Petite Griffon |
3 |
5.7 |
|
|
|
Mt. Ritter |
N/A |
3rd Class |
|
|
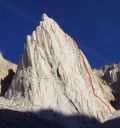
| Star Trekin
5.10c, Mt. Russell
The route as seen from Mt. Whitney summit.
Photo:Chris McNamara |
|
Mt. Russell |
8 |
5.10c |
|
|
| Sun Ribbon Arete
5.10a, Temple Crag
The route as seen from Second Lake.
Photo:SP Parker |
|
Temple Crag |
16 |
5.10a |
|
|
|


