Route Name  |
Formation |
|
|
Review |
|
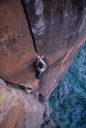
| Omaha Bob
I 5.10, Cragmont, Tunnel Wall
Photo:Bryan Bird |
|
Cragmont, Tunnel Wall |
1 |
I 5.10 |
|
|
|
East Temple |
6 |
III 5.10 |
|
|
|
Beehives |
1 |
5.12c |
|
|
|
Mountain of The Sun |
10 |
III 5.7 |
|
|
|
Angels Landing |
8 |
IV 5.10+ |
|
|
|
Lady Mountain |
7 |
III 5.7 or 5.10 |
|
|
|
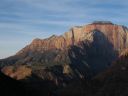
The Watchman |
N/A |
IV 5.10 A0 |
|
|
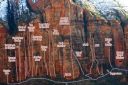
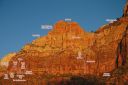
| North Ridge
III/IV 5.10 C1, 10 aid moves, Sub Peak of Bridge Mountain
Photo:Bryan Bird |
|
Sub Peak of Bridge Mountain |
12 |
III/IV 5.10 C1, 10 aid moves |
|
|
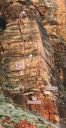
| Never Again
II 5.10, Headache Area, Tunnel Wall
Photo:Bryan Bird |
|
Headache Area, Tunnel Wall |
1 |
II 5.10 |
|
|
|
The Watchman |
8 |
IV 5.11- |
|
|
|
The Watchman |
6 |
III 5.10 |
|
|
| Mortal Combat
II 5.10, Kung Fu Theatre, Tunnel Wall
Photo:Bryan Bird |
|
Kung Fu Theatre, Tunnel Wall |
3 |
II 5.10 |
|
|
|
Three Marys |
5 |
III/IV 5.10 |
|
|
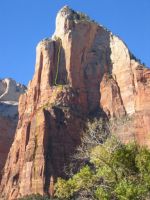
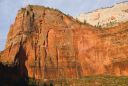
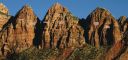
| Moonlight Buttress
5.12d or 5.9 C1, Moonlight Buttress Area
The route as seen from the loop road.
Photo:Chris McNamara |
|
Moonlight Buttress Area |
9 |
5.12d or 5.9 C1 |
|
|
|
Moonlight Buttress Area |
9 |
IV 5.12+ or 5.9 C1 |
|
|
|


