For up to date topos of this route, go to http://yosemitebigwall.com/jericho
For more photos and trip reports and such, go to http://www.failfalling.com
Horns of Jericho (Direct Start Variation) - First Ascent
At that time Joshua pronounced this solemn oath: Cursed before the Lord is the one who undertakes to rebuild this city, Jericho: At the cost of his firstborn son, he will lay its foundations; at the cost of his youngest, he will set up its gates.
 Book of Joshua, Chapter 6, Verse 26
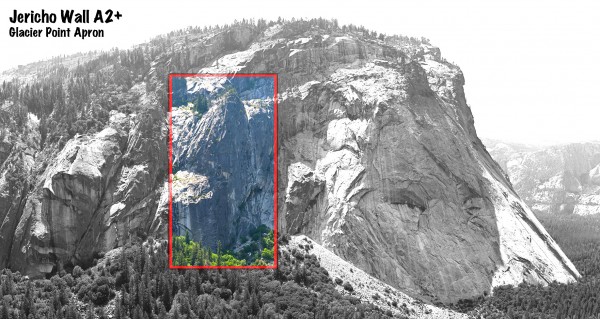 Glacier Point Overview Credit: xrez |
||
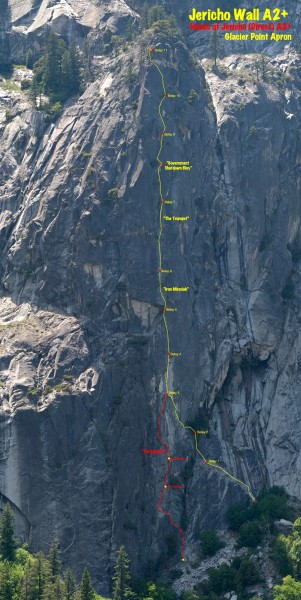 Photo Route Overlay Credit: xrez |
||
Once the hangover from New Years Eve passed, I found myself obsessed with a possible direct start to Jericho. The route deserved something to give climbers the option of more aiding and easier hauling and rapping. I pored over my photos and zoomed in on Xrez to plan my attempt. There would be multiple possibilities that Id only be able to decide upon once I got to the base. My goal was to find a line that was consistent in feel to the pitches on Jericho above. I wanted, if possible, to use the same gear rack, same type of placements, and same difficulty if at all possible.
With a direct variation, I felt like it was important to honor the style and vision of the FA party on the original line. This was to be less about myself, and more about the route itself. I worry about my reasons for wanting to carve an ascent into the rock and feel its important to have a reason beyond getting to the top for starting a project. In this case, I wanted this route to appeal to more people and at the same time, help those climbers have a more consistent experience. This would allow me to become part of the climb that my schedule hadnt originally allowed.
When I finished Jerichos second ascent, I remembered the first two pitches as nothing more than approach pitches, 5.easy climbing and awkward hauling. I had discovered from talking with Mucci after coming off of the climb that they had not hauled from the ground to the tree belay. I had wondered about this when the 200 static did not reach the ground from the tree. I had assumed that theyd done this because the only other option I could think of at the time was hauling off of an anchor made of thin beaks and blades in an incipient and shallow crack. Mucci told me that they had actually climbed to the first anchor and then set up a fixed line to shuttle their gear. No hauling needed.
I like to get started directly from the ground. In general, it takes a few pitches to warm up and feel like the climbing systems are working just so. The climbing gets good after the 3rd pitch on Jericho and I could see a direct line to make sure that by the time the next team got there, theyd be warmed up and ready to experience the climbing above with all cylinders firing.
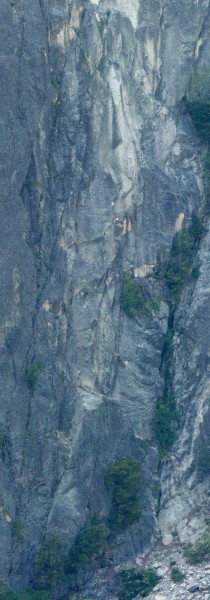 xrez face pano Credit: j-tree |
||
Approach
When I parked in the Glacier Point parking area, I was happy to see that much of the ice was gone from the asphalt this morning. With any luck, Id be able to get on the trail without falling on my face like Id done on my first trip up tot his wall. If anything, not slipping around and falling would be a definite good sign.
With the memory of the hellish approach I did the first time up to the wall, I had decided that I would head up with just what was needed to start the first pitch and then come down to bivy in the truck and have hot wings at Cedar Lodge as a reward. (Hot wings at Cedar Lodge is my usual dinner reward for fixing) This time the approach went a little bit better since I knew where to break from the road to head up into the trees. Unfortunately, I veered a bit too much to the left as I was going through the trees and ended up well to the left and downhill of the route once I finally touched the wall. Protip: Dont veer left at every chance you get when going through the trees.
Pitch 1
At the base, I spent a while laying on the talus boulders and taking pictures, allowing me to zoom in and decide upon my route. I could see possibilities for perhaps interesting copperheading up high but decided that Id attempt to stay to the cracks I could see since it made sense that if Jericho has only 1 head placement, then the direct start should avoid head placements if possible. Plus, I dont like heading if theres any possibility to use beaks. From the pictures and various vantage points amongst the talus I figured that my best bet would be to climb up the easy ramps to the top of a small buttress in the middle of the wall and start up what looked like a C1 crack to a cool looking stance that would have a plum line to the ground without getting snagged in the myriad of trees that are littered about the ledges. I grabbed a rope and some gear to build an anchor and soloed the 40 or so up to the ledge. The climbing was 5.easy and comparable to the original start to Jericho. I reached the top and found that the base of the C1 crack I was hoping for was rotten and flakey. I placed a few angles and fixed the line Id brought with me so that I could bring the rest of the gear up.
Once back with my gear, I prepped an anchor of two cams and an angle to solo off of and set off for the stance belay at the end of the right leaning crack. This crack will become a beautiful C1 pitch with a few more ascents to clean it up. I did not climb the crack that lucky parties in the future will climb. I found myself primarily swimming through dirt and flakey rock interspersed with short sections of climbing. Essentially, I was involved in the best and most time-consuming part of a first ascent, cleaning out the crack. My process for this crack was to place a piece, step up as high as possible in my ladders, clean out spots to place the next cam, bath in the dirt the spilled down and covered every piece that had come before, rinse and repeat. Towards the top of the crack there is the option to step to the right onto a detached horn to take a thin crack up to the ledge. Sick of feeling like a ditch digger, I decided to give it a try. I tensioned right off of the piece I was on and stepped gingerly on the flake between the new crack system and myself. As I touched the flake, it started to shift a bit. Looking down to make sure I wasnt directly over any of my rope, I stepped on the flake again with just enough force for it to separate from whatever was holding it in place and go crashing down to the ground. Jericho indeed. I muttered to myself as I stepped past the brand new rock scar in order to stem off a small corner while I fiddled small offset gear into the crack for the final feet to the belay.
I reached the stance and began drilling. Having just finished doing some hand bolting in the Pinnacles a couple months earlier, I had an idea in my head about how long it would take to hand drill two bolts. I hadnt factored for the difference between Pinnacles rock and Yosemite granite. These bolts were taking about twice as long as those Pinnacles bolts. I would find myself becoming tired of the constant tapping sooner and sooner, doing more work opening and closing my hands to ward off the cramps than I was hammering. After what felt like an eternity, I had both 3/8 bolts in and was able to set the anchor and rap back to the solo anchor at the ledge so that I could finally clean my gear, rap and get some wings.
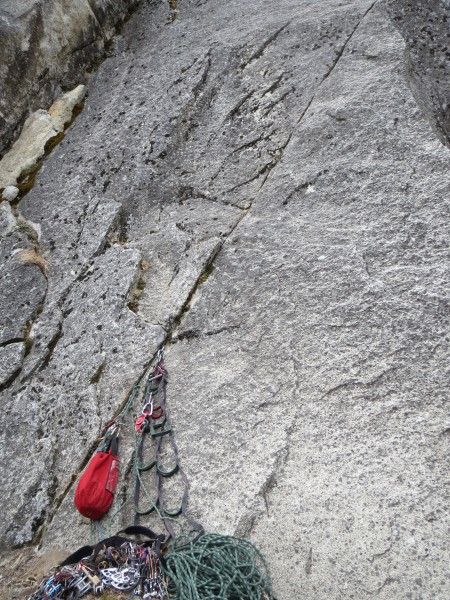 "C1" crack on pitch 1 Credit: j-tree |
||
 Dirty times Credit: j-tree |
||
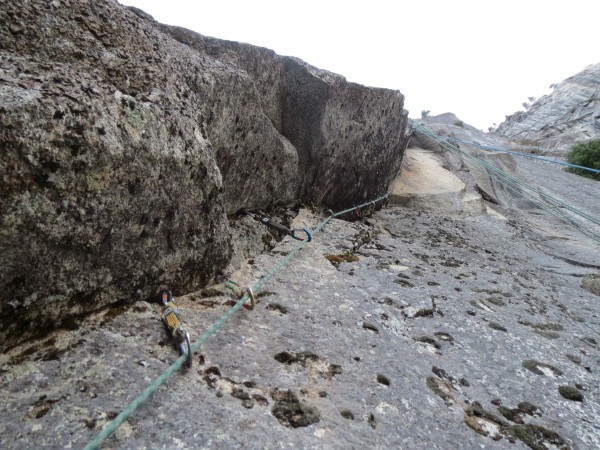
 Pitch 1 anchors Credit: j-tree |
||
Pitch 2
The next morning I woke up late in my truck outside the gates and decided I had enough time to stop by the Mountain Store in the hopes that they might carry an extra bolt for the second anchor I hoped to be placing that day. After waiting a bit, the doors opened and I went in to find that they had no bolts at all. I didnt really expect them to, but I had hopes. The day before, as I was rummaging through my bolt bag, I realized that I did not have the six 3/8 bolts that I had prepped back at home. I had clipped three of each bolt and hanger set to a biner. Two biners total before leaving the house, one biner made it to the wall and the other biner still on the ground in my gear closet. I had enough ¼ split shaft bolts to make a three bolt anchor using the one 3/8 bolt so I headed up to the wall to start the second pitch.
This time on the approach, I wanted to make sure that I found the entire trail up through the trees and took my time, finding every cairn point. It was very easy to do without a heavy pack and knowing to avoid bad forks in the faint climbers trail once you can nail the approach, the path to Jericho Wall is not too bad at all, on par with Washington Column but a bit shorter
I spent a bit more time on the boulders below the wall looking at the possible directions. From the first set of anchors, I could head straight up and meet in the middle of the original pitch 3 of Jericho, or I could veer up and left to meet a dirty looking corner that looked to be A2/C2 climbing. Based upon my desire to retain the feeling of the original route, I knew I was going to try to use the dirty left crack rather than the more blank looking line that would intersect with the original 3rd pitch.
Ascending the fixed rope to my first belay anchor, I expected a quick and easy day of going up the continuing C2 crack from the day before. Once at the belay I gathered my things and stepped up in my ladders to place the first piece of the pitch, a green .75 C4. This was to be the last time on this pitch I would be comfortable standing on my pro. The placements would be easy, but the rock quality would require quite a bit of cleaning and negotiating of rotten rock.
The pace soon slowed to that of a snails as twice as much cleaning was required as the day before. I switched to iron once more than a few C1 placements quickly crumbled to flakey dust once I bounce tested the piece. Ive read somewhere that youre not supposed to bounce test cams but I tend to bounce test everything. With cams, I seldom am worried about the placement itself, as a good visual check will usually tell you if the placement is good or not. Instead, I bounce test cams to see if the rock around the cam lobes can survive the outward force they produce when loaded. Thinking about this now from my desk, the fact that the rock quality around a cam lobe is always paramount in my mind when aiding, I think that maybe I need to start climbing routes that are a little less chossy. Maybe a nice trade route where you can just plug in the cam and go, secure on the backs of the thousands of hands, feet, and gear that came before to test the strength of the rock surrounding the placement.
I made steady but glacial progress up the corner. Because of its right leaning cornerness, it was difficult to get too high in my ladders without torquing the piece in weird directions. More than once a cam or pin would shift on me. Normally, this would mean, breath slowly, place next piece without moving your center of gravity and move on. With this pitch, I would still have a lot of cleaning out the dirt and broken rock from the crack which wasnt something easy to do while trying not to move about so Id move back down upon a piece shifting and reset it. Usually, resetting the piece would entail removing it, cleaning out the placement again and replacing the piece or one a size larger. Time consuming to say the least.
Halfway up the pitch, the crack turns a corner and begins to head straight up through a band of beautiful orange and yellow rock. At the same time, the crack pinches down to blades and beaks. I knew that at some point I needed to get onto the face to the left of this corner. Each time Id look, Id try to justify a line going up to my intended stopping point but didnt want to get stuck drilling if the line didnt pan out. Taking the evil I knew over the evil I didnt I stayed in the corner and headed up.
After a blade and a few beaks, I reached a small rooflet with more of the rotten rock and munge that Id been dealing with up to that point. I stood out on my ladders to survey that face to the left over the corner and saw that I could connect across the face to a crack system that I had thought looked like a duckbill from the talus below. Seeing a small weakness at the point where the sloping ledge met the more vertical face I was able to get a Shallow SMC angle driven up. Though the piece looked good, it didnt ring much as I drove it in and instead had that sad dull muted sound that screams, Test me test me test me I think Im going to fail! Unfortunately, my position on the right side of this corner made it impossible to bounce test it with anything more than a yank with my arm. If the piece failed I would fall out and over the edge of the corner before banging into the rock below questionable beaks attached to screamers. Now I was starting to have fun.
Breathing deeply a few times, I slowly moved out onto the face, giving more and more weight to the SMC holding me. Once I had rolled over the edge of the corner like someone beach whaling themself over a fence, I exhaled and looked around to figure out what to do next. This was my first up-close look at the duckbill feature. One word came to mind, loose. There were two eggshell thin horns that extended out from the rock like feathers and plenty of loose blocks inside of this large seemingly detached feature. I decided that with the eggshell flakes and the duckbill shaped feature, this part of the pitch should be called the "Duck Nest."
My desired belay point was to be about 40 above where I was and the light was starting to cast shadows on the trees along the top of Vernal Falls and Liberty Cap. It was starting to get late in the day and I did not know how solid any pieces after this point would be. I had images flash before my eyes of the entire feature falling off and I would need to grab cams from lower in the pitch to safely get through the this section anyways. I placed an arrow next to the SMC and stood up in the topsteps of the ladders. This allowed me to reach out with my left hand and touch the lower of the two eggshell flakes on this feature. Pulling down on the eggshell to see if I could use it immediately made the entire eggshell flake detach. Looking down, the rest of the pitch was protected by the overhanging corner it climbs through and so I yelled rock for a while before letting it crash down to the talus, shattering to pieces and looking for targets to spray with its granite shrapnel. This made up my mind that I was at the end of this pitch. It would be a short one, barely 70 but this was not out of character with the entire Jericho route, which had a fair selection of long and short pitches on it. I laughed at the idea that both this variation and the original variation would have a long first pitch followed by a ridiculously short second pitch.
I quickly got to work drilling the first bolt. Because I only had one 3/8 bolt, I started with one of the two ¼ split-shaft bolts that would complement the one 3/8. It went in much quicker than the 3/8 bolts yesterday and soon I had both ¼ bolts sunk. I was now clipped to these bolts instead of relying on the two pitons I was standing on to keep me from what would be a pretty bad fall if they blew. I trusted the pitons, but the muted thunk of their tone when being driven was still haunting me. After what felt like even more of an eternity than the day before, I sunk the 3/8 bolt into the face and happily clipped into it. In the process of tightening the hex head of the 5-piece bolt I was able to keep my bolt-placing self-damage to 100% of the time as the wrench slipped off of the head during one of the rotations. I had enough time to look at the white flesh beneath the surface of my skin on my knuckles before the edges went from bordering with spots of blood that soon became a flood fighting to push through the climbing tape that I wrapped them in. Once my knuckles were attended to, I needed to continue to set the bolt with my wrench that now seemed sinister and untrustworthy in my bandaged hands. I had enough time to build the anchor, rap down and clean the pitch before the light across the valley turned golden and soon was chased away by the dark.
 Starting Pitch 2 Credit: j-tree |
||
 Pitch 2 Credit: j-tree |
||
 Pitch 2 continues Credit: j-tree |
||
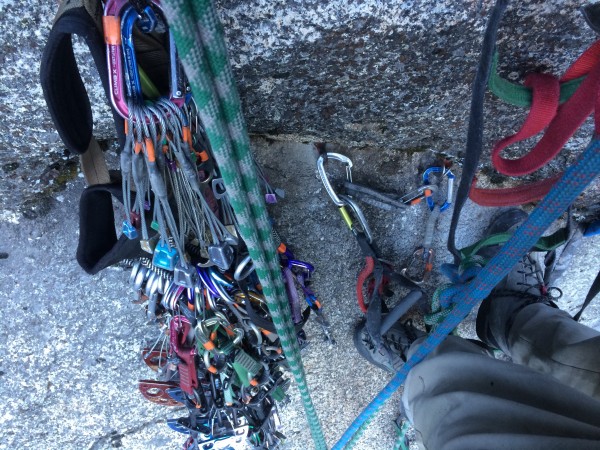 Bolting stance Credit: j-tree |
||
Pitch 3
I awoke the next morning happy to have the full day to tackle the final pitch. I was out of bolts and needed to make it to the 3rd pitch belay of Jericho Wall. I knew I had enough rope to do it and hoped that the rock would present a path to the top that didnt need to be easy, but which I hoped would at least be quickish.
From the belay, I moved left on C1-if-the-rock-stays-on-the-wall placements until I reached the eggshell. This feature (like the one Id jettisoned the day before) was a flake that was less than a fingers width think and the size of a microwave. Unlike its fallen brethren though, this flake was completely attached to the larger detached feature it jutted out from. Not wanting to get between it and the wall, I decided to try hooking this flake at the point where it connected to the larger feature it was part of. The hollow scrapping of the hook on the flake was disconcerting but seemed solid enough to allow me to reach over and right of the flake to a good purple totem placement. I knew I was probably safe now, but still needed to do a few delicate moves to stay clear of the flake as I move around it. If I somehow broke this flake moving around it, I was partially certain it would slice the rope beneath it and I would fall thousands and thousands of feet to the ground, losing limbs along the way. My mind was starting to get hyperactive.
Once established in the duckbill feature, I had a choice of following it out right and around the tip or topstepping the pieces Id placed in it and hooking the top. Not knowing what lurked around the right side of the duckbill, I choose the solid hook move. Second stepping the hook, it was beaks in the corner leading up to what I had intended to be the belay ledge the day before. As I hung on my beak placements I looked out to the right and noticed that the rock at the very tip of this duckbill was completely detached and resting on the wall by gravity and friction alone. I touched it with my fingers and saw that it wouldnt take more than a nudge to send it down to the ground. I didnt want the next person to possibly have that block come off onto their lap and decided to send it on its way. A quick push with my hand was almost enough and I watched as it leaned out from the wall and then fall back into the wall, right where my fingers were. Pain instantly shot up my arm before bouncing back to my hand and taking up residence there. I tried to push off the block again but the pain in my hand was too much and I resorted to sending the block on its way with my foot. By now the tip of my finger was bright red and felt like it was on fire. Later, my fingertip would turn black and remained black and sensitive for over a month. Now I was really really having fun.
Once on the would-be-belay ledge I traversed on sloping terrain until I reached a point where I had to make a decision. At this point, I was 15 out with a purple and a green C3 placed for psychological pro, both of those above 15 of beaks, which was about 10 above the solid C1 cams in the bottom of the duckbill. I could continue traversing down and left to the crack which looked similarly mungy and rotten as the pitch two crack or I could place two rivets to reach the crack at a higher point that looked a little bit better than what was directly to my left. My desire to make this line similar to the later pitches of Jericho made the decision for me. If a party had to traverse down to the crack, they would need to back clean their pieces in the corner that looked to be primarily thin nailing, all while looking at a long swinging fall should things go wrong. Definite A3 territory that would go against the cohesion goal of the direct route. I stood on the sloping spot Id stopped at and put in a rivet.
Once the hole was drilled, I put a washer on my machine head rivet and began to hammer it in. I learned very quickly that when pounding in the machine head, youll need a washer a bit bigger than the threads because as the threads of the machine head started to fold over themselves, they began to trap the washer against the rock. I realized this too late to push the washer up and so instead of having a rivet with the washer up by the head, this rivet had the washer flush against the rock. I clipped into the rivet, placed a ¼ split shaft with a hanger above that and was able to reach the corner.
The next 25 of the corner went with beaks and other thin iron. Once it cleaned up, it was fantastic nailing around the rotten rock found in the 2nd pitch. Both pitches will clean up well after few more ascents and will be perfect compliments to the nailing found above on the rest of Jericho. After this, cams and nuts come back into play. At the top of the crack there is the option of veering right or left. I didnt have photos to guide me at this point and decided to try the face to the left. A hook move established me outside the corner and I let out a whoop upon seeing a perfect ramp that took a beak and an angle before a solid C1 placement. From here I was able to move up a bit more, place a few more C2 placements and then swing around from the end of the ramp onto the final section before the anchors. From here the corner system becomes overhanging but offers solid rock and C1 placements. At the top of this section, I placed a #3 Pecker directly into the dirt to protect the mantle move into the 5.easy chute that would take me the rest of the way to the anchor.
As I clipped into the belay bolts that I thankfully didnt have to drill I wasnt sure what to do. Instead of letting out a shout, I took off my rack and sat down on the ledge that makes up the 3rd belay of both Jericho and my now-completed Horns of Jericho variation and just looked out at the view that had been my constant companion both on the ascent of this variation as well as the ascent of the entire original line with Ryan. I heard Ryans voice in my head, This is what its all about, getting out here, just doing it. For a split second I started to think about what all of this meant before I shut that voice down. I know the answer to that question. It means very little to anyone but the barking dogs in my head. I sat for a bit longer and had a cigarette, just breathing and watching the hikers on the Mist Trail. I waved at the groups standing there in case they were looking up at me. No response. I smiled and finished my cigarette. Party Wall. I said out loud and prepped my gear to rap back to the anchor so that I could clean the pitch and head down. I would be meeting up with Mucci and Bosque the next day to hike out to a new route the three of us were starting in another part of the valley. I had wanted this direct variation to be something that would let future suitors be completely warmed up by the time they hit the great climbing to be found above. Sucking on my finger that was still burning hot with pain, I realized that on this wall, in the middle of January, I was as warm as I needed to be.
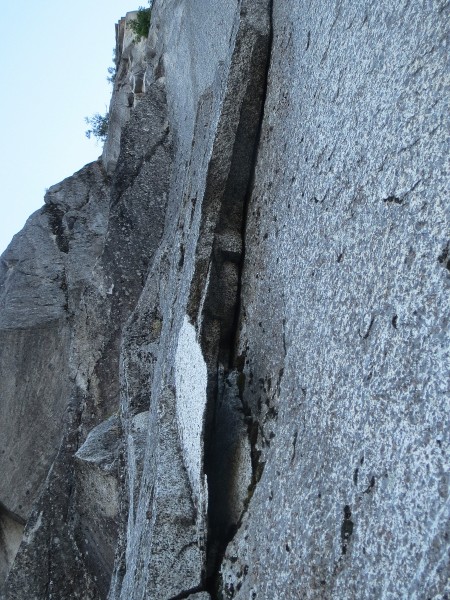 Eggshell flake Credit: j-tree |
||
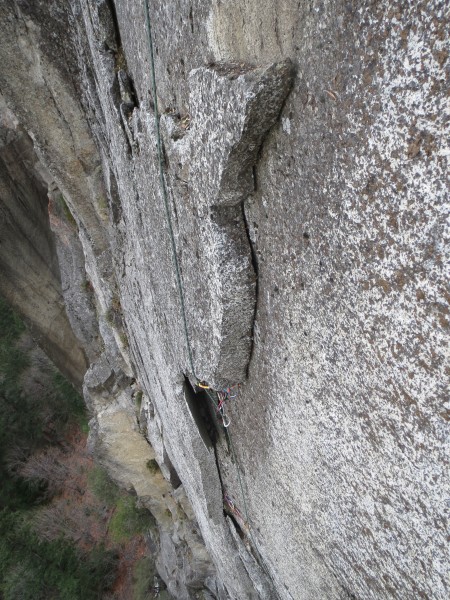 Duckbill feature Credit: j-tree |
||
 More pitch 3 Credit: j-tree |
||
 Pitch 3's dirty corner Credit: j-tree |
||
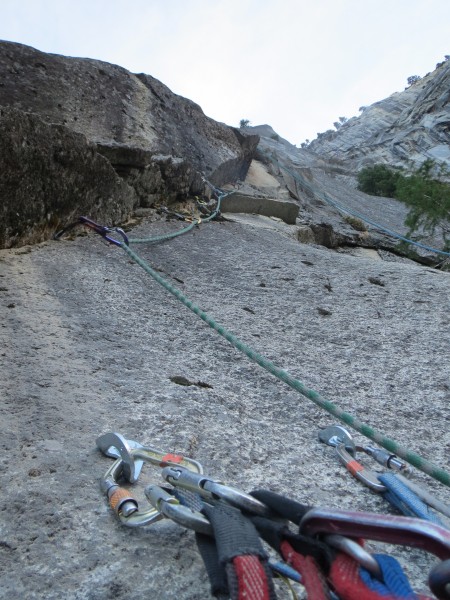
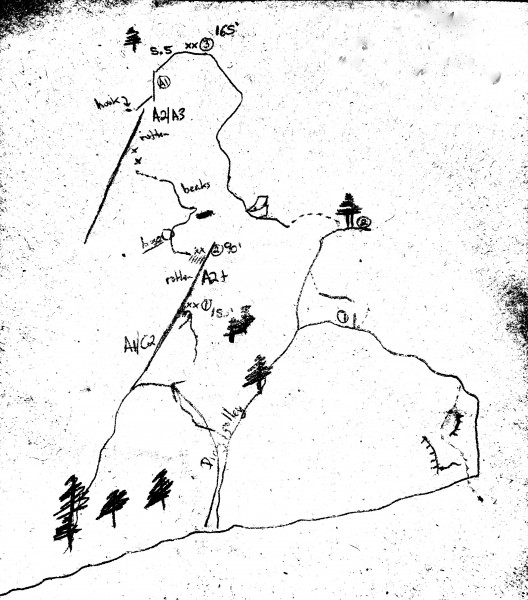 topo (real topo at http://yosemitebigwall.com/jericho) Credit: j-tree |
||