| Route Name |
Formation |
Climbing Area |
|
|
Review |
|
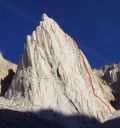
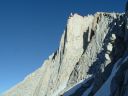
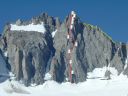
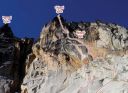
| Dark Star
5.10b, Temple Crag
The route as seen from Second Lake.
Photo:Ryan Crochiere |
|
Temple Crag |
High Sierra, California USA |
20 |
5.10b |
|
|
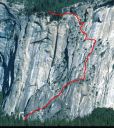
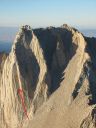
| Royal Arches
5.10b or 5.7 A0, Royal Arches Area
A surprisingly moderate passage on such a large wall.
Photo:Chris McNamara |
|
Royal Arches Area |
Yosemite Valley, California USA |
16 |
5.10b or 5.7 A0 |
|
|
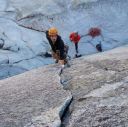
| Clean Break
IV 5.10b/c, Juno Tower
Tino Villanueva leads up the amazing Pitch 1 of Clean Break
Photo:Ian Nicholson |
|
Juno Tower |
Washington Pass, Washington, USA |
15 |
IV 5.10b/c |
|
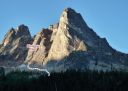
| Liberty Crack |
Liberty Bell |
Washington Pass, Washington, USA |
14 |
V 5.10b C2+ or 5.13a/b |
|
|
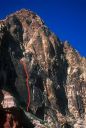
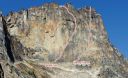
| Red Dihedral
5.10b, Incredible Hulk
The route as seen from Maltby Lake.
Photo:Chris McNamara |
|
Incredible Hulk |
High Sierra, California USA |
12 |
5.10b |
|
|
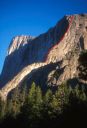
| East Buttress
5.10b, El Capitan
East Buttress with top of The Nose on left.
Photo:Mark Kroese |
|
El Capitan |
Yosemite Valley, California USA |
11 |
5.10b |
|
|
| Flycatcher Buttress
IV 5.10b, North Early Winters Spire
The East Buttresss of South and North Early Winters
Photo:Ian Nicholson |
|
North Early Winters Spire |
Washington Pass, Washington, USA |
11 |
IV 5.10b |
|
|
| Yellow Brick Road
5.10b, Black Velvet Canyon
Yellow Brick Road is a two-pitch variation to Dream of Wild Turkeys.
Photo:Greg Barnes |
|
Black Velvet Canyon |
Red Rocks, Nevada USA |
10 |
5.10b |
|
|
| North Buttress
5.10b/c, Merriam Peak
The prominent North Buttress of Merriam Peak
Photo:Ryan Crochiere |
|
Merriam Peak |
High Sierra, California USA |
10 |
5.10b/c |
|
|
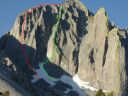
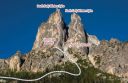
| Pirates
IV 5.10b, Starlight Peak
Red line + the climb. Yellow line is the descent.
Photo:Ryan Crochiere |
|
Starlight Peak |
High Sierra, California USA |
10 |
IV 5.10b |
|
|
| Mithral Dihedral
5.10b, Mt. Russell
The route as seen from Mt. Whitney summit.
Photo:Chris McNamara |
|
Mt. Russell |
High Sierra, California USA |
8 |
5.10b |
|
|
| Kearney-Thomas
III 5.11b or 5.10b C1, Big Kangaroo
Big Kangaroo
Photo:Ian Nicholson |
|
Big Kangaroo |
Washington Pass, Washington, USA |
8 |
III 5.11b or 5.10b C1 |
|
|
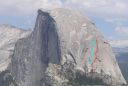
| Two Hoofers
5.12 or 5.10b A0, Half Dome
Two Hoofers follows the blue line.
Photo:Chris McNamara |
|
Half Dome |
Yosemite Valley, California USA |
7 |
5.12 or 5.10b A0 |
|
|
| Rebel Yell
III 5.10b, Chianti Spire
Chianti Spire Rebel Yell
Photo:Ian Nicholson |
|
Chianti Spire |
Washington Pass, Washington, USA |
7 |
III 5.10b |
|
|
| East Face
III 5.10b, Minuteman Tower
Minuteman Tower East Face
Photo:Mark Allen |
|
Minuteman Tower |
Washington Pass, Washington, USA |
6 |
III 5.10b |
|
|
|